Download
1 / 57
570 likes | 831 Views
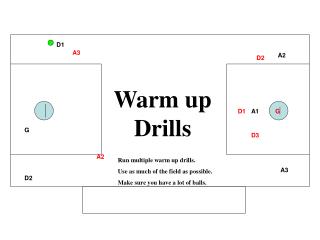
D1. A3. A2. D2. Warm up Drills. D1. A1. G. G. D3. A2. Run multiple warm up drills. Use as much of the field as possible. Make sure you have a lot of balls. A3. D2. Use the whole field to warm up. D4. D3. D2. D1. Redirect Drills.

E N D
D1 A3 A2 D2 Warm up Drills D1 A1 G G D3 A2 Run multiple warm up drills. Use as much of the field as possible. Make sure you have a lot of balls. A3 D2
Use the whole field to warm up D4 D3 D2 D1 Redirect Drills During the warm up stage have the players spread out and use the whole field to do a few passing or stick handling drills. In this example the whole team can spread out and do several drills. 1. The Attack and Middies can do a dodging drill the players run in and out of each other changing hands from left to right. (players act like cones) 2. The Coach can warm up the goalie. 3.The Defense can be doing long throws. Every player is involved. Coach can be shooting at Keeper G C Little Kid Face Dodge / SplitDodge M4 A1 A2 A3 M1 M2 M3
Four Corners Passing Drill Diamond Passing Drill (Advanced) Players behind can do a split or roll to the out side M2 Players up top do a Split dodge A3 M3 M1 G A3 V Cut A1 M1 Catch left roll to the outside . A1 Pass right. The Diamond drill introduces 2 additional moves to a passing drill. The V cut and the roll to the outside. V cut in and out. Receive pass left handed. Roll to outside with stick in right hand. Pass right handed. This is the basic four corners drill. Make sure the advanced players are catching with one hand and passing with the other. Use a split dodge or roll outside.
Triangle Passing Drill M3 M1 The triangle drill is a good warmup drill for the Attack and the Midfield players. The players spread out on the field in groups of three. The first player cuts to the ball and receives it in his right hand. He then makes a split dodge, changes hands and feeds the next player who does the same thing. After 5 minutes have the players change direction. Catch left, throw right. This teaches the players to use both hands throwing and catching as well as being able split dodge and switch hands. Coaching tips: When running this drill, the Defense can be doing long throws or the clearing drill. This is also a good time to warmup the goalie. M2 G C A1 A2 A3
Defense long throw/ clear drill D3 • The ball begins with the Goalie. • The defense should start in a triangle formation and break out to the spots shown. • 1. G moves left and passes to D3 as in a clear. • 2. D3 catches right, turns up field to the outside with stick in the left hand. Turns back outside right for the redirect to D2. • 3. D2 catches left, turns outside with stick in right hand and passes to D1. • 4. D1 catches left, turns outside with stick in right hand and returns the ball to the goalie to end the drill. • Repeat. • Players must concentrate on catching the ball , switch hands and turn away from defender. G D1 D2 A3 M4 LSM M2 C
D1 A3 A2 D2 Skill/ Playmaker Drills D1 A1 G G D3 A2 Good technique can make the man with the ball a dangerous player. A3 D2
Give and Go Drill When running the give and go drill, it is important to teach the players proper technique. In this drill there are 3 players involved. M1 starts with the ball and will run the give and go, M2 is the defensive player (play no contact defense) and M3 is the feeder. 1. M3 pops out high to receive the ball from M1. By popping out high he is giving himself room to feed or dodge. 2. M1 passes the ball to M3. After M1 passes the ball he runs at the defender, M2, to set him back on his heels. He then cuts left with stick in left hand looking for the over the shoulder pass. 3. M1 then shoots a high bounce shot on goal. At the end of the drill, the players rotate as follows: M1 gets ball and becomes the feeder, M2 runs the give and go and M3 becomes the defender. Run from different parts of the field with the Attack and Midfield. Box Area M2 M1 Give and go M3 M2 M3 M1 This is a drill version of Z100
Fig. 1 1 on 1 Split Dodge Drill The split dodge has become one of the most popular moves in the game of lacrosse. It is important to have the players practice it often. The split dodge is the key to any offensive play that starts from the top or wing (ie. Syracuse or Virginia). Practice the drill the same way that the play would be done. In this drill the coach (or a player) is the feeder (have lots of balls). Line up the middies up top and attack and defense on a wing or behind. 1. The first player in line (M1) plays defense. The player (M2) pops out to receive the pass which gives the player dodging room. 2. The player now puts the stick in his left hand (it is ok to choke up on the stick for control). With stick in left hand the player runs at the defender. This sets the D man back on his heels. 3. When the player is about 2 stick lengths from the D man, he shoots his head and shoulders left. This will get the D to turn his body. 4. At that time split back to the right (push hard off of left foot) , change hands to right, and run to the far pipe. Try to get “into” the D man (ie run a tight line to get behind the defense). 5. Shoot. The shot should be a high bounce shot. C Far pipe M2 M1 D2 A2 *Any time a player starts with the ball in a settled situation, he should begin with the ball in one hand and switch to the other hand. Practice this often.
D1 A3 A2 D2 Specialized Drills D1 A1 G G D3 A2 The good player needs to understand how to react to certain situations. A3 D2
Attack No-Stick Ride Drill 1 on 1 Defensive Pressure Drill M3 A2 D2 M3 This 1 on 1 drill is designed to teach the ball carrier to run away from pressure. Most young players are not used to heavy pressure and as a result they tend to freeze rather than move their feet. Set up 2 lines of Attack and Defense behind and 2 lines of Middies out front in the 4 corners of the half field. Put the defense up close to the offensive player. The offense has to run from the pressure but must stay in bounds. Run the drill one corner at a time. It is also beneficial to run 2 on 2 and 4 on 4 pressure D drills where all players are covered in a tight man to man. This will teach the offense to make quick moves off of the ball (v-cuts)to get open or picks and flips. The purpose of the drill is to teach the attack to play good body position and to force the defense to the outside and out of bounds. The Attack must play without a stick. If the attackman turns the defender and forces the pass he has done the job. The defense needs to learn how to run past the attack up the sideline or if turned around, how to switch hands and change direction under pressure. A2 M1 D2 D3 M1 A3
D1 A3 A2 D2 ShootingDrills D1 A1 G G D3 Game situation shooting tends to be the skill least practiced. Most players stand around the goal and shoot. It is unlikely that they will get that opportunity in a game. Many players have great moves but can’t finish. The reality is, if you can’t shoot you can’t score. There are 3 types of shooting situations: Shooting in close, Shooting with time and room and Shooting on the run. The following drills should help the players become better shooters. * Shooting drills can be used on a second goal off to the side for players who are not in a particular drill ( ie play set up, EMO MDD). A3 D2
Close in Shooting Drill Shooting with Time and Room This is a shooting drill designed to give the shooter a chance to practice inside shooting. Start with 2 players behind the goal wide, with 2 balls each and a cone set up about 2 yards off the center of the crease. The shooter starts low on the crease and cuts up off of the cone to get a feed from A3. He should make a quick shot and move to the opposite side of the crease down low. Repeat so that the player gets 2 shots with right hand and 2 shots with left hand. Coaching points: The player does not need to shoot hard. He should choke up on the stick for more control(especially with the off hand). The shot should be downward and about 12 inches off of the ground. Do not bounce it in front of the goalie. A2 M3 A3 cone cone cone A C A2 This is a simple shooting drill to give the player the experience of shooting with “time and room”. The coach is the feeder (get a lot of balls). Each player runs around the cones as shown and cuts to the ball. The player must cradle take a couple of steps and shoot. This is not shooting on the run. Coaching tips: Shots should be high bounce shots. Shots must be overhand not sidearm. The player should take a little skip step and uncork it.
“The Wheel” Shooting On The Run Drill The wheel drill has a similar setup to the “close in” shooting drill but it is “shooting on the run”. In this drill we use five feeders instead of two. The shooter starts down low off of the crease and receives a feed from the opposite side feeder. He then goes to the other side of the crease area. The order of feeds in this example would be: A3, A2, M3, M1, M2. Each shooter gets five consecutive shots “on the run”. This drill simulates shots in a game as well as keeping the shooter moving. Coaching Tips: The shooter must call for the ball and shoot while moving. He uses left and right hand. The shots should be the same as shooting with “time and room”, high bounce shots M3 A3 M2 A A2 M1
A2 A3 Transition Drills D2 D1 D2 A2 G D1 A1 G D1 D3 A1 A3
4 on 3 Fast Break Drill In the fast break defense there are four things for the D to think about. Triangle: D forms a tight triangle. D2 and D3 are on the edge of the crease as shown. D1 should be no more than 3-5 yards out. Patience: Don’t slide or commit too early. D1 must not over commit Passing lane: When D1 moves to cover the ball D2 must slide into the passing lane between M3 and A2 to prevent the skip pass. When M3 passes to A1, D1 must cover the passing lane from A1 to A3. Rotation: The final rotation comes . D2 covers the ball and D3 moves into original position of D2 on crease. *Important: D sticks should be pointing inside the triangle at all times. Box Area M3 A3 D3 G D1 Passing lanes D2 A1 A2 Offense needs to spread out and move the ball quickly. Look for skip pass if possible.
5 on 4 Drill This drill is designed to be a fast drill. Every player starts up near the mid line and must sprint back into position. Rotate each midfield line where 1 player is D and the other 2 are Offense. Defense tips: D2/D3 stay tight on the crease on the goal plane when ball is up top. All D sticks are to the middle. Offense tips: Draw a man and dump to the next player. Work the 2 on 1. Look to crease man or skip pass if D slides too soon. Each drill should be quick. The offense should get a shot off within 30 seconds or play is over. A3 M3 M1 D3 G A1 D1 D2 M2 A2 C
A2 A3 Offensive Plays D2 D1 D2 A2 G D1 A1 G D1 D3 A1 The following plays are good basic offense that encourage movement with and without the ball. Each play is broken into modules that can be run and drilled separately. Ideally the modules are put together into one play that has 5 or 6 options. A3
Fig. 1 “Z100” Module 1 Give and Go Start in the basic 2-1-3 offense. 1.M3 starts the play. A2 and A3 stack behind the goal to occupy defenders and backup shots. A1 sets up low on far side of crease (away from M3 to give room. 2.M3 passes to M2 and cuts for give and go. If no give and go exists, M3 sets a low pick for A1. A2 and A3 stack Field is now set up in a 2-2-2 *Key coaching points: M2 pops out to receive pass from M3 and drifts to his right to balance field and make dodging room. M3 cuts hard with stick in left hand and looks for over the shoulder pass, ‘the give and go”. M3 sets pick on A1 defender. Box Area M3 A3 A2 and A3 stack behind goal Give and go M2 A1 A1 sets up low A2 M1
Fig. 1 “Z100” From Wing Attack Give and Go M3 This is a give and go between the M1 and A2. Start in 2-1-3 offense. 1. M1 starts the play. A3 and A1 stack on far side crease. 2. A2 pops out for the ball. M1 passes to A2 and cuts for the give and go. A3 moves behind the goal. 3. If there is no give and go the M1 sets a pick for A1. 4. M2 and M3 balance up the field. We are now in a 2-2-2 set up. A3 A1 M2 Give and go A2 M1
Fig. 2 “Syracuse” Module 2 The Split Dodge This play can be run from the 2-2-2 offense where M1 passes to M2 to start the play or it can be run as a follow up to Z100 when the give and go is not there. 1. M2 receives the ball after he has popped out and drifts right to get room. A2 and A3 should stack behind to occupy the defense. 2. M2 puts stick in left hand, drives hard left and splits right changing hands. 3. M1 should move to cover break. 4. At the time of the split: A2 cuts out to left (above plane of goal) for outlet. And A1 cuts off of pick set by M3. 5. M2 has 3 options: shoot, dump to A3 or pass to A1 off of pick. A2 backs up the shots. *Key to success: M2 must start with stick in left hand and split to the right changing hands. A1 and A3 cuts have to be timed with the split. This should be practiced often. M1 must move to top center to prevent the fast break. Box Area Outlet M2 A3 G A2 Split Dodge Backup M3 A1 M1 C
Fig. 3 Extended Syracuse Module 3 Backside pass and sneak around goal Backside pass 1. If the ball is dumped to A3, then M2 and M3 move to balance the field into a 1-3-2 setup. 2. From here , A3 can hold the ball to rebalance or quickly move the ball to A2 who can try to go backside to the goal. (M3 should be the outlet) A1 needs to make room and be ready for look from A2. Key tip: A3 must make a quick left handed pass to A2. M3 must be out wide which should happen after A1 cuts off of low pick. A3 M2 A1 A2 G M3 M1 Make room and be ready for outlet from A2.
Fig. 2 “Virginia”Module 2 Split Dodge This is an attack version of Syracuse. 1. As M1 crosses in front of the goalie, A2 puts the stick in his left hand, drives hard left and splits right changing hands. 2. At the time of the split, A1 pops out off of M1 pick. 3. A2 has 3 options: Shoot, Pass to A1, Dump to A3 behind. A3 is the back up for shots. M3 A1 M1 A3 M2 Split dodge A2
A2 Rides and Clears A3 D2 D1 D2 A2 G D1 A1 G D1 D3 A1 A3
The Basic Ride D1 M3 M3 A2 M2 D2 M1 A3 A1 D1 G A1 M1 M2 A2 D3 A3 D2 D3 In this ride, the onus is on the attack to do the running. The Middies lock on their man and the attack play 3 on 4 forcing the D to make the long pass. It is imperative that the attack use their legs and force the redirect. Middies must not lose their man. This can be an very effective ride especially when the D sticks are weak.
Ride from the Midline D1 M3 M3 A2 A3 M2 D2 M1 A1 A1 D1 G M1 M2 A2 D3 A3 D2 D3 In this ride, the Attack stay up between the restraining line and the midfield line. They let the D walk the ball up but as they do so, the field is shrinking which takes away the 4 on 3 advantage. It also may allow the riding team to sub on the fly because the attack is covering midfield. This is an interesting twist to throw at an opposing team.
The L Clear D1 M3 M3 A2 A3 M2 D2 M1 G A1 A1 D1 M1 M2 A2 D3 A3 D2 D3 In the L clear, the Goalie and Defense form the L and the Middies spread out across. Therefore you have 3 down and 4 across. The key to the clear is to get the 2 on 1 with the attack. To do this the goalie should move to his left which will force A3 to cover D1 and A1 will have to cover the Goalie. By making a move left the goalie has drawn the 2 attackmen over forcing the lone attackman A2 to cover both D2 and D3. A couple quick passes or a sprint up the sideline should enable a successful clear.
A2 A3 Man Up/ Man Down D2 D1 D2 A2 G D1 A1 G D1 D3 A1 A3
Extra Man Offense This is a simple yet effective Extra Man Offense. Set up in a 1-3-2 as shown. A1 is the quarterback. He must be a good feeder and have the ability to draw defenders. A2 , A3 and M3 are the most likely targets. Start the play up top, get it around to get the defense to move. Make sure all offensive players are testing the defense ie. Make them move. When the ball gets to A2 there are several options: 1. A1 drives around goal, draws D2 and dumps to A2. 2. A2 cuts thru crease area drawing D2 and A1 drives around to shoot. 3. A2 cuts thru crease area drawing D2, A1 drives draws D3 and feeds M3 who has cut toward the goal. 4. A1 drives around right and pass back door to A3. 5. Backside feed to M3. Mix it up the Defense will over anticipate. Box Area M3 M3 A3 D3 D3 5 M3 A1 G D1 4 2 D2 3 D3 1 M3 A2
Man Down Defense Crease D stays put Box Area M3 M3 A3 D3 D3 M3 A1 G D1 D2 D3 M3 A2
Man Down Defense Slide from the Crease Box Area M3 M3 A3 D3 D3 M3 A1 G D1 D2 D3 M3 A2
A2 A3 Advanced Concepts D2 D1 D2 A2 G D1 A1 G D1 D3 A1 A3
A2 A3 Another Ride D2 D1 D2 A2 G D1 A1 G D1 D3 A1 A3
Fig. 1 ¾ Field Pressure D1 M3 A2 M2 D2 M3 A3 A1 D1 G A1 M1 M1 A2 D3 A3 M2 D2 D3 In this ride, the 3 Middies cover the 4 men at midfield by leaving the far man open, and the attack play more of a man to man. This could be a good ride for a team with weak sticks. C
Fig. 2 ¾ Field Pressure D1 M3 A2 M2 A3 M3 A1 G D2 A1 G M1 M1 D1 A2 D3 A3 M2 D2 D3 Here A1 and A2 jump on their man but A3 stays in the long seam between D2 and M3.
Fig. 3 ¾ Field Pressure D1 M3 A2 M2 M3 D2 A3 A1 G G A1 M1 D1 M1 A2 D3 A3 D2 M2 D3 When D2 makes the long pass to D1, then A3 jumps on the ball. The middies slide to cover the strong side of the field, leaving only the long pass from D1 to D3.
A2 Clearing Against a Press Ride A3 D2 D1 D2 A2 G D1 A1 G D1 D3 A1 A3
Fig. 1 Clearing against a Press Ride D3 A3 M1 A1 M3 M2 A2 M2 M3 G A1 M1 D1 A3 D2 A2 M4 LSM M4 D3 D1 D2 LSM C G
Fig. 2 Clearing against a Press Ride D3 A3 M1 A1 M3 M2 A2 M2 M3 G A1 M1 D1 A3 D2 A2 M4 LSM M4 D3 D1 D2 LSM C G
Fig. 3 Clearing against a Press Ride D3 A3 M1 A1 2 M3 M2 A2 M2 1 M3 G A1 M1 3 D1 A3 D2 A2 M4 LSM M4 D3 D1 D2 LSM C G
A2 Crease Slide Defense A3 D2 D1 D2 A2 G D1 A1 G D1 D3 A1 A3
Crease Slide Defense Vs. 1-3-2 Fig. 1 A1 A2 A3 D1 D2 D3 M3 LSM DM1 DM2 M2 M1
Crease Slide Defense Vs. 1-3-2 Fig. 2 A1 A2 A3 D1 D2 D3 M3 LSM DM2 DM1 M2 M1 If M2 tries to drive
Crease Slide Defense Vs. 1-3-2 Fig. 3 A1 A2 A3 D1 D2 D3 M3 LSM DM1 DM2 M2 M1 M2 passes to A3
Crease Slide Defense Vs. 1-3-2 Fig. 4 A1 D1 A2 A3 D3 D2 LSM M3 DM1 DM2 M2 M1 Ball Behind
A2 6 vs 4 Rotation Defense A3 D2 D1 D2 A2 G D1 A1 G D1 D3 A1 A3
Fig. 1 6 on 4 Drill A3 M3 M1 D3 A1 G M1 D1 D2 M2 A2 M4 LSM LSM M3 M2 C G
Fig. 2 6 on 4 Drill A3 M3 D3 M1 G M1 D2 A1 D1 M2 A2 M4 LSM LSM M3 M2 C G
Fig. 3 6 on 4 Drill A3 M3 D3 G M1 D2 A1 D1 M1 M2 A2 M4 LSM LSM M3 M2 C G
Fig. 4 6 on 4 Drill A3 M3 D3 G M1 D2 A1 D1 M1 M2 A2 M4 LSM LSM M3 M2 C G
Fig. 5 6 on 4 Drill A3 D2 M3 A1 D3 D1 G M1 M1 M2 A2 M4 LSM LSM M3 M2 C G