Download
1 / 21
210 likes | 310 Views
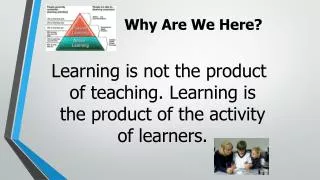
Integrating Youtube into Teaching & Learning. What is YouTube?. video sharing website where users can upload, view, & share video clips

E N D
Integrating Youtube into Teaching & Learning
What is YouTube? • video sharing website where users can upload, view, & share video clips • allows users to post & tag videos, watch those posted by others, post comments in a threaded discussion format, search for content by keyword or category, & create & participate in topical groups participate in topical groups
Why use Youtube? • draws user into the experience of viewing videos & engaging with the content as commentators & creators, activities that heighten students’ visual literacy • the act of creating a valuable learning exercise, helping develop a deeper understanding of the subject matter & the tools used to create that content
Why use Youtube? • part of a trend among Net Generation students to replace passive learning with active participation, where everyone has a voice, anyone can contribute, & the value lies less in the content itself than in the networks of learners that form around content & support one another in learning goals
Components in Youtube • Flag – ability to indicate a video that has inappropriate content; • Title - main title of the video; • Tags – keywords specified by the person who has uploaded the video
Components in Youtube • Flag – ability to indicate a video that has inappropriate content; • Title - main title of the video; • Tags – keywords specified by the person who has uploaded the video
Components in Youtube • Comments – often not monitored can be provided by any registered user about a video uploaded; • Views – the number of times a video has been watched; • Rating - videos can be rated by registered users
Video Title – Use the simple titles includes keywords if possible • Videos by creator – A link to other videos from this account holder’s channel • Subscribe – An option to subscribe to this person’s videos. New videos will appear in your YouTube account inbox when they are created • Video Play Option – Play and pause the video and adjust volume controls • Video Time/Length – Numeric and visual display or where you are in the video • View Controls – Expand or contract your view of the video on your screen • Video Creator – The account name of the person who created this video • Video Description – Provide descriptive text to explain the video content • Views – The number of times this video has been viewed on YouTube • Review – Give feedback for the video with a “thumbs up” or “thums down” rating • Share and save – Share or send the video to friends and colleagues. Save the video to your favorites, or include it in a playlist of videos you enjoy • Embed Option – Access code to copy and paste on website or blog so that video can be shared outside of YouTube
STEP 2 Creating an account
1 Select the “Create Account” link at the top of the page on YouTube.com Select a username that aligns with your personal identity or company name. Indicate your location, postal code and date of birth. 2 3 Then, click ‘I accept’
Create New Use Existing 4 Now you are successfully created your YouTube account. At this point you can customize a YouTube channel, upload new videos and refresh account settings.
STEP 3 Recording
You can record from sophisticated, high definition digital video recorders to inexpensive tools. You can even record video from an enabled mobile phone or your computer’s webcam. Accepted file formats include: Windows Media Video (.WMV) .3GP (cell phones) .AVI (windows) .MOV (mac) .MP4 (ipod/psp) .MKV (h.264) size < 2GB or < 10 minutes
STEP 4 Uploading
1 Click the upload button Select a movie from your computer or record a video from your webcam 2
3 Name the video – use a descriptive title and helpful description Use tags - these are keywords that indicate what the video contains 4 5 Select a video category 6 Decide to make the video public or private
7 Save your video settings and wait for processing (usually a few minutes but can depend upon the size of the video) Share it on Facebook, Twitter, Google Reader, Orkut and Myspace using AutoShare options. 8 Once the video is process and live on YouTube in public or private setting, you may also choose to embed the video onto a website or blog by copying and pasting embed code wherever you want to show it 9