Download
1 / 78
780 likes | 830 Views
Learn about PCR process theory, applications, and evolution studies in plants using amplified chloroplast DNA. Explore amplification stages and advancements in DNA extraction technologies. Experience hands-on sessions and discover molecular insights.

E N D
PCR of Chloroplast DNA
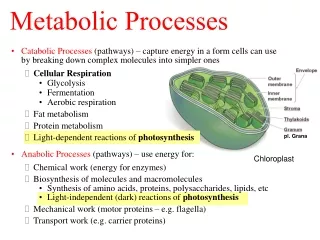
Aims • Explore process of PCR: theory / practical • Applications of PCR • Investigate evolutionary relationships of plants • Curriculum links
PCR Polymerase Chain Reaction (PCR) • Allows selective amplification of any fragment of DNA providing the nucleotide sequences flanking the fragment are known Finds a needle in the haystack and then produces a haystack of needles by selective amplification • Kary Mullis: Nobel Prize for Chemistry 1993
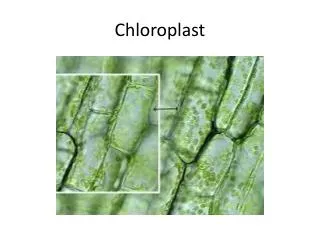
Plant PCR The use of amplified chloroplast DNA (cpDNA) to investigate evolutionary relationships of common plants
Plant PCR 1998: Flowering plants re-classified according to similarities in DNA Angiosperm Phylogeny Group Genes for rubisco - encoded in chloroplast DNA
Plant PCR • Kenny Hamilton, Biology teacher, RSE Teaching Fellowship • Science and Plants for Schools • Royal Society of Edinburgh, Scottish Executive • Dr Craig Simpson - Scottish Crop Research Institute • Dr Jan Barfoot - Scottish Institute for Biotechnology Education • University of Edinburgh
Plant PCR Summary of the procedure Diagram: Dean Madden, NCBE
Schedule for today • Plant PCR (1): Extraction of DNA from plant material • Pour gel Transfer of energy via ATP: meeting room Plant PCR (2): Purification of DNA from plant material Plant PCR (3): Amplification of cpDNA Immunity and Stem Cells: meeting room Plant PCR (4): Gel electrophoresis of amplified products Stain gels Results, discussion
Plant PCR – Session 1 Diagram: Dean Madden, NCBE
(i) Extraction of DNA Traditional method • Mechanical breakdown of cell walls/membranes by homogenisation with sand • Chemical disruption of cellular membranes by addition of detergent (SDS) • EDTA chelates Mg++ ions, helps break up protein complexes • NaCl helps disrupt cells and precipitate DNA • Tris buffer maintains appropriate pH • Ethanol to precipitate DNA
(i) Extraction of DNA FTA Cards – technology for processing nucleic acids invented by Professor Leigh Burgoyne of Flinders University • Flinders Technology Australia, Fast Track Analysis • Commercially obtained from Whatmans –contain SDS, TrisEDTA buffer and other proprietary reagents • Application in research, diagnostics, environmental science, forensics and DNA databases • Included in SAPS/NCBE PCR kit
Plant PCR (i) Extraction of DNA from plant material FTA card – chemically treated paper matrix for the safe collection, transport, storage, purification and analysis of DNA. DNA is extracted on to the paper matrix, purified and then amplified.
Plant PCR • Four FTA card • Four backing boards • Four different plant materials (2 Brassicas, 2 non-Brassicas) • Four pestles • Four punches per 8 people
Plant PCR Place backing board between the back cover of the card and the absorbent layer.
Plant PCR Place a piece of fresh plant material on to one box on the FTA card. Ensure it does not extend outwith the box. Close cover.
Try to keep the sample within the box. Plant PCR Using a pestle, squash the leaf on to the card until moisture has soaked through to the back of the absorbent layer. Discard squashed plant material.
Plant PCR Make sure that moisture from the leaf has soaked through to the back of the paper.
Plant PCR Have you labelled your samples?
Plant PCR Leave cards open to dry.
Frosted panel on this side Molten agarose 55–60 °C Diagram: Dean Madden, NCBE
Outer membrane Inner membrane DNA within the chloroplast Stroma Starch granule Stroma lamellae Lipid globule Granum Diagram: Dean Madden, NCBE
Plant PCR Chloroplast DNA • Self-replicating DNA, 120 – 220 kb pairs • Highly conserved gene order • Contains genes that encode for tRNA (highly conserved across species) nucleotide sequences identical in the chloroplast DNA of almost all higher plants ‘consensus’ or ‘universal’ oligonucleotide primers
Plant PCR Chloroplast DNA • higher frequency of mutations in non-coding stretches of cpDNA which lie between genes • relatively high rates of evolutionary change • amplification of non-coding regions of DNA between genes may be used to show differences in the cpDNA of different populations
(1) Denaturation – by heating to 94°C - 98° C Amplification of DNA Three stages in amplification process
(2) Annealing – of synthetic oligonucleotide primers to end of area to be copied at 64° C primers Taq polymerase Amplification of DNA Three stages in amplification process
Amplification of DNA Three stages in amplification process (3) Extension – of the strand by DNA polymerase from Thermus aquaticus at 72°C These three steps are repeated many times, the quantity of DNA doubling with each cycle
Taq polymerase Non-target DNA Target DNA 50–65°C Primers anneal to complementary sequences of bases Primers 72°C Taq DNA polymerase extends the DNA strands 94°C Double-stranded DNA is denatured Diagram: Dean Madden, NCBE
Cycle 1 Cycle 2 Cycle 3 5| 3| 3| 5| 5| 3| 3| 5|
Plant PCR Diagram: Dean Madden, NCBE
Plant PCR Soft rubber tubing HOLD HERE Do not touch the point! 100 µL Yellow graduated tip Measure to the top of each band 50 µL 20 µL 10 µL Diagram: Dean Madden, NCBE
Plant PCR Microsyringe Microsyringe HOLD HERE Do not touch the tip! HOLD HERE Do not touch the point! Graduated tip Graduated tip 10 μL 2 μL 10 µL 2 µL Diagram: Dean Madden, NCBE
(ii) Purification of DNA Purification buffer • Commercial preparation, composition unknown but possibly contains SDS, Tris EDTA buffer • Removes naturally occurring agents that would inhibit the PCR. For example, compounds that contain heavy metals such as chlorophyll, and other proteins TE-1 buffer (10 mM TrisHCl,0.1 mM Na2EDTA pH 8) • Removes SDS • Ensures correct pH
Plant PCR (ii) Purification of the extracted DNA • Use the punch in turn (cleaning between samples) so that each individual removes one disc – the DNA to be amplified is on the disc. • One Brassica and one non-Brassica per pair. • One of each sample or one of three samples + negative control (blank paper, one per card) per four people. 4 completed cards (4 samples), 4 punches per 8 people
Plant PCR 1. Place cutting/backing board (clean!) behind absorbent layer. Place tip of the punch over the area to be sampled, press firmly and rotate to remove a paper disc. Important – choose an area where the extract has soaked through to the back. Clean punch between samples by removing a disc of paper from an extract-free area.
Plant PCR 2. Use a cocktail stick/ plastic ‘wire’ to transfer the disc from the punch into a labelled, clear 1.5 cm3 microcentrifuge tube. Use a different cocktail stick / ‘wire’ for each sample! Label sample!
Plant PCR 3. Add 100 l Purification Reagent to the disc. Different tips for different discs! 4. Close tube and flick tube to wash the disc. Ensure the disc remains in the liquid. 5. Remove and discard purification reagent. 6. Repeat steps 3, 4 and 5
Plant PCR 7. Use a fresh tip to add 100 l TE-1 buffer to the disc. Different tips for different discs! 8. Close tube and flick tube to wash the disc. Ensure the disc remains in the liquid. 9. Remove and discard buffer. 10. Repeat steps 7, 8 and 9
Plant PCR Summary of the procedure Diagram: Dean Madden, NCBE
Plant PCR -amplification PCR Beads: each bead is designed for a single 25 l reaction, in which volume the final component concentrations are: • Taq polymerase ~2.5 units • dNTPs (dATP, dCTP, dGTP, dTTP) 0.2 mM each • TrisHCl (pH 9.0) 20 mM • KCl 50 mM • MgCl2 1.5 mM PCR Primers Primers are diluted to a working concentration of 10 pmol/ l • CHc primer (forward) • CHd primer (reverse)
Amplification of chloroplast DNA 5’ 3’ 5’ 3’ oligonucleotide primer highly conserved region of cpDNA variable (non-coding) region of cpDNA CHc: 5’CGAAATCGGTAGACGCTACG3’ CHd: 5’GGGGATAGAGGGACTTGAAC3’ Primers Plant PCR
Plant PCR (iii) Amplification of cpDNA 1. Label PCR tube PCR beads contain Taq poymerase, dNTPs, buffers, co-factors • 2. Add reagents • 4 l sterile deionised water • 10 l CHc primer • 10 l CHd primer
Plant PCR 3,4 Close PCR tube, flick – centrifuge if necessary. 5. Use clean forceps to transfer the disc from microtube to PCR tube. Ensure disc is submerged in the PCR reagents. 6.Close tube.
Plant PCR 8. Place in thermal cycler.
30 seconds 30 seconds 30 seconds Repeat this three-step cycle 30 times Diagram: Dean Madden, NCBE
Plant PCR PCR cycle • 94°C for two minutes to ensure maximum separation of the strands • Thirty cycles of: 94°C for 30 seconds 55°C for 30 seconds 72°C for 30 seconds (at final stage 2 minutes) PCR product can now be refrigerated or frozen