Setting Up the Cortex Microcontroller System: EasyC® V4 Guide
This guide provides step-by-step instructions for setting up the Cortex microcontroller with EasyC® V4 software. Begin by charging the required batteries: both 7.2V and all 6 AAA batteries. Follow procedures for installing and updating EasyC®, including unlocking the software and firmware updates for the microcontroller and joystick. The document covers tethering the controller and joystick, allowing for wireless communication. Access additional resources from BEST Robotics for comprehensive training, troubleshooting, and programming options, including system features and motor connections.

Setting Up the Cortex Microcontroller System: EasyC® V4 Guide
E N D
Presentation Transcript
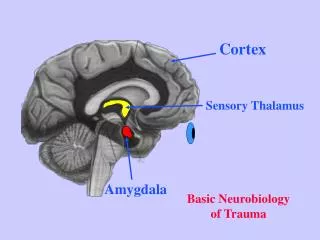
Using the Cortex Carolyn Bauer August 5-6, 2013
Charge the Batteries • Before you begin any work, charge the following: • Both 7.2 V batteries • All 6 AAA batteries
Introduction to easyC® & Cortex™ Adapted from http://www.intelitekdownloads.com/easyCV4/intro.pdf and http://best.eng.auburn.edu/stored_procedures/folder-manager/create-folder.php?folder=491&parent_id=489
Setup for Download of Firmware to Cortex/Joystick • AAA batteries in joystick • Connect programming cable • Power on • Open easyC • Use same connection with Cortex microcontroller
Install easyC • Install easyC v4 for Cortex (Trial version) on your computer • Download from http://www.intelitekdownloads.com/easyCV4/
easyC®V4 Programming Software • Download from the website. • Run as Administrator to install.
Unlocking easyC® • Right-click easyC , Run as Administrator • Type in your CD Key and click Unlock.
Updating easyC® Go to Help…Check For Updates. If you don’t have the latest version, you can download updates.
Updating Firmware on Controller and Joystick We don’t need to do this in 2013 • Start…All Programs…easyC v4 For Cortex…IFI VEXNet Firmware Utility
Updating Controller and Joystick • Select SEARCH. If the response is Upgrade requiredthen BOOTLOADand YES.
Updating Controller and Joystick • Click DOWNLOAD. • Afterward you should see:
Updating Controller and Joystick • Now repeat the entire SEARCH…BootLoad… DOWNLOAD process with the Cortex Microcontroller.
Tethering Controller and Joystick Do this in 2013 After updating the firmware on both the joystick and Cortex microcontroller: • Connect the two devices with the tethering cable and turn them both on. • Wait until both VEXNet LEDs turn solid green. This lets the devices learn each other’s addresses, so that they can talk together wirelessly.
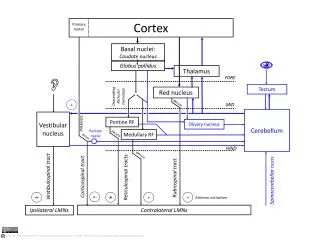
BEST Control System • Training from BEST Robotics, Inc. online Resources • Includes photos of all items in Returnable Kit • Hookups, labels, system features of Cortex • Motor connections & motors, servos • Digital, analog connections • BEST default firmware (default program) • Programming options • Testing tips; team tips; joystick calibration • Where to find help