Download
1 / 8
80 likes | 212 Views
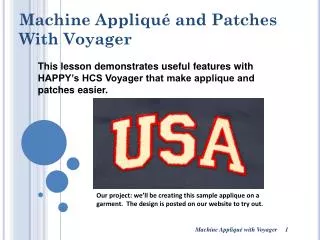
Machine Appliqué and Patches With Voyager. This lesson demonstrates useful features with HAPPY’s HCS Voyager that make applique and patches easier. Our project: we’ll be creating this sample applique on a garment. The design is posted on our website to try out. NOTES.

E N D
Machine Appliqué and Patches With Voyager This lesson demonstrates useful features with HAPPY’s HCS Voyager that make applique and patches easier. Our project: we’ll be creating this sample applique on a garment. The design is posted on our website to try out.
NOTES • ABOUT APPLIQUE: “A technique of apparel decoration in which material is cut out and sewn or pasted onto a garment as all or part of a design.” • In Home/Craft Projects it opens up worlds of creative flexibility especially using creative/contrasting fabrics or media • In Commercial Projects it creates many practical advantages by (1) saving on sewing time otherwise spent sewing large fill stitches • ADVANTAGES WITH HAPPY’s HCS VOYAGER: • Large sewing field means larger applique shapes or larger projects – fewer hoopings for large projects • Sturdy construction means Voyager handles heavy applique materials and large garments with ease • Multi-Needle system – time saver for more complicated designs, plus programmable auto-stop after the mark stitch. • Run-Down of the Steps: • Create or buy the applique shape. • Create or buy a design matched to the shape with a “mark” stitch, “tackdown” stitch and/or finishing satin. • Sew the mark stitch onto the garment. Machine automatically stops. • Place the applique shape onto the marked area on the fabric. (Use adhesive to hold the shape in place) • Finish sewing the tack-down and satin stitch by pressing START.
MATERIALS • Materials List • Material to use for appliqué • Adhesive (fusible web, or spray-on adhesive such as 505) • Appliqué design itself
Getting the Applique Shape: 2 Ways • Buying Pre-cut Shapes • Well-Known Sources including DALCO ATHLETIC and STAHL’S • Can be ordered with a “sew disk” that contains the mark stitch, tack-down and finishing stitch • Making your own Applique Shapes • Find an embroidery design (or make your own) suitable for applique. The shape of the design is used to “sew” the shape into the applique material. The design must have these parts in order for it to work as applique: (1) the outline stitch, in a separate color (2) (optional) the design itself (3) a tack-down and optional finishing border stitch. • Find a suitable material that will work for the shape. Most commercial jobs use tough, nylon twill-type fabrics, but just about any type of fabric that won’t stretch or fray easily can work. • Use the design to mark and cut out the shape using your embroidery machine. On the next page, we’ll talk about how to do this with Voyager.
Typical Commercial Applique Project Marking and cutting out the shape Unthread one of the needles. We’ll use that needle to create a pattern to cut the applique shape. Figure 1: To turn off the thread break sensors, go to Option, choose Machine Options then set TRD Break detect to “OFF”. 2. Turn off the thread break sensors. This will let Voyager “sew” without stopping and reporting a false thread break from the un-threaded needle. (see figure 1.) 3. Tell the machine to stop after “marking” the pattern. This is done in the Needle screen by selecting the “mark” stitch and pressing the SET key, causing an asterisk (*) to appear next to that color block. (See figure 2.) Figure 2: In our example, the marking stitch block is the first color change. Select it, press SET, and an asterisk appears, causing the machine to stop after “sewing” the mark stitch. 4. Sew the “mark stitch” onto a piece of cardboard. Setting the “mark stitch” to the un-threaded needle will cause it to punch the outline of the pattern onto the cardboard. Figure 3: Marked pattern on cardboard. Cut out and use as a template to trace onto appliqué material.
Typical Commercial Applique Project Sewing the Design Itself 1. Prepare shapes with adhesive. In this example, we’re using spray-on adhesive. (figure 4) 2. Hoop garment and begin sewing as normal. 3. Machine will the “marker” or “basting” stitch has been laid for the appliqué shape, then stop. (figure 5) 4. Position the shape(s) onto the fabric. (It’s okay to remove the hoop if you need to, but don’t turn off the machine). Apply heat/iron if needed. (figure 6) 5. Press START to let the machine finish sewing the tackdown stitch and finishing satin. Figure 4: Spray-on adhesive Figure 5: Marker stitch on garment Figure 6: Position the shapes.
Typical Commercial Applique Project Sewing the Design Itself Figure 7: Tack-Down Stitch Figure 8: Finishing satin stitch
Some Notes on Patches • Patches work similarly to Applique – use the Color Stop option in the Needle menu to sew the marker stitch. • Voyager’s Large Sewing Field means you can “manufature” a large number of patches at a time on the 12” x 12” hoop. • Create the patch with stable material (such as several layers of cut-away backing). Sew the emblem but don’t sew the tack-down and border stitch. • Back the patch with adhesive backing (iron-on type) and apply the patch with heat to the fabric • Sew the tack-down and satin stitch to sew the patch permanently onto the garment. No need for a merrow machine if you’re happy with the results!