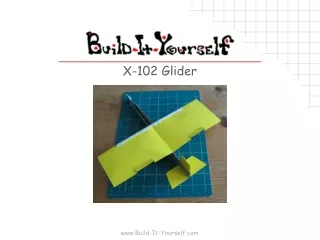
X-102 Glider
130 likes | 159 Views
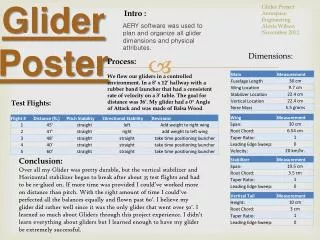
Learn construction tricks and scoring methods for making a glider from paper, cardboard, and tape using basic tools and materials like card stock, foam sheets, rubber bands, and scissors. Experiment with wing and tail designs for optimal flight performance. Test and adjust your glider before launching it with a rubber band slingshot. Enhance your creation with custom decals using PowerPoint.

X-102 Glider
E N D
Presentation Transcript
Tools and Materials 8 ½”x11” 20lb copier paper 8 ½”x11” 64lb card stock 8 ½”x11” cardboard Foamie sheets Rubber bands Paperclips Coffee stirrer sticks Straws Scotch tape Masking tape Scissors Glue gun Colored pencils 12” ruler
Construction tricks Scoring: Makes a straight, clean fold especially important on cardboard. 1) Hold ruler VERY firmly where you want a straight fold. 2) Press and run a scissors tip along the ruler edge. 3) Bend the cardboard along the scored line. Good Bad Use little pieces of scotch tape rather than long strips. (1 inch strips or less) It’s easier to control short strips and it saves tape. The strength of your ‘stickiness’ is usually more a function of how well you clamp or press the bond than it is the amount of tape or glue you use. Good Bad Use > marks when measuring. If you use ‘ marks, your line is likely to be crooked. Good Bad
Fuselage Mark another ¾” strip with a pencil. Cut along the mark. Should be 1.5” wide by 11” long. Score length of cardboard ¾” wide with scissors. Scoring paper or cardboard makes it bend straight and clean. To score, hold your ruler VERY firmly and run the tip of your scissors straight along the the ruler edge.
Fuselage Bend the cardboard along the score line. This will make a pretty light but rigid fuselage. Wrap masking tape around the nose. Cut a notch on scored side. NOT THE OPEN SIDE! This ‘hook’ must be strong enough to support a rubber band sling shot launch.
Wings Score 1” from the edge. This bend on the front edge of your wing will make it stiff. Bend the wing along the score line. Cut a 1.25” strip for the tail. From card stock paper, mark a 5” wide wing x 11” long.
Tail Bend the 1.5” wide tail strip in the middle. Cut a 2” slot in the rear of the fuselage for the tail.
Tail Insert the tail piece in the fuselage slot. The tail fin should stick above the fuselage about 1.5”. Cut the tail wings together about 2” below the fuselage. Bend the tail wings out. Tape the front end of the tail fin so it cuts the air. Wrap scotch tape around the fuselage and tail to secure it.
Mount wings (Optional step to increase strength) This mount piece can help keep your wing perpendicular to the fuselage. Front View Top View ½ “ Tape or hot glue the cardboard mount piece to the middle of the wing. 3.75” 2” Bend the cardboard to make a strong wing mount. The “V” section will fit in your fuselage. The flaps will be attached to your wing. Cut a cardboard strip 3.75”x2”. Score ½” wide strips. Measure cut and bend elevator flaps.
Mount wings You may want to tape or hot glue a cardboard strip or coffee stirrer stick to keep the wing extra stiff. Cut and bend elevator flaps. 2” from the edges. 2” long. ½” wide. Tape or hot glue the front wing edge to stiffen the wing. Mark the center of your wing. (5.5” on each side.) Tape your wing to fuselage. It usually glides better if the wing is mounted very close to the tail.
Test your glider Before you launch your glider with the rubber band sling shot, throw it gently to see how well it glides. You can control the center of gravity (so your plane does not stall or dive) by wrapping a rubber band around the front of the fuselage. Adjust the position of the rubber band until your glider flies straight. You can also adjust the wing elevators to make your plane fly in a loop. Wrap and tape some foam rubber or a small paper strip around the nose tip so your plane won’t poke your eye out. Two eyes are better than one!!!
Flying Machines Make your own decals in PowerPoint