Download
1 / 21
210 likes | 662 Views
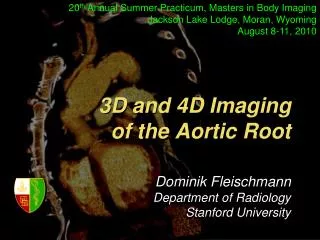
Aortic imaging with CMR. Dr. Saul Myerson Clinical Lecturer in Cardiovascular Medicine For www.scmr.org 02/2007 This presentation posted for members of scmr as an educational guide – it represents the views and practices of the author, and not necessarily those of SCMR.

E N D
Aortic imaging with CMR Dr. Saul Myerson Clinical Lecturer in Cardiovascular Medicine For www.scmr.org 02/2007 This presentation posted for members of scmr as an educational guide – it represents the views and practices of the author, and not necessarily those of SCMR. University of Oxford Centre for Clinical Magnetic Resonance Research (OCMR)
Overview • Background • Basic imaging techniques • Specific application to common disease states
Background • Many advantages that CMR brings : • Free choice of imaging planes • Range of imaging techniques – anatomical, cine, angiography, flow • 3D imaging with angiography • CMR is the gold standard for aortic imaging • Other techniques (TEE, CT) do have strengths, esp. in the acute setting
Basic approaches • Start with standard imaging stack in 3 planes: • Transverse • Coronal • Oblique sagittal, parallel to asc & desc aorta • Aim for reasonable long-axis view of aortic arch/descending aorta (the ‘candy-stick’ view) • Gives good representation of anatomy • May need other views for measuring diameter/flow • Use transverse/other images piloted from long axis view for better visualisation/measurement • Should usually include the aortic root & valve too • Hints: • Make good use of Cine imaging • Be creative in your choice of image plane • You don’t always need to image the entire aorta in one plane
Oblique sagittal slices Can sometimes achieve good long-axis view of aorta if lucky – otherwise may need to adjust above views using coronal views to guide, or utilise 3-point-planning
Cine images in aortic long axis • May need 3- point planning to achieve • Good identification of aortic wall and motion • Excellent representation of course of the aorta without mental re-construction • Not good for diameter measurement however, but is good for planning trans-aorta image slices
Oblique coronal image Sometimes useful for depicting anatomy: * * Dilated & tortuous descending aorta with intra-mural haematoma (*)
LV outflow tract Need to assess: general anatomy, dilation, shape diameters (sinus, asc aorta, arch ± aortic annulus) - use transverse views from this one aortic valve function
Specific applications • Dilated aorta • Dissection • Coarctation • Cervical arch
Dilated aorta • Important to take full advantage of CMR and use trans-aortic planes for true diameters • Several points are required (sinuses, asc Ao, mid arch, mid-desc Ao…) • For dilated Ao roots, it is important to document any AR
Dilated aorta (3) - angiography • MR angiography can be especially useful for complex dilated aortas, and the exact anatomy can be visualised. • Surface-rendered angiograms are good, but can miss smaller vessels and stenoses can be overestimated. Dilated aortic arch with small calibre entry and exit vessel. Note left subclavian arises from dilated section, and requires re-implantation at surgery
Dissection (1) • Cine imaging often v. helpful • Motion of dissection flap • High signal from surrounding flowing blood • Low signal from flap ± adjacent slow flow (in false lumen) • Needs to be perpendicular to the plane of dissection for good visualisation of the flap
Dissection (2) - example Type B aortic dissection in long-axis plane
Dissection (3) Shows correct piloting of long-axis plane from transverse image – perpendicular to dissection flap • Coronal LVOT view of repaired ascending aortic dissection (with short inter-positional graft) – some turbulence seen but dissection flap not seen • Angulated slightly further to reveal suspicious turbulence but still not clear • Further imaging in correct plane reveals clear dissection flap above the inter-positional graft
Dissection (4)– importance of correct imaging plane • Coronal LVOT view of repaired ascending aortic dissection (with short inter-positional graft - arrowed). Some turbulence seen but dissection flap not seen • Angulated slightly further to reveal suspicious turbulence but still not clear • Further imaging in correct plane reveals clear dissection flap (arrowed) above the inter-positional graft a c b
True lumen False lumen Pleural effusion Dissection (5) • The dissection flap usually spirals from the root around the lesser curve of the arch • The true lumen is often smaller and commonly medial • The dissection may extend into branch vessels
Coarctation (1) • Aim for a longitudinal plane through the coarctation site • Ideally obtain in-plane flow in this plane - can be tricky to obtain, and in severe or complete coarctation, impossible
Coarctation (2) – angiography • Very severe or complete coarctation is aided by MR angiography. • Collateral vessels can also be seen well. Note the aneurysm in the collateral vessel (close to the aorta) in this patient • Be careful not to overestimate the tightness of the coarctation by poor threshold setting
Coarctation (3) - tips • Beware metal clip artefacts post-repair – can cause image drop-out and appear as more severe/recurrent coarctation • Do image the aortic valve ± flow - the aortopathy persists even after coarctation repair and 50% of coarctations have a bicuspid valve and Metal artefact from clips suggesting tight re-coarctation. Catheter data showed no significant stenosis
Cervical aortic arch High-coursing aortic arch (behind clavicle). Can be narrowed, or (as in this case) of normal calibre. May be due to persistence of 3rd branchial arch in fetal development, or failure of 4th branchial arch to migrate downwards
Conclusions • Aortic imaging is straightforward if you think about what you’re trying to visualise • Make good use of cine, flow and contrast angiography • Don’t forget about the aortic valve