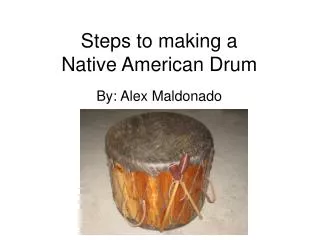
Steps to making a Native American Drum
280 likes | 464 Views
Steps to making a Native American Drum. By: Alex Maldonado. Cleaning the Fresh Hide. The hide is received fresh and you should first wash it to remove any substances like blood, mud or manure. Holes are then punched in the outer edge of the rawhide so it can be stretched on the rack.

Steps to making a Native American Drum
E N D
Presentation Transcript
Steps to making a Native American Drum By: Alex Maldonado
Cleaning the Fresh Hide The hide is received fresh and you should first wash it to remove any substances like blood, mud or manure. Holes are then punched in the outer edge of the rawhide so it can be stretched on the rack.
Cleaning the Fresh Hide (cont) Here are some of the tools that are used to clean the hide. All excess meat and fat are trimmed off and the hide is then allowed to dry. These steps take approximately six hours.
Trimming the fat Drying out the hide can take up to a few days depending on the weather. Once dry, any excess fat still on the hide is trimmed off. Trimming the fat takes a little less then one hour depending on how much is left on the hide.
Harvesting Buffalo Hair After the buffalo hide has completely dried, it is ready for harvesting the buffalo hair. I use sheers and scissors to cut the majority of the hair off of the hide.
Harvesting Buffalo Hair (cont) After the buffalo hair has been harvested it is saved for future use. I use the hair later in the process when making the drum sticks. Harvesting the buffalo hair takes approximately two to three hours depending on size of the hide.
Dry Scraping After harvesting the hair the hide is now ready for dry scraping. Using a skinners knife the hide is scraped to removed all excess hair. Scraping this size of a hide, which was a small buffalo, took approximately four hours to complete.
Preparing Rawhide for Storage The final step in cleaning the hide is to remove the hide from the rack and trim the edges. Once complete, the hide is now in rawhide form and can be rolled up for easy storage. There are many ways to clean a hide but this is the process that I use. If the drum maker buys a hide that was commercially cleaned, all of the prior steps are removed. The rawhide is bought already cleaned and rolled up. Total time to clean a fresh hide is approximately fourteen hours of work. (this time will vary depending on the size of the hide)
Removing the Bark The first step in milling your own wood is to select the log and allow it to dry. This could take at least one year. The log I selected is Cottonwood which grows locally in my area. After completely dry, the bark comes off fairly easily using a pry bar. This size of this log is approximately 12 inches by 36 inches.
Milling the Log Now that the bark has been removed the log is ready to be squared off. I run it through the band saw on all four sides to create an even surface to turn into lumber.
Milling the Log (cont) I measure and mark the log to the thickness desired and run it through the band saw again. The final product is rough cut lumber. The stacks in the lower right are from more then one log to ensure enough material is available to make the drum rims. Milling the wood took approximately eight hours. If the drum maker was to buy the rough wood from a lumber yard, the previous steps would not be needed.
Cutting the Staves I make the rims out of 18 staves cut to a 10 degree angle. You can see the angle in the lower right hand picture. The size of the rim will determine the width of the stave. I measure the height and width for the rim and cut the lumber accordingly.
Surfacing the Staves The next step is to surface the staves so that they are all the same thickness and smooth. I then lay out the 18 staves and tape them together. Insert Picture 35
Taping and Gluing the Staves Once all of the staves are taped together, I flip it over and apply the wood glue in between the staves and spread it evenly.
Joining the Drum Rim I bring all of the staves together by taping the two ends to each other. Using strap clamps provides added pressure and then the rim is allowed to dry overnight. The process up to this point takes approximately four hours.
Shaping the Drum Rim After the straps and tape are removed I smooth out the sharp surfaces and edges. You will notice the difference between the two rims in the lower right picture. The one on the right has a curved edge which helps prevent the hide from cracking with extensive use.
Sanding, Drilling and Oiling I use four different grits of sandpaper for the smoothest surface. I then drill holes in some of the larger drums to add handles. I then oil the rim with linseed oil which helps seal the wood. For some drum makers this is their final step for the rims.
Finishing the Drum Rim I add my makers mark to all of my drums. After adding the oil and allowing it to soak in, for a day or so, I then lacquer the rim. This final step allows the rim to be sealed and not needing to be oiled again in the future.
Soaking the Rawhide If you were to buy the rawhide commercially cleaned, you would start at this phase with soaking the hide. The rawhide should soak overnight, or until soft and pliable.
Cutting the Drum Heads The area of the rawhide that will be cut for each drum will depend on the kind and size of drum you will be making. The thicker area of the hide is around the backend and shoulders and thinner area is around the stomach. The age of the animal will also factor into the thickness of the hide, normally the older the animal the thicker the hide. I made my own templates for my drum sizes and trace them onto the rawhide and cut accordingly
Punching holes and cutting lacing The number of drum heads you can cut out of one rawhide will vary based on size of drums and rawhide as well as any imperfections in the hide. After the drum heads have been cut out, I punch holes on the tabs of the rawhide. I cut the lacing from leftover rawhide material. This drum in particular is 21” x 21” and required about 45 feet of lacing.
Lacing the drum Lacing the drum can be done in several different ways. I use a crisscross style on my drums twisting the lacing as I thread it through each tab hole. Tension can be tricky as too much tension will cause the drum to dry too tight. Not enough tension will result in a flat drum. Getting it just right takes practice. After the lacing is complete, I allow it to dry for two to three days.
Drumsticks I make the drumsticks out of different woods and use the same oil and lacquer that I use on the drum rims. The ones you see here are out of cottonwood, which matches the drum rim. I cut the drum stick heads out of buffalo leather or deer skin. I then sew the edges with artificial sinew. I use the harvested buffalo hair to stuff the drumstick head. I then insert the drumstick into the drumstick head and attach them.
Finishing Steps If the drum needs handles I use buffalo leather that I cut and braided. I feed this through the handle holes in the drum rim and secure together. I do a final dry scrape on the drum head to remove any extra hair. At this point the drum head could be oiled or a leather lacquer could be applied.
The final product is a beautiful 100% hand made drum. From cleaning the hide, to milling the wood, making the rim, cutting and lacing the rawhide and the finishing steps took me over a month to complete. This drum received a 1st Place ribbon at the 52nd Annual Heard Museum Guild Indian Fair & Market in March 2010. Property of Alex Maldonado; not to be copied or reproduced