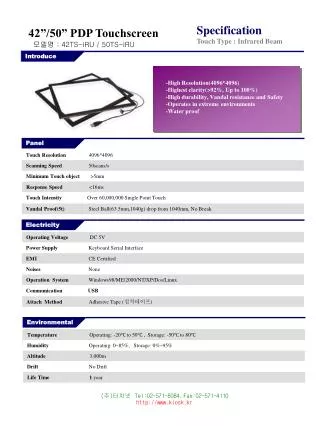
Download
1 / 41
410 likes | 626 Views
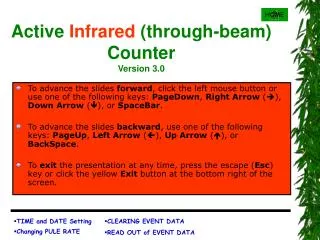
Active Infrared (through-beam) Counter Version 3.0. To advance the slides forward , click the left mouse button or use one of the following keys: PageDown , Right Arrow ( ), Down Arrow (), or SpaceBar .

E N D
Active Infrared (through-beam) CounterVersion 3.0 • To advance the slides forward, click the left mouse button or use one of the following keys: PageDown, Right Arrow (), Down Arrow (), or SpaceBar. • To advance the slides backward, use one of the following keys: PageUp, Left Arrow (), Up Arrow (), or BackSpace. • To exit the presentation at any time, press the escape (Esc) key or click the yellow Exit button at the bottom right of the screen.
Active Infrared (through-beam) CounterVersion 3.0 • To advance the slides forward, click the left mouse button or use one of the following keys: PageDown, Right Arrow (), Down Arrow (), or SpaceBar. • To advance the slides backward, use one of the following keys: PageUp, Left Arrow (), Up Arrow (), or BackSpace. • To exit the presentation at any time, press the escape (Esc) key or click the yellow Exit button at the bottom right of the screen. You can go directly to topics by selecting then clicking on a topic at the bottom of the screen.
Active Infrared (through-beam) CounterVersion 3.0 TrailMaster Model TM1550 (with 4K Memory)
TrailMaster Model TM1550 Red alignment indicator light Power Switch Press TIME SET and SET UP buttons simultaneously. Sight line for alignment with transmitter Camera Connector (for optional accessory) Data Port (for optional data collector unit) Power Switch
TM1550—Installation Instructions Recommended Tools: Screwdriver, (Philips head) Step 1. In forested locations, select a site along the trail with up to 10” diameter trees on both sides of the trail. The extra set(s) of straps (included with your counter) can be used to lengthen the straps, thus allowing the attachment to large diameter trees. Step 2. Mount the Receiver unit (with nylon straps, provided on the unit) to one tree, with the sensor (located on the right side of the unit) facing the opposite tree. (Note, use the alignment sighting line to aim the receiver’s sensor in the direction of the opposite tree where the Transmitter unit will be mounted.)
TM1550—Installation Instructions Step 3. Turn “on” the Receiver unit’s power switch and press the “Set Up” button on the front of the unit. Step 4. Mount the Transmitter unit on the opposite tree (up to 150 feet away). Note, the sensor of the transmitter is located on the front face of the unit. This sensor should be aiming back towards the Receiver unit. Turn the power switch on.
TM1550—Installation Instructions Step 5. At this time, you should notice the “red” alignment indicator on the Receiver unit blinking indicating the transmitter and receiver units are initially aligned. Step 6. Tighten all mounting straps on each unit. Then, take several passes back and forth on the trail to verify that the counter is counting. If not, reposition the Receiver unit to align the sensor’s beam.
TIME and DATE Setting This section will illustrate how to set up the TIME and DATE function for the receiver unit.
TIME and DATE Setting …the display will toggle between time and date for several seconds, then display the total counts. mm.dd hh:mm mm.dd hh:mm xx press press Turn the receiver unit on.
TIME and DATE Setting …the display will show the time with the hours blinking. hh:mm next, hold down the TIME SET button for five seconds. press and hold
TIME and DATE Setting …the hour number will advance from 0 to 24 each time the R/O ADV button is pressed. hh:mm press the R/O ADV buttonto advance the hour (0-24). press
TIME and DATE Setting …the display will show the time with the minutes blinking. hh:mm To change the minutes, press the TIME SET button once. press once
TIME and DATE Setting …the minutes number will advance from 01 to 59 each time the R/O ADV button is pressed. hh:mm press the R/O ADV buttonto advance the minutes (01-59). press
TIME and DATE Setting …the display will show the year with the second to last digit of the year blinking. yrxx To change the year, press the TIME SET button once. press once
TIME and DATE Setting …the number will advance each time the R/O ADV button is pressed. yr0x press the R/O ADV buttonto advance the number (0-9). press
TIME and DATE Setting …the display will show the year with the last digit of the year blinking. yr0x press the TIME SET button again to change the last digit of the year. press once
TIME and DATE Setting …the number will advance each time the R/O ADV button is pressed. yr04 press the R/O ADV buttonto advance the number (0-9). press
TIME and DATE Setting …the display will show the month and day. The month number will be blinking. mm.dd To change the month and day, press the TIME SET button once. press once
TIME and DATE Setting …the month will advance each time the R/O ADV button is pressed. 7.dd press the R/O ADV buttonto advance the number (1-12). press
TIME and DATE Setting …the display will show the month and day. The date number will be blinking. 7.dd To change the day, press the TIME SET button once. press once
TIME and DATE Setting …the day will advance each time the R/O ADV button is pressed. 7.14 press the R/O ADV buttonto advance the number (1-31). press
TIME and DATE Setting 7.14 press the TIME SET button when done. press
Changing PULSE RATE 2 This section will illustrate how to adjust the pulse rate function for the receiver unit.
Changing PULSE RATE …the display will show the pulse rate - P and blinking number from 1 through 30. -P 2 press the TIME SET button twice. press twice
Changing PULSE RATE …the display will show the pulse rate - P and blinking number from 1 through 30. -P 5 press the R/O ADV buttonto change the rate from 1 to 30. Tip: use 5 for pedestrians or 2 for vehicles. press
CLEARING EVENT DATA 3867 This section will illustrate how to set clear or “zero” the counter.
CLEARING EVENT DATA S. uP “Resetting the Counter” Press
CLEARING EVENT DATA c lr “Resetting the Counter” Press
CLEARING EVENT DATA 0 “Resetting the Counter” Press
CLEARING EVENT DATA 0 The counter is now ready to begin counting.
READ OUT of EVENT DATA 386 This section will illustrate how read out the event data from the receiver unit.
READ OUT of EVENT DATA 386 To extract your collected date/time-stamped data from the counter, do the following...
READ OUT of EVENT DATA Note, the number displayed is the total counts (cumulative) for the entire sampling period. 386
READ OUT of EVENT DATA Note, the number displayed is the total counts (cumulative) for the entire sampling period. 386 To find out when these counts occurred, do the following . . .
READ OUT of EVENT DATA 12. 1 …the date will appear (month.day) 1 Press here
READ OUT of EVENT DATA 15.31 …the time will appear (hour.minute) 2 Press here again
READ OUT of EVENT DATA …the count will appear 1 Note, the count displayed is a cumulative total of successive counts. 3 Press here again
READ OUT of EVENT DATA …when this message is displayed it indicates you have reached the end of the recorded counts. Ehru 4 Press here again
READ OUT of EVENT DATA You should be recording this information onto the form. The form enclosed with your shipment may be different from the one shown here.
TM1500—Product Service Information Goodson and Associates, Inc. 10614 Widmer Lenexa, KS 66215 Contact: Bill Goodson Phone: 913-345-8555 or 1-800-544-5415 Fax: 913/345-8272 Website: www.trailmaster.com