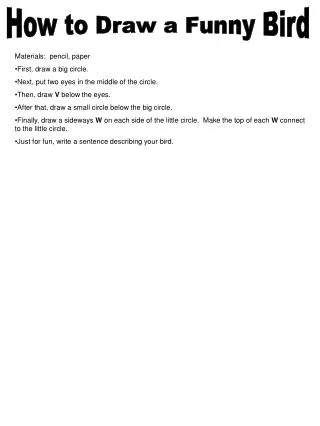
Download

1 / 17
170 likes | 175 Views
How To Accurately Draw a Project. Scale Three View Drawings. Sketches. Sketch: Drawing of an idea, object or procedure Used in agriculture mechanics to put ideas on paper Needed to determine the amount of material to be used

E N D
How To Accurately Draw a Project Scale Three View Drawings
Sketches • Sketch: Drawing of an idea, object or procedure • Used in agriculture mechanics to put ideas on paper • Needed to determine the amount of material to be used • Any project will be more efficient if there is an accurate sketch to follow
Symbols used in drawing Border Line Object Line Hidden Line Dimension line Extension lines with Dimension line Break Line Center Line Leader Line
Symbols used in drawing • Border line- a heavy, solid line drawn parallel to the edges of the drawing paper • Object line- a solid line showing visible edges and form of an object • Hidden line – a several dashes that indicate the presence of unseen edges
Symbols used in drawing • Dimension line- a solid line with arrowheads at the ends to indicate the length, width or height of an object. • Extension line- a solid line showing the exact area specified by a dimension. • Break Line- a solid, zigzag line used to show the illustration stops but the object does not
Symbols used in drawing • Center line- a long-short-long line used to indicate the center of a round object • Leader line- a solid line with an arrow used with an explanatory note to point to a specific feature of an object
Symbols used in drawing • These lines and symbols help the person who is drawing to communicate with the person who will use the plan. • Your plans should be drawn so that anyone can pick them up and construct the project.
Elements of a Plan • Paper of any size may be used for drawings however in this course I will require that you complete your drawing on 8 ½ by 11 graph paper that you supply.
Elements of a Plan • Border • Draw a heavy line all around and close to the outer edges of the paper. • The lines should be drawn ½” from the edge of the paper
Elements of a Plan • Title Block • A few items of information about the total drawing are necessary.
Elements of a Plan • The name of the person who prepared the drawing. • The date when the drawing was completed. • The name of the drawing. • The scale of the drawing.
Elements of a Plan • The title block should be constructed at the bottom of your sketch. • Draw a line ½” above the bottom border line. • The required information can be printed in the new box in the following order. • Name, Date, Title, Scale
Scale Drawing • The word scale means the size of the plan or drawing as compared to that of the object it represents. • A piece of 8 ½” by 11” paper turned sideways with borders and title block has 10” of horizontal drawing space and 7” of vertical drawing space. • The three views must be planned to fit in this space without crowding.
Scale Drawing • Using standard graph paper one square is 1cm by 1 cm. • A good place to start when determining scale is to decide if 1cm should equal 1’ or 1”. • The answer to this question will depend on the size of the project in construction.
Scale Drawing • The drawings you will be completing have three views. • Front or side, Top, and End view. • The top view should be drawn over the front or side view on the left hand side of your paper. • The end view should be drawn on the bottom right side of the paper.