Download
1 / 7
80 likes | 480 Views
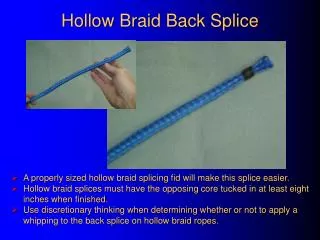
Hollow Braid Back Splice. A properly sized hollow braid splicing fid will make this splice easier. Hollow braid splices must have the opposing core tucked in at least eight inches when finished.

E N D
Hollow Braid Back Splice • A properly sized hollow braid splicing fid will make this splice easier. • Hollow braid splices must have the opposing core tucked in at least eight inches when finished. • Use discretionary thinking when determining whether or not to apply a whipping to the back splice on hollow braid ropes.
Hollow Braid Splicing Tools ¼” 5/16” 3/16” 3/8” Whipping Twine Hollow Braid Splicing Fids Appropriate Sized Knife
The first step with most hollow braid splices involve inserting the end of the rope into the hollow end of an appropriately sized splicing fid (Figures 1 & 2). Fids are sized according to the diameter of the rope. A 3/8” diameter rope will be used in this demonstration, therefore a 3/8” fid is the appropriate size. FIG. 1 FIG. 2 • The fid can prove useful when estimating the length the opposing core is tucked. A minimum of eight inches is required.
FIG. 2A • After inserting the end of the rope into a splicing fid(figure 2A)– • Loosen the braid in the rope approximately 10” to 12” from the end to be spliced(figure 3). • Push the pointed end of the fid into one of the openings of the braid, allowing the fid to travel down the hollow center of the braided rope(figures 4 & 5). FIG. 3 Approximately 8” to 12” From the end of the rope. FIG. 4 FIG. 5
FIG.6 • Allow the fid to travel down the hollow center of the braided rope8” or more. Compressing the rope on the fid will allow a distance safely in excess of 8”(figure 6). • When the desired length is reached (“compressed fid length”) bring the fid out of the center of the rope.(figure 7)It will be necessary to keep loosening the braid to allow the fid to move easily. • Extend the outer cover over the core in the center of the rope until the “bight” in the end disappears (figure 8). FIG. 7 FIG. 8 “Bight”
FIG.9 • When the “bight” in the end disappears, remove the fid and grasp the end of the core (figure 9). • Slide the outer braids toward the “finished end” and cut the excess “core” of rope (figure 10). • Once the excess core has been cut allow the cover to slide back and “swallow” the end of the core (figure 11). FIG.10 • When finished, the core should be tucked into the rope a minimum of eight inches. FIG.11
Finished Hollow Braid Back Splice Minimum of 8 inches, the greater the distance the better the splice.. • A back splice is the only hollow braid splice which does not “require” a whipping. If used as a “true” back splice, to prevent the end of a line from unlaying, a plain whipping should be applied. If used in combination with another splice, a whipping isn’t appropriate.