Download
1 / 10
120 likes | 463 Views
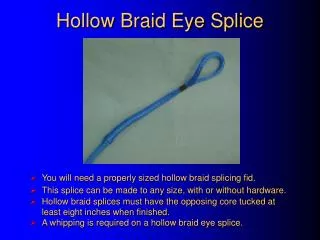
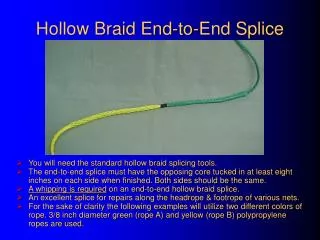
Hollow Braid End-to-End Splice. You will need the standard hollow braid splicing tools. The end-to-end splice must have the opposing core tucked in at least eight inches on each side when finished. Both sides should be the same. A whipping is required on an end-to-end hollow braid splice.

E N D
Hollow Braid End-to-End Splice • You will need the standard hollow braid splicing tools. • The end-to-end splice must have the opposing core tucked in at least eight inches on each side when finished. Both sides should be the same. • A whipping is required on an end-to-end hollow braid splice. • An excellent splice for repairs along the headrope & footrope of various nets. • For the sake of clarity the following examples will utilize two different colors of rope. 3/8 inch diameter green (rope A) and yellow (rope B) polypropylene ropes are used.
Insert rope A into the hollow end of a properly sized hollow braid splicing fid. • Loosen the braid in rope B approximately 18” to 20” from the end and insert the fid into the rope. (figure 1) • When the desired length is reached (“compressed fid length”) bring the fid out of the center of rope B. (figures 2,3 & 4) 18 to 20 inches from the end of rope B “Compressed Fid Length” is in excess of the minimum 8” when released. Rope A FIG. 1 FIG. 2 FIG. 3 FIG. 4
After bringing the fid out of the center of rope B(fig. 5) note the exit point and insert a back splice into rope A, beginning at the point where it exits rope B. Do not exceed the minimum eight inches tucked into rope B when completing the back splice in rope A. (figures 6,7 & 8) “Exit Point” FIG. 5 FIG. 6 FIG. 7 FIG. 8
After completing the back splice in rope A, “milk” it into the center of rope B and tighten the braid. (figures 9,10 & 11) When finished with this step, rope A should be tucked into rope B a minimum of eight inches. (figure 12) FIG. 9 FIG. 10 Minimum of 8 inches, the greater the distance the stronger the splice. FIG. 11 FIG. 12
FIG. 12A • After tightening the braid of rope B over rope A. (figure 12A) Insert rope B into the hollow end of the splicing fid. • Loosen the braid in rope Aat a point 2” to 3” from where rope A entered rope B and insert the fid into the rope. (figure 13) • Work the fid and rope B down the center of rope A as you did when putting rope A into rope B. • When the desired length is reached (“compressed fid length”) bring the fid out of the center of rope A.(figures 14 & 15) FIG. 13 FIG. 14 FIG. 15
After bringing the fid out of the center of rope A tighten the braid of rope A while holding the point where rope B entered rope A(fig. 16). FIG. 16 FIG. 17 • After tightening rope A note the exit point of rope B(fig. 17). • Slide rope A back toward the junction of ropes A & B. Insert a back splice into rope B, beginning at the point where it exited rope A (figure 18) . Exit Point FIG. 18 Exit Point Junction
FIG. 19 • Do not exceed the minimum eight inches which will be tucked into rope Awhen completing the back splice in rope B. (figures 19 & 20) • After completing the back splice in rope B, “milk” it into the center of rope A(figure 21). • Tighten the braid of rope A over rope B(figure 22). • When finished, rope B should be tucked into rope A the same distance as rope rope A was tucked into rope B, a minimum of eight inches. FIG. 20 FIG. 21 FIG. 22
After tightening the braids of both rope A and rope B (figure 23) the splice will have a gap of approximately 2 inches (figure 23A). It is not uncommon nor incorrect to apply the required whipping over this gap. However, a much more professional approach would involve “milking” the 2 inch gap out of the splice as shown in the following slide. Rope A Rope B FIG. 23 FIG. 23A
FIG. 24 • Grasp rope A at the point where the back splice of rope B ends and “milk” approximately 1” of excess rope A toward the junction of ropes A & B(figure 24). • Leave the excess of rope A at the junction and “milk” rope B toward the junction, allowing the excess of rope A to work itself inside the core of rope B(figures 25 & 26). • The aforementioned process may have to be repeated to attain a “gapless” end-to-end splice (figure 27). FIG. 25 FIG. 26 FIG. 27
Finished Hollow Braid End-to-End Splice • A plain whipping is required at the junction in a hollow braid end-to-end splice.