Download
1 / 41
410 likes | 524 Views
Step-by-step instructions for installing IMS client software & configuring settings in Outlook for integrated messaging. Learn how to synchronize voicemail & manage options easily.

E N D
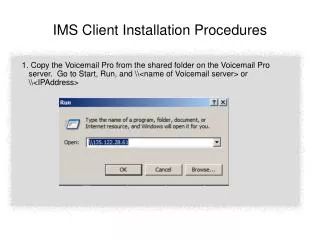
IMS Client Installation Procedures • 1. Copy the Voicemail Pro from the shared folder on the Voicemail Pro server. Go to Start, Run, and \\<name of Voicemail server> or \\<IPAddress>
IMS Client Installation Procedures 2. Click on the shared folder and copy to the local PC.
IMS Client Installation 3. Choose the Language and then ok. Click on the shared folder and copy to the local PC.
IMS Client Installation Procedures 3. Choose Next
IMS Client Installation Procedures 3. Choose the Folder to install the IMS program and then Next
IMS Client Installation Procedures 3. Enter the User name. This must match the User Name in Manager.. 4. Enter the Fully Qualified Domain name of the Voicemail Server. 5. Press Next
IMS Client Installation Procedures 3. Enter the extension that the user will listen to the messages 4. Click “Pick Up Automatically” If the user wants the message to play on the Telephone speaker without answering it. 6. Press Next
IMS Client Installation Proceedures 7. Press Next
IMS Client Installation Procedures 8. Select “Yes, I want to restart my computer now” 9. Press “Finish” to Reboot
IMS Client Installation Procedures • 10 After the Reboot, have the customer open Outlook and the Options Tab will appear • 11. The customer can change: • Voice Mail box • Voicemail Message Playback • Use Handset at Ext Number • Pick up Automatically • Connect Options • Prompt before connecting to server. • Use OLD date/time Format • (not used in IPOffice)
IMS Client Installation Procedures 12. IMS will then synchronize all Outlook Inbox and voicemail box.
IMS Client Installation Procedures 13. User will be prompted to connect to the Integrated Messaging server. Click “YES” 13. At this point, the users can start using IMS in their outlook.
IMS Client Installation Procedures To check or change settings in Integrated Messaging, go to Outlook’s Toolbar, Tools and Options. Avaya added the Integrated Messing Tab
IMS Client Installation • The customer can change: • Voice Mail box • Voicemail Message Playback • Use Handset at Ext Number • Pick up Automatically • Connect Options • Prompt before connecting to server. • Use OLD date/time Format (not used in IPOffice)
IMS Client Installation If “Prompt Before connecting to IMS server” is selected, when the user opens Outlook, they will be prompted to connect. If the user says yes, then IMS will start to scan their email messages If the user says no, Outlook will open. The user can then connect to IMS later to sync their mailbox. Thru Outlook Tool bar,Tools, Integrated Messaging, connect. IMS will then scan all the message in the Inbox.
DCOM for IMS Client XP Pro Service Pack 2 • COM Objects Enhanced Security • Additional enhancements to the operating system, in the Windows XP Service Pack 2, • are within the security of DCOM. • This gives rise to applications failing to operate, without any clear indication of the failure. • Within the IP Office application range there are programs, such as the IP Office IMS • client, which utilize DCOM. • The following information shows how to modify the security level to enable their correct operation. When running the component services icon (from Administration) or ‘dcomcnfg’ from the command line for the first time after the service pack installation, you will receive a security alert. • Consult Tech Tip #49 for DCOM Settings for Windows XP Service Pack 2.
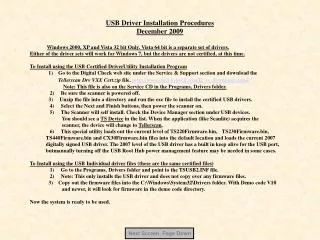
DCOM for IMS Client XP Pro Service Pack 2 • To set the DCOM settings for the Client • Start, Run, CMD. • Type: DCOMCNFG
DCOM for IMS Client XP Pro Service Pack 2 • 3. Windows XP will attempt to block the Microsoft Management Console Select ‘Unblock’ to continue. Navigate down to ‘My Computer’ and select properties.
DCOM for IMS Client XP Pro Service Pack 2 • 4. Component services Admin Box will open. Double click on “Computers”
DCOM for IMS Client XP Pro Service Pack 2 5. “My Computer” will appear. Right Click and choose properties.
DCOM for IMS Client XP Pro Service Pack 2 • 5. The COM security Tab will have two sections with two tabs under each: • Access Permission • Edit Limits • Edit Defaults • Launch and Activation Permissions • Edit Limits • Edit Defaults Note: Windows XP , Windows XP Service Pack 1, and Windows Server 2003 will only have “Edit Defaults”.
DCOM IMS Client XP Pro SP2 6. Now edit the limits for ‘Access Permissions’ and ‘Launch and Activation Permissions’ to allow Remote Access and remote Launch/Activation permissions for anonymous and everyone. Note: Windows XP, Windows XP Sp1, and Windows 2000 Server grant the “Everyone” all Permissions.
DCOM IMS Client XP Pro SP2 6. Now edit the limits for ‘Access Permissions’ and ‘Launch and Activation Permissions’ to allow Remote Access and remote Launch/Activation permissions for anonymous and everyone. Note: Windows XP, Windows XP Sp1, and Windows 2000 Server grant the “Everyone” all Permissions.
Windows XP 2 Firewall • Windows XP Service Pack 2 IMS Clients must run the AvayaFW.bat File. • This file is included in Avaya Tech Tip 49. • To Run this file. Save it to the desktop and double click and Press enter. The Program will close when it is done.
Windows Firewall Exceptions • Outlook must be added to the Firewall Exceptions list in order to allow IMS to update the Message Waiting lights on the Telephone. • Start, Run, Program, • Windows Control Panel • Windows Firewall
Windows Firewall Exceptions • Go to the Exceptions tab • Select “Add Programs” • Enter the location of the Microsoft Outlook program. One location is: • C:\Program Files\Microsoft Office\OFFICE11 • The Outlook Executable may be located in a different Directory. • Click “OK”
Windows Firewall Exceptions • Turn Off the Windows Firewall on the Local LAN Card. • Go to “Windows Control Panel” • Select “Local Area Connection” and right click • Choose “Properties” and “Advanced”
Windows Firewall Exceptions • Uncheck Local Area Connection. • Check OK. Message Waiting Lights can be delayed or even stopped from updating if enabled.
IMS Embedded Interface This error message indicates that there is a problem with communications with the Extension used for playing the message back. Check the Option Tab in Outlook for the extension. Also check the phone for DND.
IMS Embedded Interface Click on the required user in the Available Mailboxes list to highlight them, then click on the 'To ->' button to copy the user into the Message Recipients list. Repeat this for each recipient that you want to add. Once all recipients are listed click on OK, this will return you to the message dialogue with the recipients shown in the 'To:' box.
IMS Tips and Hints (Cont) • If clients are having problems connecting to the IMS server or synchronizing On the client machine: • Make sure the Mailbox name you are using is exactly what is in the "Name" section of the user form in Manager. It is case sensitive so John Doe and john doe are not the same. • Make sure when you installed the client you gave the fully qualified domain name (FQDN) of the VMPro/IMS server and you may need to put an entry in the hosts and lmhosts with the #PRE option in the lmhosts. • Use ping to verify you can resolve the VMPro/IMS server. • Try removing the client, reboot and reinstall it and verify that these are put in correctly then check the dcomcnfg settings.
IMS Tips and Hints (Cont) • On the VMPro/IMS server: • Verify that you are using the proper account to start the IMS and VMPro services. • During the install you will be asked for the name of the user that Voicemail Pro and IMS services will use to start, specify the user the administrator created for you, i.e. In this case “IMSAdmin”. This should be an account with a password that never expires. • It is not recommended to use Administrator. It must be a domain account with and Exchange Email mailbox not a local account and it must have at least local admin rights on the PC or domain admin rights. • Check to see if the Outlook account is setup correctly by making sure it can send and receive email.
IMS Tips and Hints (Cont) • On the VMPro/IMS server: • Verify that you are using the proper account to start the IMS and VMPro services. • During the install you will be asked for the name of the user that Voicemail Pro and IMS services will use to start, specify the user the administrator created for you, i.e. In this case “IMSAdmin”. This should be an account with a password that never expires. • It is not recommended to use Administrator. It must be a domain account with and Exchange Email mailbox not a local account and it must have at least local admin rights on the PC or domain admin rights. • Check to see if the Outlook account is setup correctly by making sure it can send and receive email.
IMS Tips and Hints (Cont) • On the VMPro/IMS server: • Check the event viewer and look for any UMServer errors in Application and any errors in the System section that may indicate a general problem. • Stop and start the VMPro and IMS services and see if you get any new errors. • Right click on the Voicemail Pro service and choose restart and answer yes to restarting the IMS Gateway and IMS Voice services. • Go to Windows Control Panel and run the "IP Office Voicemail Pro" control panel applet and verify the Voicemail Pro/IMS server machine name is correct in the Path Settings and the account is the proper account, i.e. “IMSAdmin” for example. You should be able to browse and find the IMSAdmin email account you are using here. • NOTE: If at this point you cannot successfully browse for an email account then there is a problem with the MAPI client on your PC and IMS will not work. You may have to uninstall Outlook, reboot and reinstall Outlook.
IMS Tips and Hints (Cont) • On the VMPro/IMS server: • Run the IMS Administration Tool and verify that the mailboxes have been setup properly. Un-assign then reassign them and verify that you can browse and find the email and NT login accounts, do not just type them in. A typing error can cause IMS not to function properly. • Next synchronize the mailbox by right clicking and choosing Synchronize on the Voice Mailbox. Next go into the event viewer and check for new errors. • Reboot the VMPro/IMS server and make sure it comes up without errors and starts all the services.
IMS Tips and Hints (Cont) • On the VMPro/IMS server: • Make sure you have not tried to run the IMS Client installation executable on the VMPro/IMS. This will cause corruption and you will have to uninstall and reinstall VMPro and IMS. • Questions you should ask yourself: • Are any client machines able to connect? • If you have installed only one client try installing the client on more machines. • If none of the clients can connect problem is most likely a problem on the server. If one or more can connect the problem is most likely on the client.