Download
1 / 38
380 likes | 846 Views
Learn terms, responsibilities, and procedures related to safely freeing individuals from vehicle entrapment. Study accident protection systems and initial operational protocols. Practice stabilization techniques using pneumatic lifting bags.

E N D
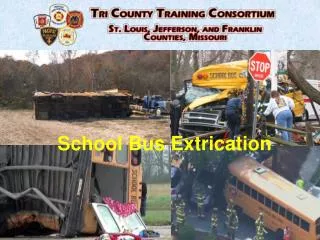
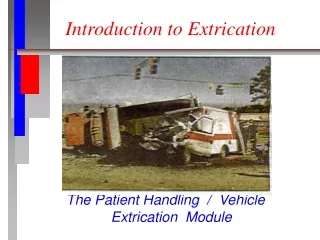
Vehicle Extrication Firefighter Curriculum: Component 2
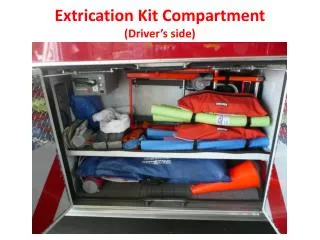
Overview • Terms & Definitions • Responsibilities • Vehicle Recognition • Accident Protection Systems • Initial Operational Procedures • Stabilization • Pneumatic Lifting Bags
Terms & Definitions • Extrication – safely and efficiently freeing persons, pets, or livestock from entrapment in land-based vehicles of all types. • Disentanglement – that part of vehicle extrication that relates to the removal and/or manipulation of vehicle components to allow a properly packaged victim to be removed from the vehicle. Sometimes referred to as removing the vehicle from the victim. • Rescue – that part of vehicle extrication that relates to assessing, stabilizing, protecting, and removing a victim from entrapment.
Terms & Definitions S.A.F.E. • Stop And First Evaluate Freeze • FREEZE! Hand on Shoulder • Stop what you’re doing and listen Control Zones – hot, warm and cold • Hot Zone – restricted access area immediately surrounding the scene, and only those directly involved in the extrication operation are allowed in this area. (rescue sector officer & crew) • Warm Zone – where those in support of the extrication operation may function. (power plant for rescue tools and charged hose line) • Cold Zone – where incident command and related functions can be conducted. (tools, trucks and personnel staging)
Responsibilities Police: • Prevent further accidents • Traffic control • Arrange for additional resources (i.e. tow truck) • Investigate cause and violations Ambulance: • Evaluate patient condition • Provide medical care – stabilize, package • Remove patient • Transport patient Fire: • IMS • Prevent/Control/Extinguish fires • Extrication • Assist medical personnel
Vehicle Recognition Body on Frame Unibody
Unibody One-piece hydroformed body side rings. Door hinges secured by thick through-bolts located in A- and B-pillars. Cast magnesium transverse beam behind the instrument panel. Triple-rolled A-post design resists roof collapse. Shock towers connected solidly to instrument panel. Lateral tie bars that connect the front longitudinal rails were closed to stiffen the front structure and improve crashworthiness. Hydroformed engine cradle ( not shown )
Accident Protection Systems Activation can be electrical, mechanical or pyrotechnic • Supplemental Restraint Systems (SRS) • Side Impact Protection Systems (SIPS) • Head Protection Systems (HPS) • Seat belt pretensioners • Knee bolsters • Side impact beams • Energy absorbing bumpers • Rollover Protection Systems (ROPS)
Airbags • Steering Wheel • Dash • Seats • Doors • Knees • A-Post/Roof • Side Impact Curtains • Head and Torso Airbag • Head/Thorax Airbag • Intelligent Airbags
Airbags • 5-10-20 Rule • Side impact – 5” deployment zone • Steering wheel – 10” deployment zone • Dash – 20” deployment zone • Capacitors – Designed to hold a charge up to 30 minutes for secondary impact
Seatbelt Pretensioners • Located in B posts or on the buckle side of seats • Designed to tighten or back wind seat belt during frontal collisions • Deployed only with the front airbags Solution? • Cut the seat belt early in the extrication • Disconnect the battery • Look before you cut!
Size Up • Starts from time of dispatch or earlier (pre-plan) • Ongoing throughout Types of Collisions: • Head-on • Rear-end • T-bone • Rollover • Water
Size Up Captains Arrival Report: • Paint a picture for dispatch and other crews • Be professional, concise and calm • You are setting the tone of the call • Think before you speak Should include: • Incident location • Observations – # of vehicles/patients • Additional resources required • Resources already on scene • Actions to be taken • Incident commander
Size Up • Outer and inner circle checks (mandatory) • Can be done quickly if you work as a team • Outer circle check first • Once safe, proceed with inner check of each vehicle involved • Hazards – Update Captain
Size Up What are you looking for during the outer circle check? • Hazards – hydro, damage to structures • Other vehicles • Patients thrown from vehicle – TIC • Firefighter looking after patient should make verbal contact at this time
Size Up What are you looking for during the inner circle checks? • # of patients in or around vehicle • Severity of injuries/entrapments • Hazards – fire, fuel leaks, vehicle in drive, keys in ignition, airbags deployed, alternative fuel sources • Rubber set windows??
Stabilization Scene 1st Vehicle 2nd Patient 3rd
Stabilization Stabilize Scene: • Charged hose line • Spills (Hazmat, fuel) • Toxic gases • Electrical • Traffic control • Crowd control
Stabilization Stabilize Vehicle: • Never test stability of vehicle! • Cribbing • Shoring • Winches • Chains/Straps/Ropes • Neutralize vehicle hazards (SRS)
Stabilization Stabilize Patient: • ABC’s • First aid • Protect from operations, environment, weather • Monitor until EMS relieves
Pneumatic Lifting Bags • Various shapes and sizes • High, medium and low pressure
Pneumatic Lifting Bags • Plan operation before starting the work • Be familiar with equipment • Have an adequate air supply and sufficient cribbing on hand before beginning operations • Position bags on or against a solid surface • Never inflate bags against sharp objects – use protective mats • Never inflate bags fully unless they are under load • Inflate bags slowly and monitor them continuously for any shifting • Never work under a load supported only by lifting bags • Do not stand in front of pressurized bags
Pneumatic Lifting Bags • Shore up the load with enough cribbing to support the load in case of bag failure • Interrupt the process frequently to increase cribbing – lift an inch, crib an inch • Ensure that the top tier is solid when using box cribbing • Avoid exposing bags to materials hotter than 220°F (104°C). • Never stack more than two bags; centre the bags with smaller bag on top and inflate the bottom bag first (½ full), then inflate the top bag fully. • Stacked bags can only lift the capacity of the lowest rated bag
Pneumatic Lifting Bags Max Lifting Capacity: • Small – 20.8 US tons or 41600 lbs • Large – 34.2 US tons or 68400 lbs Full of water, Tanker 67 weighs 45600 lbs. Is it safe to lift the tanker with our high pressure air bags stacked? Answer: No, call for additional rescue and use two large bags.