Download
1 / 7
90 likes | 420 Views
No Electronics At School! Who Broke The Rule? Gel Electrophoresis. A DNA Fingerprinting Simulation. Today’s Task.

E N D
No Electronics At School! Who Broke The Rule? Gel Electrophoresis A DNA Fingerprinting Simulation
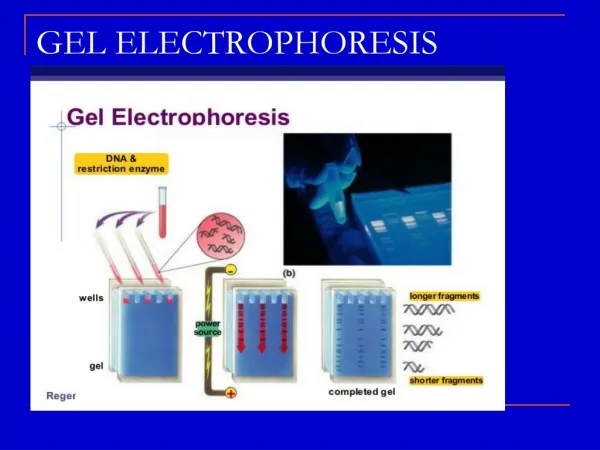
Today’s Task Today you will work with a partner to perform a lab simulation based on a scenario in which you are to identify the owner of an electronic device left in a classroom and subsequently claimed by four different students. This activity will model the processes of gel electrophoresis and DNA fingerprinting Let’s get started!!
Procedures • Begin by reading the scenario and discussing it with your partner. Be sure you understand the problem. • Get the materials needed to complete the activity.
Procedures Use the chart paper provided by your teacher to make a larger version of the chart shown. The enlarged chart will simulate a gel electrophoresis chamber. If necessary, use a ruler or meter stick to make sure all of the lengths are the same.
Procedures • Cut out one of the DNA fragment sample strips from each of the 5 DNA Results sheets, making sure to leave the source of the DNA (Earphone DNA, Student 1 DNA, Student 2 DNA, etc.) attached. • Examine each DNA fragment strip closely, looking for the sequence CCGG. This is a restriction site, where enzymes will cut the DNA into even smaller fragments. Use a pencil to mark these sites, with a line between the inner C and the inner G (CC│GG). • Then use the scissors to cut across the fragments at those sites. Count and label the number of base pairs contained in each of the DNA fragments. • . • Look at each DNA fragment carefully, looking for the sequence CCGG. This is a restriction site, where enzymes will cut the DNA into even smaller fragments. • Use a pencil to mark these sites, with a line between the inner C and the inner G (CC│GG). Then use the scissors to cut across the fragments at those sites. • Count and label the number of base pairs contained in each DNA fragment.
Procedures • Tape the DNA fragments to the chart that you made, using the number of base pairs in each DNA fragment as a guide in placing the fragments. Example: IF a DNA fragment from Student 4 contained 16 base pairs, it would be taped at the place indicated on the chart. • Compare the DNA from the earphone used with the electronic device to the student DNA samples. • Circle the student’s DNA that matches the DNA from the earphone.
What’s Next? • Complete the questions in the “Analysis” section. • Follow your teacher’s instructions for sharing results. • Return materials, and, CLEAN UP.