Download
1 / 6
60 likes | 465 Views
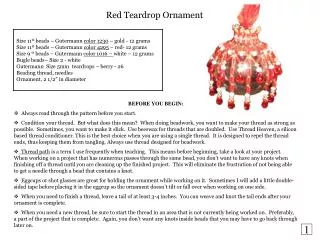
Red Teardrop Ornament Size 11º beads – Gutermann color 1230 – gold - 12 grams Size 11º beads – Gutermann color 4295 – red- 12 grams Size 9 º beads – Gutermann color 1016 – white – 12 grams Bugle beads– Size 2 - white Gutermann Size 5mm teardrops – berry - 26

E N D
Red Teardrop Ornament Size 11º beads – Gutermann color 1230 – gold - 12 grams Size 11º beads – Gutermann color 4295 – red- 12 grams Size 9 º beads – Gutermann color 1016 – white – 12 grams Bugle beads– Size 2 - whiteGutermann Size 5mm teardrops – berry - 26 Beading thread, needlesOrnament, 2 1/2” in diameter • BEFORE YOU BEGIN: • Always read through the pattern before you start. • Condition your thread. But what does this mean? When doing beadwork, you want to make your thread as strong as possible. Sometimes, you want to make it slick. Use beeswax for threads that are doubled. Use Thread Heaven, a silicon based thread conditioner. This is the best choice when you are using a single thread. It is designed to repel the thread ends, thus keeping them from tangling. Always use thread designed for beadwork. • Thread path is a term I use frequently when teaching. This means before beginning, take a look at your project. When working on a project that has numerous passes through the same bead, you don’t want to have any knots when finishing off a thread until you are cleaning up the finished project. This will eliminate the frustration of not being able to get a needle through a bead that contains a knot. • Eggcups or shot glasses are great for holding the ornament while working on it. Sometimes I will add a little double-sided tape before placing it in the eggcup so the ornament doesn’t tilt or fall over when working on one side. • When you need to finish a thread, leave a tail of at least 3-4 inches. You can weave and knot the tail ends after your ornament is complete. • When you need a new thread, be sure to start the thread in an area that is not currently being worked on. Preferably, a part of the project that is complete. Again, you don’t want any knots inside beads that you may have to go back through later on. 1
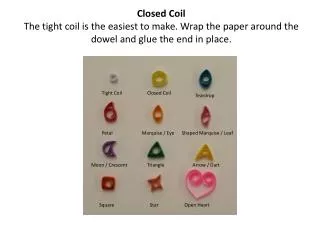
start Step 1 String 1 bugle bead + 2 red beads + 1 gold+2 red beads. Pass back through bugle bead. Your thread should be exiting the bugle bead. (Figure 1) Pass thread through the red and gold bead combination again, to make it a little more secure. (Figure 1) Step 2 Put thread back through both sets of beads. You are exiting a bugle bead. Pick up 2 red + 1 gold + 2 red and go through the bugle bead and pass through the red and gold combination again.(Figure 1) Pick up bugle bead next start Step 3 Pick up a bugle and pass needle through the red and gold combination. Pass through the bugle again. Continue in the pattern until your ladder is 14-bugle bead /red combo long. (Figure 2) (Figure 2) 2
Step 4 A-B C-D (Figure 4) The next steps will form the top picotrow and the middle first row. Exiting from a red/gold combo pick up 2 reds + 4 golds. Take your needle and put back through the 1st gold bead. (Figure 4) Top picot row collar Now it is time to join your ladder into a circle. You should have a red/gold combo on one end (A-B) and a bugle on the other end (C-D). If your needle is coming out of the bugle side, pass through the red/gold combo. (Figure 3) I usually pass it through a few times to make it more secure. (Figure 3) Step 5 This will give you a collar for your ornament. It may be a little large, but it will work for a variety of ornament sizes. Step 6 3
Start 1st gold bead 1st drop row Step 7 Time to start your 1st drop row. Pick up 3 red + 1 gold + 5 reds + 1 gold + 1 white + 1 gold + 5 red. Pass back through 1st gold bead on your way back to foundation row. Pass needle through the foundation row red/gold combo. Continue on in this manner until you have 14 white drops and 14 picots. (Figure 5) (Figure 5) (Figure 6) Step 8 Bring your needle so that it is exiting from the 2nd gold bead on one side of the white Size 9º º. (Figure 6) Pick up 5 red. Pass your needle through the next gold/whit/gold drop combination. Perform this step until all white drops are connected. 2nd gold bead 4
(Figure 7) 5 red bead combo 5 5 5 5 (Figure 8) Step 9 At this point your needle should be exiting a gold bead from the white drop bead combination. Time to start the long drop row. (Figure 7) Step 10 Pass your needle through to the 3rd red bead bead on the 5 bead combo. Pick up 1 gold + 5 red + 1 gold + 5 red + 1 gold + 5 red + 1 gold + 5 red + 1 gold + 1 white + 4 gold. We are going to make a Picot here before finishing the drop. Bring your needle back through the first gold bead of the (4 gold) combo. Secure this by going back up to the first group of 5 reds. Have your needle exit through the 4th red and pass needle back down through the 3rd red bead (Figure 8). Go back down to the picot. Pick up 1 gold + 1 red + drop + 1 red + 1 gold. Go through the opposite side of the picot. (Figure 9) (Figure 9) Continue this step until you have completed the required number of drops. Then it is time to finish off the ornament. 5