Comprehensive Guide to eCheck Requisition System for First-Time Users
This guide provides step-by-step instructions for first-time users of the eCheck Requisition System. It covers initial sign-on, entering shipping details, creating or selecting payees, entering payment types, accounting information, tax details, delivery options, and submitting the requisition for approval. Users will learn how to navigate through the various screens, attach necessary documents, and understand the approval workflow. This resource ensures that users can successfully complete their eCheck requests while following all necessary procedures.

Comprehensive Guide to eCheck Requisition System for First-Time Users
E N D
Presentation Transcript
1. eCheck Requisition System
2. Sign On
3. Getting Started First time users will need to complete a Ship To request. Click OK.
4. Getting Started Skip the Personal Information page by selecting Next. Enter a Default Shipping Address section on the Accounting/Shipping Info page, then click Next.
5. Getting Started Search for Shipping Address by changing the Field to Department and typing your department name. Click the Select option that is next to the correct address. Review your information and Submit.
6. Getting Started From the home page, select Create.
7. Select University eForms Getting Started
8. Fill in the information on each numbered screen until you are able to submit the requisition for approval. Follow the Steps
9. Payee Enter an eCheck Title and select a Payee name. You do have the ability to create a New Payee, if necessary.
To select a Payee, click on the drop down arrow and select Other�
10. Payee Select your Search field (Name, SSN/Tax ID, Address, City, State), type your search criteria, and click Search. Select your payee from the list of results.
11. Creating a Payee ONLY IF PAYEE DOES NOT EXIST, Click on New in the Payee search screen. Fill in the required information correctly and click on Save. If you have the Social Security Number or Tax ID number of the new Payee, please enter it before you save.
12. Payee To view different Payment Types, click on Select.
13. Payee Scroll down the list and select the appropriate payment type for your requisition. Remember that each payment type is restricted to certain sub object codes. Refer to the eCheck Help Document for the full list.
14. Payee Enter the Payment Amount and then click Next
15. Accounting Manually enter the appropriate account number and sub object code from which the check is to be paid. If you do not have this information memorized, click Select and search for account number or sub object code. Enter the amount to be paid in US dollars and select Next.
16. Split Accounting
17. The system will ask you to specify the Payee�s Ownership Type and Payee Service Type, along with the Social Security Number or Tax ID if any of these payments types are used:
(2) Honorarium � Non Resident Alien, (3) Honorarium � US National, (6) Legal Services, (7) Legal Settlement, (8) Medical Services, (9) Other Services, (14) Registration, (17) Rental Expenses, (20) Research Subject Participants, (21) Royalties, or (22) Student Awards/Prizes/Stipends
Tax Information
18. Tax Information If the Payment Type is not flagged as being 1099 reportable, this screen will only ask for the Payee�s Social Security Number or Tax ID. Enter this and click Next.
19. Delivery Verify the address and select YES if the address matches the address on the invoice. Other delivery options are Enclosure, FedEx, and Internal Distribution and can be selected by clicking the corresponding YES or check box.
20. Enclosure: documents to be mailed with the check. You must scan and attach the enclosure on the Summary screen. The enclosure�s file name needs to be �ENCLOSURE�.
FedEx: check will be held at Check Distribution until a completed FedEx air bill and envelope are sent to them. Delivery Options
21. Internal Distribution: the check will be held for pickup at one of the listed hold locations. This requires a valid reason and the approval of either your VP or the Disbursements Office.
Circumstances that are exempt from VP Signature include Travel Advance checks and Petty Cash payments. Delivery Options
22. Explanation Stub Information: This information will print on the check stub. Enter an invoice number and/or any information that identifies what the payment is for.
Explanation of Request: Enter a detailed explanation outlining the business purpose for the expense.
23. Instructions Read the instructions carefully to ensure the correct process is followed. This screen will notify you if any of the Central Offices (Disbursements, Controller�s, Sponsored Programs) have been added to the approval flow. This screen also advises what should be done with the original backup documents.
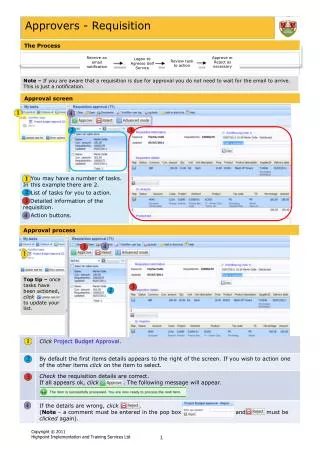
24. Approval Flow Review all the approvers by using the horizontal scroll bar to scroll through the approval flow window.
25. Summary Scan and attach the backup documents into the eCheck by scrolling down to the bottom of the page and selecting Add Attachment. This will speed up the eCheck�s approval processing time.
26. Click Browse and select the appropriate file/document to include. Click OK. Repeat these steps if you need to add multiple attachments into the eCheck.
27. You should now see the attachment included on your eCheck. If you have any additional information or special instructions for the eCheck, include a comment in the Comment section.
After reviewing the Summary screen for accuracy, click Submit. Summary
28. Print Summary Once submitted, select Print a copy of this request, which will bring up the Summary page.
Print this page, attach it to the original backup documentation, and mail it to Disbursements Office within five (5) business days of the eCheck submission date.
29. Disbursements Office 750 Gables Tower
Locator 2979
Phone: (305) 284-3570
Website
30. Other Interoffice Addresses Check Distribution
Ashe Bldg #129
Coral Gables
Locator 4613
Gables Sponsored Programs
Max Orovitz Bldg #206
Coral Gables
Locator 1425
Medical Sponsored Programs
Dominion Tower #1001A
Medical Campus
Locator R45
RSMAS Sponsored Programs
SLAB Bldg #111
Virginia Key, VK
31. Questions? Allison Gilbert
System Trainer, Accounts Payable
agilbert2@miami.edu
(305) 284-6787
eCheck Help Document