Requisition Process
Requisition Process . Procurement Services Laurie Krauel Updated 4.5.12. Requisition Processes. Navigation Define Requisition Add Items & Services Suggest New Vendor Review & Submit Chartfield Changes Attachments/Comments Manage Requisitions. Agenda. eProcurement Demo

Requisition Process
E N D
Presentation Transcript
Requisition Process Procurement Services Laurie Krauel Updated 4.5.12
Requisition Processes • Navigation • Define Requisition • Add Items & Services • Suggest New Vendor • Review & Submit • Chartfield Changes • Attachments/Comments • Manage Requisitions
Agenda • eProcurement Demo • Other Approvers
Initiating a Requisition • Main Menu>eProcurement>Create Requisition
Define Requisition A descriptive requisition name is helpful when managing requisitions later, but not required. Click on Spyglass to see more info The fields that you enter on this page will be applied to the entire requisition.
Vendor If you can’t find the vendor we will Suggest a New Vendor under the Add Lines & Services page. Select the vendor for the items on this requisition. Purchase orders will not be created unless the vendor ID and vendor location are on the requisition.
Vendor Location The default location for the vendor appears to the right of the Vendor field.
Category Define a category for this order. For this page you will need to click the Find Button to see all of the different categories. You can search by category or by description (Account Code).
Unit of Measure Define the UOM for this order.
Ship To Select the building you want your order ship to.
Attention Enter the name and room number of the individual who should receive the items or services.
Chartfield Information Enter Chartfield information. The Account code will default in from the Category. When done, click the Continue button at the bottom of the page to save the information on this page.
Add Items and Services The information you entered on the Previous page default in.
Item Description: Please specific, providing any other appropriate detail. Price & Quantity : Enter price & Quantity. Parts Number: Enter identification number assigned to particular part by the manufacturer. Additional Information: Enter any other useful information, such as quote number here. Check Send to Vendor if this information should be included on the Purchase Order… if unchecked, information will go to the buyer and other approvers within DePaul, but not to the vendor.
Suggest New Vendor Use the Suggest a New Vendor feature when entering a req for a vendor not already in the system. Click on the Suggest New Vendor to enter the information. Enter all appropriate information. Please make sure to include phone number, fax number & email address. When done, click OK to save the information.
Suggest Vendor name will appear now on the Item and Service page. Make sure all required (*)fields are completed… then click Add Item to complete this line of the requisition.
When all lines have been entered, click on Review and Submit to prepare Req for submission. The item is now displayed in the Requisition Summary… and the req total is updated accordingly. You can now enter another line to this order by filling in the Item Description, Price & Quantity. Don’t forget to click the Add Item if you add more lines.
Trade In/Discounts Negative line price and amount.
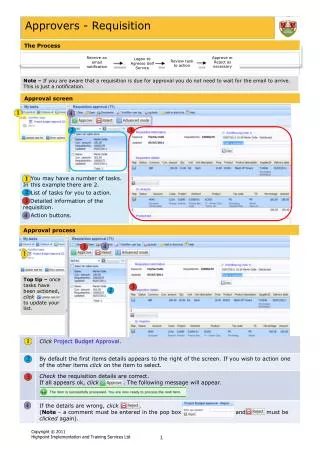
Review & Submit This screen shows a summary of your requisition with each line listed.. You are now ready to perform a budget check and submit the requisition. Before a req can be submitted, it must pass a budget check. Click on the Check Budget.
This page tells you that the req will be saved (but not submitted) before the budget check. Click on the OK button now.
Valid indicates that the req has passed budget check. You can now submit your order to Procurement for review/approval. Error: The requisition failed budget checking. Please call Buyer or Procurement Services
Confirmation Page displays your requisition number and approval workflow. This req must be first approved by a buyer.. Then the Compliance Approver. The req will become an active order only after all approvals have been processed.
Chatfield Changes Change the chartfield information from the Review & Submit page. Click on the Expand section button.
Scroll to the right you can see your chartfield information. You can change the deptid/account code on this screen.
You can also change chartfield information from the Define Requisition page. Click on Define Requisition at the top of the page.
Chartfield Changes Click on the Continue button at the bottom of the page
Account code is now updated. Click on Check Budget again.
Attachments Attachments or Standard Comment. Click on Standard comments at the bottom of the page.
Select a file to be attached to this order. Click on Open to add the file.
File is added with your name and the date and time. Add a New Row to enter another Attachment.
Under Use Standard Comment you must write Attachments. Done click the OK button.
Standard Comments Click Standard Comment to add any standard comments
Enter "PO" for purchase order comments Then use Look Up icon to display standard PO comments Click the Standard Comment Id Number to select
Need to check the box to add the Standard Comment. Click the OK button.
Check Send to Vendor if this info should be included on the Purchase Order... if unchecked, information will go to the buyer and other approvers within DePaul, but not to the Vendor