CREATING A REQUISITION
CREATING A REQUISITION. Help Desk (301) 444-2854. Create a Basic Requisition Create Requisition Define Administration Define Default ACCS Create Line Items Review and Approval Commit Submit


CREATING A REQUISITION
E N D
Presentation Transcript
CREATING A REQUISITION Help Desk (301) 444-2854
Create a Basic Requisition Create Requisition Define Administration Define Default ACCS Create Line Items Review and Approval Commit Submit This course defines how to enter the information into CRequest. For help regarding the acquisition terms please coordinate and communicate with your Acquisition Division. COURSE OBJECTIVESCourse takes approximately 1 hourPrerequisite Introduction to CRequest
THE REQUISITION CREATE REQUISITION Step 1 To create a REQUISITION in CRequest there are a series of steps. The following screen clips document these steps. Please see the diagram of the steps below: Define Administration Step 2 Define Default ACCS Step 3 Create Line Items Step 4 Review &Approval Step 5 Commit Step 6 Submit Step 7
CREATE REQUISITIONStep 1 is to create the requisition. Select REQUISITION
CREATE REQUISITIONRequisition Number Enter information as shown and select SAVE. After pressing save, Step 1, Create Requisition is complete. The system will automatically provide the screen to proceed to Step 2, Define Admin. Select the Fiscal Year (FY) the action will be awarded. Will need to be the same FY as the funding. The system will generate this number. It will be a unique number to Identify this requisition. The Requisitioner may use this field to label the requisition. If the Requisitioner does not provide a label, the system will automatically label this with the Requisition number Select the drop down arrow for a list of all PIIN Prefix options
CREATE REQUISITIONRequisition Number NWWG0110-8-29104 Org Codes (see next Page for Listing) Unique location code – Aligns to budget – agreed to between CFOs & AGO Fiscal Year to be Awarded Auto Generated by CRequest
CREATE REQUISITIONRequisition Number Org Codes: Published by DOC* Pam – Can you and Sanath put the chart with the org codes here First two characters of the PIIN
CREATE REQUISITIONStep 1, Create RequisitionOn this page the Requisition Number is created. • The PIIN Number Screen creates the Requisition Number. • The Requisition Number will stay with this transaction through out its life in CRequest, CBuy, and later in the payment system CFS. • The Requisition Number’s prefix is found in the PICKLIST. The prefix is a combination of the Requisitioner’s Line Office and Bureau code. (see page 7)
DEFINE ADMINISTRATIONStep 2 is Define Administration • The Administration Section contains input about the requisition such as WHO, WHAT, WHERE, WHEN, AND WHY. • *Indicates required fields. System will not save until all required fields are filled. • Tab key can be used to move from field to field • Watch for system messages at the bottom of the screen. They indicate success or problems with entry. • Do not SAVE until all three tabs have been filled out.
DEFINE ADMINISTRATIONAdministration Tab Point of Contact, POC Phone, & Requesting Office – Should be for the actual contact (If doing data entry for another fill in their information. Requisition Date - Defaults to today’s date. Change according to when the requisition will be sent to AGO Form - Use default of Standard Form Delivery Date – When the item is needed FSC (Federal Supply Class) code – Use look up if unsure. Purpose - Summary of product or service Suggested Vendor - Only if needed. Task & Delivery number only when applicable Contract Number & Delivery Order Number only when applicable
DEFINE ADMINISTRATIONFunding Tab Task & Delivery number only when applicable The Authorized By: and Funds Certified By: Fields should reflect names included on the REVIEW AND APPROVAL LIST. • This screen does not route. It only lists names. • Funding is one of the few screens which can either be searched through the looking glass or typed in directly.
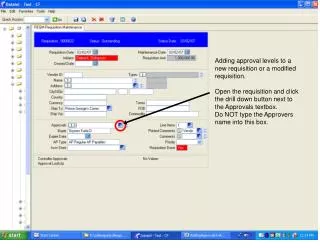
DEFINE ADMINISTRATIONAddresses Tab • Supplemental Address at the bottom is mandatory and a fill-in. If additional information is not available choose NA. • Save when finished. • The ADDRESSES TAB contains all Addresses for the Requisition • Select SAVE when finished. After pressing SAVE, Step 2 Define Administration is finished • The system will automatically provide the Summary Screen for your newly created requisition
SUMMARY SCREEN • The HOME BASE of the Requisition. • SAVE in many screens brings back to the Summary screen • All Menu options are on the left. • On the right a SUMMARY of the information in all of the screen. • Come back to this screen between actions to find menu option for next action
DEFINE DEFAULT ACCSSTEP 3 CREATING ACCOUNTING CODES Select Accounting • To create the default accounting select Accounting from the Summary screen • Default Accounting is per requisition.
DEFINE DEFAULT ACCSAccounting Code Summary Management • Step 3 is to create a default ACCS for the requisition. • (This step is optional but recommended) • In the ACCOUNTING Screen the ACCS entered will default for each line item entered Select Actions CREATE to enter ACCOUNT SUMMARY DETAIL screen This search will only yield results after the line items have been entered.
DEFINE DEFAULT ACCSABOUT THIS SCREEN • A FEW NOTES ABOUT THE ACCS: • RECOMMENDED: ENTRY BY HAND OF EACH ACCS SEGMENT • NOAA has too many ACCS that change too often to load all into CRequest. • The magnifying glass may contain the ACCS segment being searched upon but does not contain all • Import Entire Accounting Code is not used at NOAA • The title of each segment of the ACCS is to the left. • In brackets is the number of characters for each ACCS • The title of each segment of the ACCS is to the left. • In brackets is the number of characters for each ACCS • Set as Default indicates to the system that each LINE ITEM entered will automatically be applied to this ACCS • Default Percent indicates to the system how much of each line item should be applied to this ACCS. Split ACCS here. • Set as Default and
DEFINE DEFAULT ACCS Note this needs to be the fiscal year of the Award ACCS NEEDS TO BE ENTERED IN ALL CAPS 1ST of 2 screens in Setting up DEFAULT ACCS As of January 2008 the NOAA Fund Code is 4 Characters. Add leading zeros to two digit codes USER DEFINED IS ALWAYS SIX (6) Zeros
DEFINE DEFAULT ACCS As many Default ACCS as desired can be set up. Here is the second ACCS set up. 2nd of 2 ACCS set up. Note 25% + 75% = 100%
DEFINE DEFAULT ACCS Select Summary to have additional options. • After SAVE the Account Code Summary Management screen shows the breakdown of the ACCS entered • Can continue entering as many ACCS as needed by selecting CREATE • When all Default ACCS have been entered select SUMMARY to go on to LINE ITEMS
Check the number of default codes and percentage here. The percentage should not be more then 100% SUMMARY SCREEN QA • The SUMMARY screen gives a running total of the information entered. • Check after each STEP to be sure they SUMMARY is what was to be entered.
CREATE LINE ITEMSSTEP 4 CREATE LINE ITEMS Select Line Items from the Summary Screen, to start Step 4, Create Line Items
CREATE LINE ITEMS This SEARCH screen will not contain anything until the line items have been created. Select CREATE to start the process of creating Line Items
CREATE LINE ITEMS Once the LINE ITEM has been saved Accounting will accessible. Be sure to fill out all three tabs – Administration – Address – Options.
CREATE LINE ITEMSAdministration Tab Unit of issue – Use predefined abbreviation Enter Cost System Quantity X Cost = Total Cost Enter Quantity LEAVE HEADER BLANK Enter brief description of what is being requisitioned Not-Used Note APPLY has been selected. Now the Accounting is accessible. FSC – Extracted from Admin Screen – Can be edited if necessary
CREATE LINE ITEMSAddress Tab Ship date – When item is needed or contract to start Delivery Address Any additional shipping information. If none use NA • The Address Tab’s information is extracted from the Administration Screen. • Each line item can be edited to have its own shipping information.
CREATE LINE ITEMSOption Tab Enter the line’s option if applicable Enter the period of performance for line if applicable • After filling in all three tabs of the Line Item Select SAVE. • The User will be brought back to the Requisition Line Item Management • Screen and another Line Item can be created by selecting CREATE. (to page 20) • If finished entering Line Items select SUMMARY.
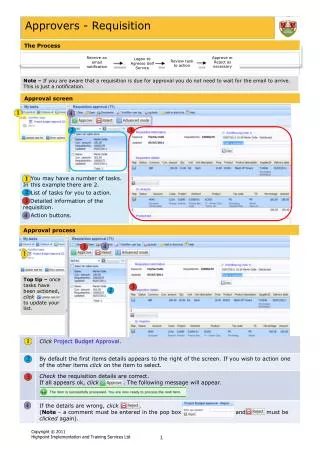
REVIEW AND APPROVALStep 5 Step 5: To create a ROUTING LIST select REVIEW AND APPROVAL from the SUMMARY SCREEN.
REVIEW AND APPROVAL Offices that have set up route models can select IMPORT ROUTE LIST MODEL (please call the Help Desk for information on how to create route models for your office.) Click CREATE a routing list • Routing Lists need to include all approvals required for an award • Anyone listed on the Funding Tab of the Administration Screen needs to be included
REVIEW AND APPROVAL • Receiving Order determines the order the Reviewers receive the action. The action does not go to the next Reviewer until the action has been approved. Once an action is in a Reviewer's inbox to be approved the Requisitioner can not remove it but they can forward to another approver if necessary. (See Bells and Whistles for further instructions) • Reviewers have full read and write access to a requisition when reviewing. Reviewers have full ability to make changes as long and View Only is not checked.
REVIEW AND APPROVAL REVIEWER CODE – Hand key or look up RECEIVING ORDER - Ordered by tens to leave room future numbers in between. PRIORITY – URENT? CARBON COPY - Being sent as an FYI – No approval APPROVAL REQUIRED -This REVIEWER will need to approve before the system sends to the next approver VIEW ONLY – If checked the requisition can only be viewed by the reviewer. If unchecked the reviewer has full write access and can make any desired changes. Select SAVE to go back to Req Review & Approval Mgt Menu
REVIEW AND APPROVAL Select to send requisition to APPROVERS • The above is a Routing list with three approvers. • A = Approval required C = Carbon Copy (will always be VIEW ONLY) • N = Full Read Write Access Y = Read Only Access • When using VIEW ONLY there needs to be an APPROVER at the same ROUTE ORDER • RELEASE needs to be selected in order for this ROUTE LIST to be sent • Rou
REVIEW AND APPROVAL Note - After RELEASE was selected the two ROUTE ORDER 10 have been released and show Review Pending. After one of the Approvers approves this action the system automatically will send it to the ROUTE ORDER 20 Approver. At this point the route list has been created and has been sent to the reviewers. Additional Reviewers can be added. Once in an INBOX it can only be FORWARDED not removed from the INBOX.
REVIEW AND APPROVAL View from Summary Screen: Waiting for approval View from Summary Screen: Approved by all. Can now COMMIT and then Submit ALL APPROVALS NEED TO BE COMPLETE BEFORE MOVING ON TO COMMIT AND SUBMIT. IF A REQUISITION IS SENT TO ACQUISITION WITHOUT APPROVED ROUTING IT WILL BE RETURNED BY AGO.
COMMIT STEP 6 Select COMMIT from the SUMMARY Menu • COMMIT checks the Requisitioner’s ACCS against the ACCS set up in the CFS (Commerce Financial System). This step only checks the ACCS it DOES NOT check that the funding is available or reserve the funding • The Acquisition Office will only be able to create an award for the amount of or less than the requisition. AGO will not be able to make the award for more then the value of the requisition. If additional funds are needed AGO will contact the Requistioner.
COMMIT CORRECT $? Select to send to CFS • Check dollar amount. When everything is fine select Save and Post. • DO NOT DOUBLE CLICK. This will result it problems with this requisition. • Once Save and Post has been selected the Requisition will be in READ ONLY MODE. If changes are needed CANCEL COMMIT will be required.
COMMITAWAITING RESPONSE For an update Status • After selecting SAVE AND POST the system automatically goes to the SUMMARY SCREEN • On the SUMMARY screen status will appear. • Once SAVE AND POST has been selected the Requisition will be in READ ONLY status • The screen will not update automatically so periodically select VIEW STATUS
COMMITREJECTION MESSAGE • If CFS finds a problem with the ACCS a REJECTED/RETURNED BY FINANCIAL SYSTEM message will be received. • Click the MESSAGEto see the problem. A pop up message will appear. • Call the Help Desk and tell them what the message says.
COMMITACCEPTED APPROVED MESSAGE • Once COMMIT has received an ACCEPTED/APPROVED the requisition will be in Read Only • If any changes need to be made the Requisitioner will need to select CANCEL COMMIT
SUBMIT STEP 7 After an ACCEPTED/APPROVED been received is the SUBMIT button available (was grey before and is now black).
SUBMIT Enter AGO Office * Select Save • Be sure to submit to the AGO OFFICE not the Specialist (the Management needs to see all of the requisitions that come across.) • After SAVING the system will go to SUMMARY. • Always check
SUBMIT REQUISITION STATUS – Will change throughout the life of the requisition. Enter AGO Office • Be sure to submit to the AGO OFFICE not the Specialist (the Management needs to see all of the requisitions that come across.) • If by accident the user selects SAVE the requisition will be sent but to no one specific. PLEASE CALL THE HELP DESK AND HAVE THEM REASSIGN IT PROPERLY. Check this message that it has been successfully submitted. If unsuccessful contact the Help Desk
The Requisition Create Requisition Define Administration Define Default ACCS Create Line Items Review and Approval Commit Submit WRAP UP
Topics Covered Administration Accounting Line Items Copy Line Items Renumber Line Items Accounting on the Line Items Review and Approval Replace an approver Commit Cancel commit Submit Forms Topics Covered Notes Properties Sharing Locking History Functions Copy Cancel Delete Period of Performance Support Documents Deliverables Add to Hotlist Learn about in Other CRequest Classes
APPENDIX A – GOOD TO KNOW • Blue Command Bar • Calendar Icon • Drop Down Arrow • Hyperlink • Letter Case • Mandatory Field • Magnifying Glass • Mark Box • Menu / Grey vs Black • Refresh • Summary Screen • Status Message
APPENDIX A – GOOD TO KNOW i. Blue Command Bar The blue Command Bar initiates your action Save = saves data, but returns you to the Home Apply = saves the data, keeps you on same page Reset = clears fields for re-entry Cancel = returns you to Home without saving ii. Calendar Icon Click the Calendar Icon and a calendar will pop-up. This allows the user to choose a date that the system will fill in automatically. Whenever a Calendar Icon is available, the user has the option to fill in the date manually in the provided field, or use the pop-up calendar. On the pop-up calendar, the inner arrows take you month to the month, and the outer arrows take you year to the year.
APPENDIX A – GOOD TO KNOW iii. Drop Down Arrow Drop Down Arrows are used to provide a pick-list. No free-form fill is available - only the pick-list items. iv. Hyperlink An item with blue – underlined text is a hyperlink. Click the blue-underlined text to go to the item. v. Letter Case It is important to type in CAPITAL LETTERS while in C.Request. The system does not always recognize a lower case letter as the same letter as an upper case letter.
APPENDIX A – GOOD TO KNOW vi. Mandatory Field * = Mandatory Field. If you do not fill in a mandatory field, then upon Save or Apply, a status message will appear at the bottom of the screen. If User leaves the screen without fixing the mandatory field, then all information (including defaults) will be lost. Resolve before going to another screen. vii. Magnifying Glass Click the Magnifying Glass Icon and a look-up screen will pop-up. This allows the user to search for available options that the system will fill in automatically. Whenever a the Magnifying Glass Icon is available, the user has the option to fill in the data manually, or select from the pop-up list to have the system fill-in. Select by clicking the clip-board with the red check-mark. Narrow your search by using the boxes at the top.
becomes APPENDIX A – GOOD TO KNOW viii. Mark Box Click the box beside an item to select it. A checkmark will appear by selected items. Some screens allow multiple selections and others do not. After selecting an item, menu functions will be available (e.g., copy). For more information see Menu / grey vs. black. Example of functions available after selecting a mark box:
becomes APPENDIX A – GOOD TO KNOW ix. Menu / grey vs black • Black menu items are available for the user to select. Light grey items are not available for the user to select. There are a couple reasons an item may be light grey and unavailable. • The User needs to select an item before a function (e.g., copy) is available, or • 2) DOC does not have licenses for the full C-Suite (e.g., FPDS), for which some options will always be light grey. becomes x. Refresh Click the Refresh Icon to have the system show the results for manually entered data. Use this to confirm that your manually entered data is correct.
APPENDIX A – GOOD TO KNOW xi. Summary Screen Summary is the home base for the requisition. Select Summary to continue to work with your requisition. It is found on the left menu screen. Summary provides the Requisition Summary menu (as shown on the right).