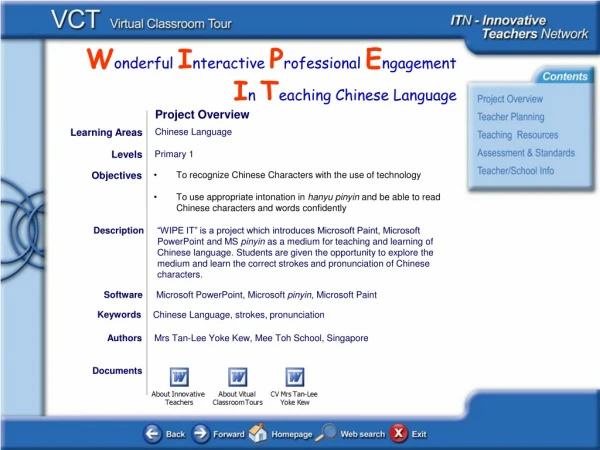
Comprehensive Guide to Attaching Documents in Grant Proposals
In this module, you will learn how to effectively attach documents to your grant proposal, including your Research Plan and Letters of Support, while adhering to Grants.gov and NIH attachment guidelines. We will cover the use of the "Exploder" feature for seamless document management, steps for uploading PDF files, and tips for ensuring compliance with formatting rules. Additionally, you will discover how to view your proposal forms and attachments in PDF format for final review before submission.

Comprehensive Guide to Attaching Documents in Grant Proposals
E N D
Presentation Transcript
Attaching Documents Module 9 Research Suite Product Support ResearchSuiteSupport@Evisions.com
Objectives In this module you will learn how to: • Attach documents to your grant proposal • Follow Grants.gov and NIH attachment guidelines • Attach your Research Plan using the “Exploder” • Attach Letters of Support • View proposal forms and attachments in PDF format
Commonly Required Attachments • PHS 398 attachments for NIH and other PHS agencies only
Attaching Documents • Locate the appropriate page of the form you need to attach the document to. • Locate the attachment point by the label. Current & Pending Support is shown below. • Click Add Attachment.
Attaching Documents • In the Upload Attachment popup, click Browse next to the PDF file slot. • Select the PDF file in the file browser and click Open. • PDF is required and will be submitted to Grants.gov. • Cayuse 424 cannot submit non-PDF files. • If desired, do the same for the Source file (e.g. Word format). • Source file is not required, but makes it easy to change the file if modifications are needed.
Attaching Documents • Once you’ve added the desired file(s), click Upload. • The files have been uploaded when PDF (and SRC if you included a source file) are blue links.
PDF Attachment Guidelines Grants.gov and NIH both maintain guidelines on successfully submitting PDF attachments. • Convert ‘active’ form field PDFs to ‘flat’ (static) PDFs using a PDF converter. • Names should be less than 50 characters. • Create PDFs using creation software, not by scanning a printed document. • Disable any security features in the document. • Do not include stamps or annotations. • Make sure your page size is 8.5” x 11” letter (do not use A4). These guidelines apply to most opportunities, but always verify your FOA instructions if you have any questions.
Attaching the Research Plan The Research Plan can be attached manually using the previous steps, but Cayuse 424 also allows you to upload just one document and get all your attachments in the right place! • Create a properly formatted Research Plan. • See the SF 424 R&R Application Guide for NIH for details. • Insert a page break at each section header (e.g. Introduction, Specific Aims). • Create a PDF of your Research Plan file using the PDF creation software of your choice.
Using the “Exploder” • Navigate to the PHS 398 Research Plan form of your proposal. • Upload your Research Plan PDF file to the 0. Composite PDF slot.
Using the “Exploder” • You should see that the division of the file has been successful. • Your attachment points will have PDF attachments associated with them.
Attaching Letters of Support • Cayuse 424 offers an Append function to put several letters of support together without bundling. • Use the Add button to add the first letter. • For subsequent letters, use the Append button. • A source file cannot be added for additional letters. • Selecting Deletewill delete all items.
Viewing Proposals in PDF Format You can generate a PDF to see how your proposal looks at any time. • Click the printer icon at the top right. • Check any form you want to print. You can select as many or as few forms as you need. • If you want to see the attachments to the form as well, check Include any attachments. • Click Generate PDF. Save or print the generated file.
Conclusion In this module you learned how to: • Attach documents to your grant proposal • Follow Grants.gov and NIH attachment guidelines • Attach your Research Plan using the “Exploder” • Attach Letters of Support • View proposal forms and attachments in PDF format