Table Top units
Table Top units. Discussion Units. 12 Configuration switches Mode I II 1 1 Single Delegate All types of discussion units can be put in the single delegate mode and use the default microphone Button. I & U Instructions. Discussion Units. 12 Configuration switches Mode I II
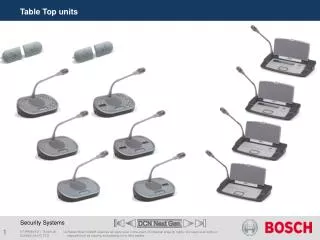

Table Top units
E N D
Presentation Transcript
Table Top units DCNNG SA PO TTU
Discussion Units 12 Configuration switches Mode I II 1 1 Single Delegate • All types of discussion units can be put in the single delegate mode and use the default microphone Button. I&U Instructions DCNNG SA PO TTU
Discussion Units 12 Configuration switches Mode I II 1 3 Chairman • All types of discussion units can be put in the chairman mode and use the DCN-DISBCM Buttons. I&U Instructions DCNNG SA PO TTU
Discussion Units 12 Configuration switches Mode I II 3 3 Single delegate with auxiliary control • You can only put these types of discussion units in the single delegate with auxiliary control mode: • DCN-DISD • DCN-DISCS • DCN-DISDCS • DCN-DISV • DCN-DISVCS • For control you can use the DCN-DISBCM or DCN-DISBDD Buttons. • The delegate can use the left microphone button as an auxiliary button. For example, to activate an indicator. • Note: When the delegate pushes the auxiliary button, the auxiliary button makes an event. Use the Open Interface to program the actions that must be started by the event. I&U Instructions DCNNG SA PO TTU
Discussion Units 12 Configuration switches Mode I II 3 1 Dual Delegate • You can only put these types of discussion units in the dual delegate mode: • DCN-DISD • DCN-DISDCS • For the microphone control use the DCN-DISBDD Buttons. I&U Instructions DCNNG SA PO TTU
Discussion Units 12 Configuration switches Internal settings I II 2 1 MicrophoneSensitivity • Adjusts the sensitivity of the microphone that is connected to the discussion unit between +2dB and -2dB. • To increasethe microphone sensitivity with steps of 0.5 dB, push the > volume button ones. • To decrease the microphone sensitivity with steps of -0.5 dB, push the < volume button. I&U Instructions DCNNG SA PO TTU
Discussion Units 12 Configuration switches Internal settings I II 2 2 Channel/volume restore function • To enable, push the > volume button. The LED around the microphone buttons come on as green. When the unit is enabled, it automatically selects the last known channel and headphone volume. • To disable, push the < volume button. The LED around the left microphone button comes on as red. Automatically channel 0 (floor) and sets the volume to -18 dB after restart system. • Note: When the discussion unit has two sets of volume buttons, configure the channel / volume restore function with the right set of volume buttons. I&U Instructions DCNNG SA PO TTU
Discussion Units 12 Configuration switches Internal settings I II 2 3 Headphones level reduction • To enable push the > volume button. The LED around the microphone buttons come on as green. When the microphone is ON, the headphones level reduction is 18 dB. • To disable push the < volume button. The LED around the left side of the microphone button comes on as red. When the microphone is ON, there is no headphones level reduction. • Note: When the discussion unit has two sets of volume buttons, configure the level reduction function with the right set of volume buttons. I&U Instructions DCNNG SA PO TTU
Discussion Units • 13De-init switch • Erases the address of the delegate unit. • All LEDs on the delegate unit come on when it does not have an address. 13 I&U Instructions DCNNG SA PO TTU
Place and replacements of buttons and Rims I&U Instructions DCNNG SA PO TTU
Locking the unit cables • You can use the cable-to-unit clamps to lock DCN cables to discussion units I&U Instructions DCNNG SA PO TTU
Quick Reference Card Quick Reference DCNNG SA PO TTU
15 16 External contact Concentus unit • 15 Sensitivity potentiometer Adjusts the sensitivity of the microphone that is connected to the delegate unit (+/- 2 dB). • 16 RJ45 socket to connect: • The Intercom Handset LBB 3555/00 • The external channel selector DCN-FCS to reduce the channel selector headphone output level with 18 dB when the delegate unit microphone-LED is on. • External contact on behalf of(Fraud push_ button) or (Finger print reader) operation. I&U Instructions DCNNG SA PO TTU
18 Concentus unit • 18De-init switch • Erases the address of the delegate unit. All LEDs on the delegate unit come on when it does not have an address. I&U Instructions DCNNG SA PO TTU
Concentus unit • S300Channel Restore solder spot • OpenDisabled(default). Start with channel 0. • ClosedEnabled. Start with last know channel. • S302Auto standby solder spot • Open Disabled(default). Channel selector enabled withheadphone connected. • ClosedEnabled. Channel selector also enabled withoutheadphone connected. • S303Level reduction solder spot • OpenDisabled(default). When the mic.LED ring is “on” the headphone signal level is not decreased. • ClosedEnabled. When the mic.LED ring is “on” the headphone signal level is decreased with 18 dB. S300 S302 S303 I&U Instructions DCNNG SA PO TTU
Quick Reference Card Quick Reference DCNNG SA PO TTU
Table Top Units End of section SA PO Menu DCNNG SA PO TTU