Review for Basic Microscope Use in the Laboratory
Review for Basic Microscope Use in the Laboratory. Graduating Senior Competency Assessment. Objectives. Review parts of both compound and dissection microscopes. Know how to focus a microscope and examine a specimen. Understand proper microscope care and handling.

Review for Basic Microscope Use in the Laboratory
E N D
Presentation Transcript
Review for Basic Microscope Use in the Laboratory Graduating Senior Competency Assessment
Objectives • Review parts of both compound and dissection microscopes. • Know how to focus a microscope and examine a specimen. • Understand proper microscope care and handling. • Review basic microscopy concepts and be aware of possible solutions and proper protocol when problems arise. • To test your microscope use proficiency before graduating. You will be tested through both a written as well as a graded “skills” performance test.
Microscopy Terms • Field of view – lighted circular area seen when looking through eyepiece(s). • Working distance – amount of distance between objective lens and slide (or specimen). • Magnification – amount of enlargement of image. • Focus – amount of distance between objective lens and specimen required for image to appear defined and sharp to the human eye. • Parfocal – amount of focus retained when switching from one objective lens to another…the more parfocal the lenses, the less amount of focusing needed when objectives are switched. • Resolution (resolving power) – ability to distinguish two points of an image as separate. Part of clarity of image. • Depth of field – amount of thickness of your specimen that is in focus at a single focal distance of the microscope.
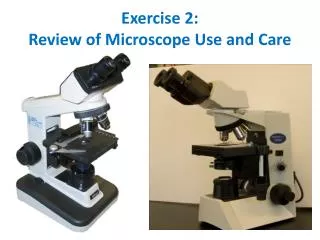
Parts of the Microscopes • In order to use these tools, it is important to know what parts comprise each microscope and the function of each part. • Study the next three slides and make sure you can identify the basic parts of each microscope. Note: our Zeiss compound microscopes are Fixed-Köhler. This basically means that optimal alignment & focusing of the light source has been pre-set from the manufacturer. Only manipulation of amount of light (with diaphragm) or intensity (with light switch) is ever needed.
Parts of the Zeiss Stemi DV4 Dissection Microscope • Front connection thread M50 to adapt front lens systems, ring lamps, and Ø 53mm mount for accessories • Eyepieces 10x20, adjustable for correction of ametropiea, if an, individual interpupillary distance adjustable • Eyecups to protect against unwanted ambient light, fold –over type suitable for spectacle wearers • Carrying handle • Zoom knob to change magnification • Focusing knob to enable focusing of the object • Illumination control panel with three buttons: M to change the illumination mode and +/- to change the illumination intensity • Power-on light, blue • Integrated reflected-light LED illuminator, adjustable • Clamping screw to fix the Stemi DV4 in the C LED stand (SW 3 screwdriver in the stand base • Integrated transmitted-light LED illuminator • Glass plate for placing the specimen (also Ø 84mm insert for stages and transmitted-light/darkfield or contrast/brightfield modules • Wide-range power supply unit (not illustrated)
Function of Microscope Parts • Ocular lens (eyepiece) – portal through which specimen is viewed; also involved in magnification of image (ocular magnification is stamped on side of eyepiece…10X on most scopes). • Objective lenses – involved in amount of magnification of image and resolution; objective magnification is stamped on side of lens (i.e. 4X, 10X, 40X, 100X) with higher power lenses being longer, lower power shorter; lenses may be “dry” (uses air as a medium) or oil immersion (requires use of oil as a medium between lens and coverslip). Oil immersion is used with higher magnification lenses (100X) • Diaphragm – regulates amount of light passing through specimen. • Condenser – focuses light beam passing through specimen. • Light switch – On/off; may be used to adjust intensity of light. • Stage – where specimen is placed; may be mechanical to allow precise movement of specimen. • Coarse & fine focus knobs – used to move the stage (and specimen) vertically to achieve focus with a compound microscope.
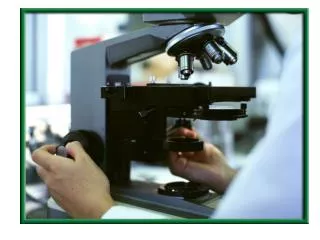
The Microscope • Perhaps one of the most important pieces of equipment used by a biologist. • Treat it with respect and handle it with care. They are expensive tools. • Always carry the microscope with two hands when moving it from place to place. • To prevent internal damage, never scoot a microscope across a surface upon which it is sitting (rubber feet on bottom are meant to prevent this).
The Microscope • Compound microscopes use transmitted light and require specimens to be mounted on slides. Dissection microscopes use either reflected or transmitted light, but specimens don’t have to be mounted on slides. • For compound microscopes, specimens are placed on a glass slide with a cover slip in place. • After use of an oil immersion objective lens, NEVER return a “dry” lens into position to use without first cleaning all of the oil off of the slide and oil immersion objective. Failure to do so contaminates the dry lenses with oil & renders them unusable, possibly permanently.
The Microscope • All microscopes are not made exactly the same, but they should have the same basic components as you saw in the previous microscope figures. You should be able to recognize the basic parts on different models. • You should be able to apply your knowledge about use of a compound microscope to properly use a dissection microscope. Key differences are pointed out in this presentation. • If you have learned how to use our microscopes, you should be able to use any others in future situations or jobs. If you have problems with use of a particular microscope in the future, consult the operator’s manual.
Where to Begin • Carefully remove microscope from storage cabinet and carry with both hands to your table. Make sure not to bump it into any surfaces upon removal or while transporting to table. • Microscope should be gently placed onto table surface in order to prevent any kind of jarring impact that may misalign scope optics and render it unusable. • Remove dust cover. Make sure microscope is placed on table in a position for you to be able to view through eyepiece(s). If it needs to be moved, DO NOT scoot it across the table surface! Pick it up and gently reposition it.
Where to Begin (continued) • Plug in the microscope, turn on the light switch, and adjust the light intensity. Close/open diaphragm about half way to start. • Before placing slide on stage, make sure the low power objective is securely clicked into place. • Use coarse focus knob to create enough distance between objective lens and stage to safely load the slide onto the stage. Make sure coverslip on slide is facing upward. Don’t look through the eyepieces when adjusting the coarse focus knob. Look at the stage.
Where to Begin (continued) • Place slide on stage making sure to properly use slide holders to hold slide in place. Do not let spring-loaded holders flip back quickly against edge of slide or slide may break. • The two knobs of the mechanical stage should then be used to position your specimen over the opening in the stage where light is coming through. • Now adjust coarse focus knob (again viewing from the side) to where objective lens is close to slide, but not touching it. If adjusted too fast, the slide could make contact with the objective lens and break the lens or slide.
Where to Begin (continued) • Make sure you are aware of what direction the stage moves when you move either of the focus knobs. (i.e. when you turn the knob toward you, is there more…or is there less distance between objective and slide?). You need to be aware of this in order to prevent possible damages while operating the microscope. • Adjust interocular distance between eyepieces so that you are comfortably viewing a perfect circular field of view. Do not try to view specimen through only one of the eyepieces! If you “feel” you need to do that in order to view the specimen, you don’t have the interocular distance properly adjusted for your eyes. • Looking through eyepieces, focus on specimen first with a small amount of adjustment with coarse focus, followed by focusing with fine focus to get best focused image.
Where to Begin (continued) • You may need to adjust focus of individual ocular lenses if one eye seems out of focus to the other. Some eyepieces have focusing rings encircling them, which can get out of adjustment and make one eye unfocused compared to the other. • To correct this, first close one eye and focus the other eye by using the focus knobs on the body of the scope to bring the open eye into focus. • Then close the eye on the focused side and open the opposite eye. If the opened eye is unfocused, twist the focus ring on that eyepiece until a crisply focused image is achieved. Now open both eyes and you should see a focused image with both eyes opened at the same time. • If you have done this properly, there should be no need to use the eyepiece focusing rings after this point during this particular viewing session (as long as no one else is using this microscope and has changed your setting). • NOW, you should be ready to start using the microscope.
Using the Microscope • Scan the specimen (notice direction each mechanical stage knob moves stage and compare to viewed specimen…it will be opposite direction) using lowest power objective first. Focus with fine focus and adjust light with diaphragm as needed. • Realize you can focus on any individual plane from top through bottom of your specimen, but only one plane at a time. Make sure you can determine depth orientation of a focused part of a specimen in comparison to other parts (i.e. is a focused part above or below another part in the specimen). • Find an area of interest that you want magnified greater. Move the area of interest of your specimen directly into the center of your field of view and switch to next higher power objective and focus with fine focus knob for a closer look. Use only fine focus knob with higher power objectives in place. • Realize more light is needed as you increase magnification, so adjust diaphragm accordingly.
Using the Microscope (continued) • If you “lose” your specimen in the field of view, always go back to the next lower power objective to relocate your specimen or area of interest and make sure it is centered in the field of view before trying higher power again. • If you still need greater magnification of an area of interest, center that area and rotate the next higher power objective into position (as long as it is a “dry” lens and not oil immersion) and focus with fine focus and adjust amount of light. • If the next higher power objective is an oil lens (look for stamp of “oil” on side of objective), immersion oil is required to be added on top of the cover slip before the oil lens is clicked into position to create a bridge of oil between the lens and cover slip. Always remember, NEVER go from using an oil lens back to a “dry” lens, without first thoroughly cleaning the oil from the slide and oil lens!
How to Finish • After you have finished examining a specimen, the lowest power objective lens must be clicked into position. • Make sure there is enough distance between slide and objective lens to prevent accidental contact while unloading slide from slide holders on stage. • Wipe the stage area clean if any liquid or solid materials remain after removing the slide that was viewed.
How to Finish (continued) • Make sure lenses are clean (see “care of microscope”). • Turn off light switch, THEN unplug electrical cord. • Make sure cord is properly stored on microscope. • Place microscope dust cover over microscope. • Return to proper storage area by carefully carrying it with both hands and making sure not to bump it into anything. • Microscope should be gently placed onto cabinet surface where it is stored in order to prevent any kind of jarring impact that may misalign scope optics and render it unusable.
Cleaning and Care of the Microscope • Always make sure the eyepieces, objectives, and light source are clean before, during, and after use. • Only use Lens Paper to clean these glass surfaces to prevent scratching. • The lenses or eyepieces may easily become dirty especially if many different people use the same microscope. Eye make-up may build up on the lenses or glasses may scratch them. Clean them often.
Cleaning and Care of the Microscope (continued) • If there is no light from light source after turning on light switch and increasing light intensity, the bulb is probably burned out and needs to be replaced. • When the microscope is not in use, it is always good practice to place the dust cover over the instrument to prevent contamination on lenses and other surfaces. • Without daily maintenance a microscope can be very costly to repair.
Microscopy Concepts and Practices You Should Know • Total magnification of a specimen is calculated by multiplying ocular lens magnification by the magnification of the objective lens clicked into position. This informs you how much larger the image you are viewing through the eyepieces is in comparison to the actual size of the specimen being viewed. • When you increase magnification: - field of view decreases - working distance decreases - amount of light needs to be increased - depth of field becomes shallower
Microscopy Concepts and Practices You Should Know (continued) • Image in a compound microscope is inverted (i.e. upside down and backwards) compared to actual specimen on slide. This is due to use of a single objective for both eyes with this type of microscope. Image is 2-dimensional. • Image in a dissection microscope is in the same orientation as the actual specimen. This is due to use of separate objective lenses for each eye to produce a separate image for each. Viewed Image is therefore stereoscopic and 3-dimensional. This type of microscope has only one focus knob (i.e. lacks a separate fine focus knob)
Microscopy Concepts and Practices You Should Know (continued) • Transmitted light is used to illuminate a specimen by passing through the specimen. This is why clearing and/or staining of the specimen may be needed to view, or see details. This type of lighting is used with compound, as well as some dissection microscopes. • Reflected light illuminates a specimen by reflecting off its surface. Angle and intensity of light is important. This type of lighting is used with dissection microscopes.
Microscopy Concepts and Practices You Should Know (continued) • Always start viewing with the lowest power object lens in position because: - gives greatest field of view making it easier to initially scan slide and find specimen - has greatest working distance making it easier to load slide without damaging it or objective • Never use coarse focus knob when a high power objective lens is in position because the coarse knob causes larger amounts of movement when there is an extremely small working distance. This may result in contact between the slide and objective, possibly producing damage.
Microscopy Concepts and Practices You Should Know (continued) • Always directly center a specimen (or area of interest in a specimen) in the middle of the circular field of view before changing to the next higher power objective lens. This is done each time you change to a higher power objective. This will help prevent “loss” of specimen at higher magnification.
Problems: What Should I Do When…? • I turn on the light switch and there is no light? POSSIBLE ANSWER: 1.)Light intensity may be set too low…increase light intensity. 2.)Bulb may be burned out…replace bulb. 3.)Poor electrical contact of bulb or short in electrical cord…repair required. • One eye is in focus and the other is not? POSSIBLE ANSWER: Ocular focus not properly adjusted for out of focus eye of user…twist ocular focus ring on eyepiece to achieve focus.
Problems: What Should I Do When…? (continued) • I don’t see a field of view that forms a complete circle when looking through both eyepieces at the same time? POSSIBLE ANSWER: Interocular distance between eyepieces is not properly adjusted for distance between eyes of user…move eyepieces in or out until a perfect circular field of view is achieved.
Problems: What Should I Do When…? (continued) • I see either a portion of the field of view darkened or no field of view (even though light is obviously turned on and shining)? POSSIBLE ANSWER: 1.)Objective lens is not properly positioned…make sure lens is clicked into position. 2.)Condenser is misaligned and improperly focused (if not fixed Köhler)…align and focus condenser. 3.)Electrical cord is lying across light source…relocate path of cord.
Problems: What Should I Do When…? (continued) • I can’t find my specimen (or area of interest of specimen) after changing to a higher power objective lens to get greater magnification? POSSIBLE ANSWER: 1.)Specimen was not centered in field of view before switching objectives…go back to next lower power objective and properly center specimen directly in middle of field of view. 2.)Lens may be dirty or damaged…clean lens or replace damaged lens.
Problems: What Should I Do When…? (continued) • The image seen with the high “dry” objective lens is extremely distorted (similar to looking at something underwater)? POSSIBLE ANSWER: 1.)Lens has been contaminated with immersion oil from improper use of microscope by another user…remove and carefully and thoroughly clean lens. It is imperative that you do not allow anything to enter open end of objective. 2.)Lens is otherwise dirty or has debris adhering to it…clean lens thoroughly.
Final Thoughts • Now that you have completed this auto-tutorial slide presentation, you will have part of a class meeting set aside to actually practice with the microscopes in lab. • The following week is when we will have the graded “microscope use proficiency test” that is comprised of both written and actual “skills” performance components. • This graded test will count as a portion of your final grade for BIOL 4001 Seminar in Biology. • If you have any questions about this material or use of the microscope, please ask your instructor.