Download
1 / 39
390 likes | 502 Views
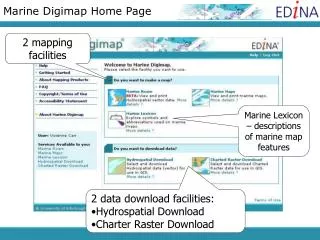
Marine Digimap 17 March 2010 Tom Armitage Vivienne Carr. Objectives. By the end of this session, you will be able to: Create maps on screen Save and print maps Download data Find help within Marine Digimap. Marine Digimap Home Page. Make a map. Marine Lexicon. 2 data download facilities:

E N D
Objectives By the end of this session, you will be able to: • Create maps on screen • Save and print maps • Download data • Find help within Marine Digimap
Marine Digimap Home Page Make a map Marine Lexicon • 2 data download facilities: • Hydrospatial Download • Charter Raster Download
Marine Maps • Maps can be viewed on screen or printed/downloaded at A4. • Source data - maps are created from scanned Admiralty Chart images, covering the UK and the surrounding seas. • The maps are grouped into 6 scale bands; ocean, sea, general, coastal, approaches and harbour (roughly equivalent to the usage bands of Admiralty Charts). • Each scale band features a different set of Admiralty Charts, with features most relevant to the scale. The scanned images are used to build up a mosaic of maps for each scale band. • Scales vary from 1:3.5million to 1:2,500. • These make ideal backdrop maps, but must NOT be used for navigation.
Scale/Usage bands • Ocean - small scale ( 1:3,500,000 to 1:750,000) • Sea - small scale (> 1:750,000 to 1:300,000) • General - small to mid scale (1:200,000 to 1:100,000) • Coastal - mid scale ( 1:100,000 to 1:50,000) • Approaches - mid to large scale ( 1:50,000 to 1:15,000) • Harbour - large scale ( 1:25,000 to 1:2,500)
Marine Maps • Source maps may be at different scales. • In Marine, maps are viewed at same scale so you may find some differences in detail in adjacent areas.
Marine Maps home page • Use the drop down menu to view areas covered by different usage bands. • To search, enter details in a search box or click on the map to go to your area of interest.
Location Map • Shows the wider area around your current area (red square). • Allows you to select and view the coverage of other usage bands, in that area. • Can pan around the location map by clicking and dragging the red square.
Different map views • Switch views by clicking on the icons above the map • Zoom in and out of that view, using the bar to the left of the map
Legend • The legend shows the more commonly found symbols on Marine Maps • More detailed information available from the Marine Lexicon
Map Chest • Maps can be saved in Map Chest • Unique to each user • Maps erased after 5 days • Print from Map Chest as: • PNG format • A4
Exercise • Login • UK Federation Training accounts: • Username: etrain01….etrain25 • Password: Tr0917 • Select Marine Maps • Search for North Berwick • Practise: • Viewing map coverage • Switch view, re-centre, zoom in and out • Saving and Printing
Marine Download services: • Charted Raster Download • Hydrospatial Download
Charted Raster data • Used in the Marine Maps facility. • Scanned Admiralty Charts covering the UK and the surrounding seas from 1:3.5million to 1:2,500. • The data is supplied as GeoTiff images, ready for use in a GIS. • Each map has its own projection, referenced to the Horizontal WGS84 Datum. • These data make ideal backdrop maps, but must NOT be used for navigation
Hydrospatial Data • This is a vector data product from SeaZone, designed for use in a GIS. • Available in 2 formats: • Shapefile (for ArcGIS) • MapInfo Tab • The data is collected at various scales, the best available for each source. • As vector data it is scale free when displayed. • The data is projected in WGS84 not British National Grid. • 7 data Topics are available.
Hydrospatial Data 7 Topics: • Bathymetry & Elevation (BE) • Socio-Economic & Marine Use (SE) • Conservation & Environment (CE) • Natural & Physical Features (NP) • Structures & Obstructions (SO) • Climate & Oceanography (CO) • Metafeatures & Cartography (MC)
Hydrospatial Data • Each Topic has layers of detail. • Depending on the area selected for download, they may not all be available. • Example: • Structures and Obstructions • Navigation Aides • Obstructions • Offshore Installations • Shoreline Constructions • Wrecks
Exercise • Download the Structures and Obstructions Topic, in ESRI Shape file format. • Take the Wrecks layer only. • Tile numbers: • NW24800060 • NW25000060 • Search using the tile names or click on the map around the Lizard in Cornwall. • Download the data to a suitable place. • Unzip the data.zip file to extract the files.
Your wrecks data Need all 4 files for Shape files to work – DBF, PRJ, SHP, SHX
Viewing your data Steps: • Open ArcGIS • Add the Wrecks data you downloaded earlier (Shape files) • Unzip the OS raster data • Add the OS raster data – provided by EDINA • Change the Data frame properties to British National Grid: View > Data Frame properties > Coordinate System > Predefined > Projected Coordinate System • Open the attribute table of your Wrecks data
Onward use of data Hydrospatial data: • Older versions of ArcGIS not supported. Can’t guarantee data will work in ArcView 3.x • Shape files, no need to convert • All of the files provided with Shape files must be kept in the same folder • For correct data display, need to download and install 2 folders: • fonts.zip • style.zip • both available in Help > Using data with ArcGIS
Onward use of data Charted raster data: • GeoTIFF files with georeferencing encoded within them n.b. ArcGIS 9.0 and 9.1 need the latest service packs installed to georeference TIFF images
Step 1: Search for location • Select the Scale bands of interest • use the coverage map to see which bands are available for your area • bands deselected can be added back in when choosing maps • Search using one of the options • Select your location from the list of results, if applicable
Step 2: Select maps • Choose the maps you want from the list or click on the map • Use the zoom and scale bands to see larger or smaller maps in the area • Click Continue
Step 3: Make settings • Option to take other sections of Multiple part maps • Previews of all maps available • Archiving and compression • Extra box to tick to confirm you are aware that charts are NOT for navigation • Click Extract Data
Step 4: Downloading • Click the link to go to the download page • Use your browser's ‘Save link as..’ or ‘Save target as..’ option
Hydrospatial Download • Hydrospatial download process: • Identify product / format • Search for your location • Select the required data • Make download settings • Download data
Step 1: Product/format • Select product/topic • Choose data format • Click Continue
Step 2: Search for location • Select a search method and input search terms • Choose a result from the list generated, where applicable
Step 3: Select data tiles • Choose the tiles you want from the list or map • Choose the required layers • Click Save layer selection • Click continue
Step 4: Make settings • Archiving and compression • Large numbers of component files mean no individual file downloads • Click Extract data
Step 5: Downloading • Use your browser's ‘Save link as..’ or ‘Save target as..’ option • Click the link to go to the download page