Download
1 / 20
200 likes | 293 Views
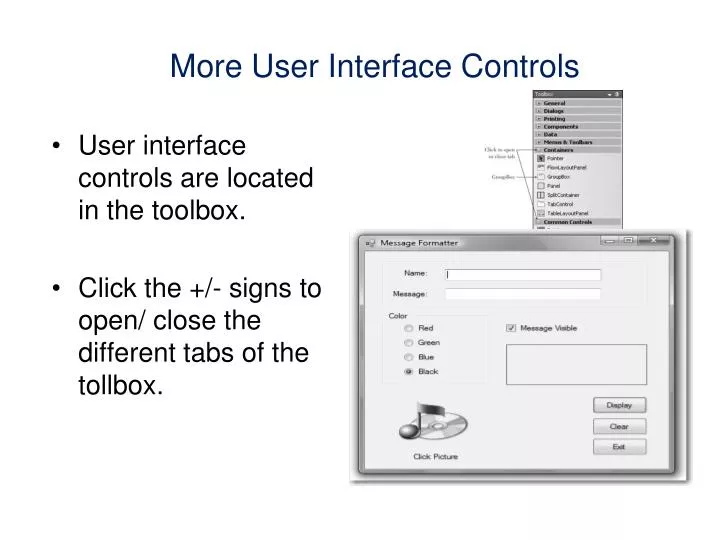
More User Interface Controls. User interface controls are located in the toolbox. Click the +/- signs to open/ close the different tabs of the tollbox. Text Boxes/ Rich Text Boxes. Allow for user input Text property indicates what is displayed or entered

E N D
More User Interface Controls • User interface controls are located in the toolbox. • Click the +/- signs to open/ close the different tabs of the tollbox.
Text Boxes/ Rich Text Boxes • Allow for user input • Text property indicates what is displayed or entered MessageTextBox.Text = “Bazinga!” • TextAlignpropertycontrols the layout MessageTextBox.TextAlign = HorizontalAlignmentLeft • Other useful properties: WordWrap, MultiLine, and BorderStyle
Masked Text Boxes • A specialized form of the text box that restricts user input to conform to a mask. • Mask is chosen from the Input Mask dialog box • Users cannot enter characters that do not conform to the mask.
Group Boxes • Used as a container for other controls such as radio buttons and check boxes • Improves readability of form by separating the controls into logical groups • Text property indicates the words that appear along the top edge of the box.
Check Boxes • Allow the user to select or deselect one or more items • Checked property can be set at design time or run time to either True or False For example: • Use the Text property for the text you want to appear next to the box. PizzaCheckBox.Checked=False
Radio Buttons • User may select onlyone in any group. • First create a group box and then create each radio button inside the group box. • Checked property has values of True or False which can be set at design time or runtime For example: • Text property • What is displayed next to the radio button RedRadioButton.Checked=True
Picture Boxes • Displays/contains an image • Image property • Complete path and filename of graphic; images should be added to a project’s resources • Allowed image types: .bmp, .gif, .jpg, .jpeg, .png, .ico, .emf, .wmf LogoPictureBox.Image = My.Resources.CompanyLogo • SizeMode property • StretchImage causes picture to be resized to match the size of the control • Visible property which can be set to False to make the picture disappear
Selecting Multiple Controls Shift-Click or Ctrl-Click to select/deselect multiple controls. To deselect all selected controls, click elsewhere on the form. • Use the mouse to drag a selection box around multiple controls. • When multiple controls are • selected, each has resizing • handles (if resizable).
Working With Multiple Controls • Drag a group of selected controls to move the entire group to a new location at one time • Set common properties of multiple controls • Use Format Menu or Layout Toolbar to • Align controls to each other • Make controls the same size • Modify the spacing between controls
Designing the User Interface • The design of the screen should be easy to understand and “comfortable” for the user. The best way to accomplish these goals is to follow industry standards for the color, size, and placement of controls. • To the user, the interface should be • Familiar • Comfortable • Organized— use group controls • Sans Serif fonts work best (no boldface or large) • Gray is a neutral color that works well • Keyboard Accessible
Text=&OK Text=E&xit Keyboard Access Keys (Hot Keys) • Many people prefer to use the keyboard, rather than a mouse, for many operations. • Denoted by an underlined letter • User presses Alt + underlined letter • Defined using Text property with & preceding access key
Setting the Tab Order of Controls • One control on a form always has the focus • Not all control types receive focus. • Text boxes, buttons — have focus • Picture boxes ,labels — no focus • TabStop property is applicable only for controls that are capable of receiving the focus. • Designates whether a control is allowed to receive the focus: set to True or False • TabIndex property determines the order the focus moves as the Tab key is pressed.
Setting the Form’s Screen Location • The StartPosition property determines where the form initially appears on the screen. • For example, use a value of CenterScreen to make the form appear centered in the window.
ToolTips • Tooltips are small labels that are displayed when the user pauses the mouse pointer over a control • Drag a ToolTip Control to the form. • The new control appears in a new pane, the Component Tray, which opens at the bottom of the Form Designer. • After you add the component to your form, each of the form’s controls has a new property. • Select the ToolTip on ToolTip1 property of each control and add the text of the tip.
Clearing Text Boxes and Labels • Text boxes and labels can be cleared several different ways. • The following clears NameTextBox in three different ways: NameTextBox.Text = "" NameTextBox.Clear() NameTextBox.Text = String.Empty
Changing the Color of Text • PropertiesForeColor and BackColor change the foreground and background colors of text. • VB color constants are available from the Color Class For example: To view the full color list, type the class Color and a period in the editor. • May be set at either design time or run time. For example: Color.AliceBlue Color.AntiqueWhite Color.Blue NameTextBox.ForeColor=Color.Red
Changing Multiple Properties of a Control • Sometimes you will want to change several properties of a single control. • Previous to Version 4, the entire name (Object.Property) for each statement had to be written. For example” TitleTextBox.Visible = True TitleTextBox.ForeColor = Color.White TitleTextBox.Focus() • Now, you can use the With and End With statements: • This runs more efficiently than the longhand version. With TitleTextBox .Visible=True .ForeColor=Color.White .Focus( ) End With
String Concatenation • Concatenation is connecting text strings together. • Use an ampersand (&) to connect the strings. For example: • Always make sure there’s whitespace surrounding the &. FullLabel.Text = FirstLabel.Text & LastLabel.Text
Continuing Long Program Lines • Normally, one VB statement is written as one line of code. But sometimes the lines of code get very long. • The Line Continuation Character (_), lets you continue a line of code on another line. For example, • If you break up a line of code at a string concatenation character (&), implicit continuation is permitted. x = 1 + 2 + 3 + 4 + 5 + _ 6 + 7 + 8 + 9 + 10 GreetingsLabel.Text="Greetings " & NameTextBox.Text & ":" & "You have been selected to win a free prize. "