Work Orders
Work Orders. Throughout this slide show there will be hyperlinks (highlighted in blue ). F ollow the hyperlinks to navigate to the specified Topic or Figure. Hyperlinks will only work when being viewed in a slide show. Work Orders. Creating Inbound Work Orders Creating Outbound Work Orders


Work Orders
E N D
Presentation Transcript
Work Orders Throughout this slide show there will be hyperlinks (highlighted in blue). Follow the hyperlinks to navigate to the specified Topic or Figure. Hyperlinks will only work when being viewed in a slide show.
Work Orders Creating Inbound Work Orders Creating Outbound Work Orders Processing Work Orders Shopping Cart (Work Orders for all customers) Work Order Tab Information
Creating Inbound Work Orders • Select a customer (FIG 1) • Click on the Work Order tab • Click on the White page icon (top left on the tool bar) to create a new Work Order • In the detail portion of the work order, use the Browse button to change it from Outbound to Inbound • Click on the Save Icon in the toolbar when finished • Click on the Line Items tab (FIG 2) • Click on the Add Line Items button • The Inbound Work Order Line Item window will pop up (FIG 3) • This will give you the option to add tag numbers, articles, or generic Line Items • A Work Order cannot have a mixture of Tag Numbers, Articles or Generic Line Items on it. You will have to have separate Work Orders for Tag Numbers, Articles, and Generic Line Items • Inbound Work Orders are great if you know what you are receiving before it gets to the warehouse. You can create an Inbound Work Order so the Warehouse can scan the pieces in as they come into the Warehouse • Inbound Work Orders will be highlighted in a light blue, that way you can always tell the difference.
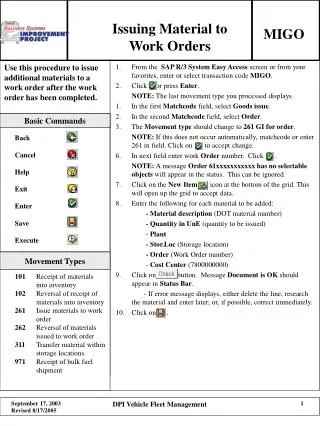
Creating Outbound Work Orders There are 2 ways to create Outbound Work Orders The First way: • Select a customer (FIG 4) • Click on the Inventory tab • Select a piece of inventory • Right Click on the inventory piece • A menu will pop up • You will have many options, one of which is to add that piece of inventory to a new or existing Work Order. • Select which option applies to your current task • You will be asked to “Add All” or you can select the quantity you would like to add to the Work Order (FIG 5) • If you created a new Work Order you can find it under the Work Order tab • If you selected “Add to an Existing Work Order,” you will receive a message that gives you the option to browse to the Work Order (FIG 6) • If you would like to select multiple pieces to add to a work order, you can do so by using the Shift key or the Ctrl key.
Creating Outbound Work Orders cont. The Second Way: • Select a customer, click on the Work Order tab, click on the White page icon (top left on the tool bar) to create a new Work Order (FIG 7) • Fill out any information for the Work Order (priority, assigned by, bill of lading etc..) • Click on the line items tab (FIG 8) • Click on the Add Line Items button • The Work Order Line Item Query box will appear • Click on the browse button next to “select filter criteria” • Select a field that you would like to use to filter • Click on the browse button under the “select filter criteria” (FIG 9) • Select a value to filter from, click on the OK button once the value is selected • Once you are finished entering the filter criteria, click on the + sign to the left of line item (FIG 10) • This will add a new line, on the new line double click in the quantity requested box and enter the quantity of the piece that you would like to add to the work order (this can not be larger than the quantity available) (FIG 11) • Once you have entered the quantity requested, click out of that box. (If you don’t, the ADD button will be grayed out) • Click on the Add button to add the piece to the work order • Click on the Close button when finished • If you follow all of the steps above, the line item should be attached to the work order when you close out of the Work Order Line Item Query box (FIG 12)
Processing Work Orders There are ways to process Work Orders: The First way • Scanning the inventory piece out against the Work Order The Second way • Manually processing the Work Order by Line Item • Select a Work Order to process (FIG 13) • Click in the quantity processed box for that line item and enter the quantity requested • Click TAB • This will open the Line Item Inventory Processing window (FIG 14) • Enter the Location Out information • Click OK when finished • If you click Close, the Work Order will still process, but the inventory will not come out of inventory The Third way • Process the entire Work Order without having to go line by line • Select a Work Order to process (FIG 15) • Right Click on the Work Order • Select ”Process Selected Work Order” • Enter Location Out Information (FIG 16) • Click OK when finished, and the Work Order will process
Shopping Cart The Shopping Cart is a way to look at Work Orders for all customers, so you don’t have to go into each customer to view their Work Orders. • Click on the Shopping Cart Icon on the toolbar (FIG 17) • You can change the Types of Work Orders you would like to view • To open a Work Order, double click on it. This will open the Work Order in the Customer window.
Work Order Tab Breakdown • Details tab • Line Items tab • Report Fields tab • Requested By tab • Delivered To tab • Service Codes tab • Comments/Instructions tab
Select a customer Right click on an inventory piece This is where you can select “Add Selected Inventory To New Work Order” or “Add Selected Inventory To Existing Work Order” Back to Outbound Work Orders
After you either Add to a New Work Order or Add to an Existing Work Order, you will be asked to Add All Inventory, or you can add a specific quantity. Click OK when finished Back to Outbound Work Orders
If you are adding inventory to an existing work order, you will be asked which work order. Check the display box, if that is not the correct work order number, then click on the Browse icon and select the correct one. Click OK when finished. Browse Back to Outbound Work Orders
Select a customer Add New Work Order tab Customer Icon Work Orders Back to Outbound Work Orders cont.
Select the field that you want to search by Line Item Tab Add Line Item Button Click on the browse button to select the field that you want to search by Back to Outbound Work Orders cont.
Select the value of your search Click ok once you have selected the value of your search Click on the browse button to select the value of the field you would like to select from Click Find when finished If you would like to filter by multiple items, keep adding filters Back to Outbound Work Orders cont.
This is the Quantity Available for you to take out Once you click Find, the pieces that fit your filter criteria will populate here In order to put the piece onto a work order, click the + sign Back to Outbound Work Orders cont.
Once you have entered the quantity requested, the quantity available will change accordingly Double Click here, and enter the quantity that you want to add to your work order (cannot be greater than the quantity available). Once you have entered the quantity requested, click out of that box. (If you don’t do this, the ADD button will be grayed out.) Click add for it to add to the work order Close the window when finished Back to Outbound Work Orders cont.
Here is the line item that was just added to the work order Back to Outbound Work Orders cont.
Select a Customer Save Work Order tab Add New Use the Browse and change to Inbound Back To Inbound Work Orders
Click on the Line Items tab Click on Add Line Item Back To Inbound Work Orders
Insert the Tag Number Use the Browse key to browse through articles Select Generic, and Enter a Line Item Quantity Click on OK when finished Back To Inbound Work Orders
Select a Work Order, Double Click to open it Shopping Cart Icon Select the types of Work Orders you would like to View Back to Shopping Cart
Select a Work Order to process Double Click in the Quantity Processed, enter the Quantity Requested and hit the TAB key. (Please note, you cannot hit enter. Only tab. Back to Processing Work Orders
Important: If you click Close, it will process the work order, but it will not take the pieces out of inventory Select Move or Out Enter your Location Out Information Click ok when finished Back to Processing Work Orders
Select a Work Order and Right click on it Click on Process Selected Work Order Back to Processing Work Orders
Enter Location Out information Click OK when finished and the Work Order will process Back to Processing Work Orders
Who this Work Order was taken by This box must be checked in order for it to download it to the scanner Work Order tab Change the View, you can select to view open Work Orders, Closed Work Orders or Open and Closed Work Orders Use the Browse to select the shipping priority (you can add to this list in Global) Details tab Bill of Lading # Browse to select the type of Work Order Work Order number Dates and Times that the Work Order was created, completed, printed, and submitted Browse to select a different Warehouse You can assign an employee to the Work Order. Use the Browse key to select an employee. (You can add employees to this list in Global.) Click on Add. The employee name should appear to the right of the Assign Employee browse key. Print Work Order Back to Work Order tab
Line Items tab Line Items Anytime any changes are made to Line Items you must Click Save Line Items Add Line Items Button Undo Line Items Button Delete Line Item from the Work Order (you must click on Save Line Items after deleting anything) Back to Work Order tab
Report Fields tab All of the fields that you can have displayed on the Work Order Use the drop down to Sort by Qty, or Sort by First in Articles can be in multiple locations, so you can tell Windfall how many locations you would like to view the pieces in Back to Work Order tab
Requested By tab Use the Browse to attach a Cost Center Code Enter the date/time, Name and Phone number of who and when the the Work Order was requested Back to Work Order tab
Delivered To tab Use the Browse to select Frequently used Delivery addresses (You can add to this list in the customer\configuration\other) Delivery Date\Time information If this customer is not set up in the Delivery info list, then enter their information here Back to Work Order tab
Service Code tab Add or Take service codes off of the Work Order (You can Add Service Codes to this list in Global) Service Codes that are attached to the Work Order Back to Work Order tab
Enter any Comments or Instructions that you would like to appear on the Work Order here Back to Work Order tab
If you have any questions you can contact the support team at 314-925-1547 or you can email us at support@assetcontrols.com You can visit us at http://www.windfallonline.com/customer/