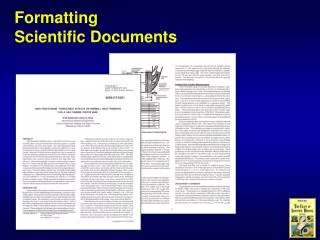
Formatting Documents
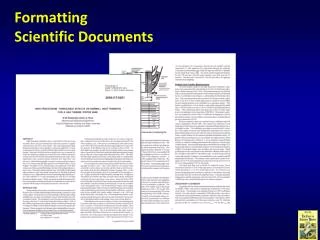
Formatting Documents. Chapter 3. Formatting a Document. The formatting applied to a document can affect: How the reader interprets the document How easily the document is read The overall impression of the document Proper formatting is crucial in creating a professional-looking document.


Formatting Documents
E N D
Presentation Transcript
Formatting Documents Chapter 3
Formatting a Document • The formatting applied to a document can affect: • How the reader interprets the document • How easily the document is read • The overall impression of the document • Proper formatting is crucial in creating a professional-looking document
Margins • Margins • White space around the text on a page • Affects the amount of text that a page can contain • Smaller margins leave more room for text • To change the margins • Click Page Layout ⇒ Margins ⇒ Custom Margins
Indenting Paragraphs • Indents • Decrease the width of lines of text in a paragraph • Often used to set off paragraphs such as a quotation • Page Layout ⇒ Indent Left and Page Layout ⇒ Indent Right • Can also set by dragging markers on the ruler
Practice: Training • Complete page 77-78
Space Before and After a Paragraph • Space between paragraphs makes the text easier to read and helps distinguish where paragraphs begin and end. • The default formatting for a paragraph is no space before (above) the paragraph and 10 points of space after (below) the paragraph. • To change space before or after a paragraph • Page Layout ⇒ Before and Page Layout ⇒ After
Line Spacing • Line spacing • Default is 1.15 lines of space • Double space adds more space between lines of text • Click Home ⇒ Line and Paragraph Spacing
Practice: Training • Complete page 80
Tab and Tab Stops • Tabs • Used to position text within a line • Align text into columns of data • Tab Stop • Specifies a location within the line of text • Default is every half inch • To display the Tabs dialog box • Double-click a tab stop on the ruler • In the dialog box type the Tab Stop Position • Select the appropriate Alignment and then select Set • Repeat this process to create as many tab stops as needed
Selecting a Vertical Block of Text • Select Vertical Text • Hold Down ALT key and drag mouse downward
Practice: Training • Complete pages 82-83
Hanging and First Line Indents • Hanging Indent • The first line is farther left than the rest of the paragraph • Used for lists, outlines, or bibliography pages • Click the Paragraph group Dialog Box Launcher ⇒ Indents and Spacing tab ⇒ Hanging ⇒ type indent amount in the By box • First Line Indent • The first line is farther right than the rest of the paragraph
Bulleted and Numbered Lists • Bulleted List • Each item is a separate paragraph formatted with a hanging indent • Select the items in the list • Home ⇒ Bullets • Used when each item is equally important • Numbered Lists • Show a priority of importance • Select the paragraphs in the list • Home ⇒ Numbering • Increasing Indents • To increase the indent of the bullets or numbers • Click Home ⇒ Increase Indent button
Practice: Training • Complete pages 86-87
Headers and Footers • Header • An area at the top of a page • Insert ⇒ Header • Footer • An area at the bottom of a page • Insert ⇒ Footer • Printed on each page of the document
Adding Times, Dates, and Page Numbers • To add a page number at the insertion point • Design ⇒ Page Number ⇒ Current Position • If header or footer not yet created • Insert ⇒ Page Number ⇒ Top of Page/Bottom of Page/Page Margins • Date & Time • Insert ⇒ Date & Time • Select Update automatically check box
Adding and Editing Graphics • Add a graphic or picture • Insert ⇒ Picture • Then apply format as needed (i.e. Center, etc.) • When inserted a Format tab is added to the Ribbon
Screenshots and OpenType Ligatures • Screenshot • Insert ⇒ Screenshot • OpenType • Scalable font format that was developed by Microsoft and Adobe • Two or more letters combined into one character • Right-click the selected text and select Font • Select the Advanced tab and then select Standard Only in the Ligatures box
Practice: Training • Complete pages 93-94
Pagination • Pagination • How a document is divided into pages • To change insert a page break • CTRL + Enter • Insert ⇒ Page Break
Creating Footnotes and Endnotes • Footnotes • Included in research papers to cite sources • Place the insertion point in the text where the footnote number should appear • References ⇒ Insert Footnote • Endnotes • Appear on the last page of a document • Common method of references for a research paper • Place the insertion point in the text where the endnote number should appear • References ⇒ Insert Endnote
Practice: Training • Complete pages 95-96
Templates • Template • Master document that includes the basic elements for particular types of documents • To create a template • Type and format text in a new document • Select File ⇒ Save As to display a dialog box • Type the file name and select Word Template in the Save As Type list • Click Save • To create a document using a template • File ⇒ New ⇒ My templates
Practice: Generic Memo • Complete pages 97-99
Creating an HTML file • HTML • Hypertext Markup Language • File format for documents viewed using a browser • More versatile because Word is not needed to view it • File ⇒ Save As and then select Web page type in the Save as type list • Click the Change Title button to give the Web page a descriptive title
Creating a PDF Document • PDF • Portable Document Format • Preserves document formatting • File ⇒ Save As ⇒ select PDF in the Save As Type list
Practice: Contini Picnic • Complete pages 100-101
Assignment • Exercise 16 page 114