Download
1 / 32
320 likes | 398 Views
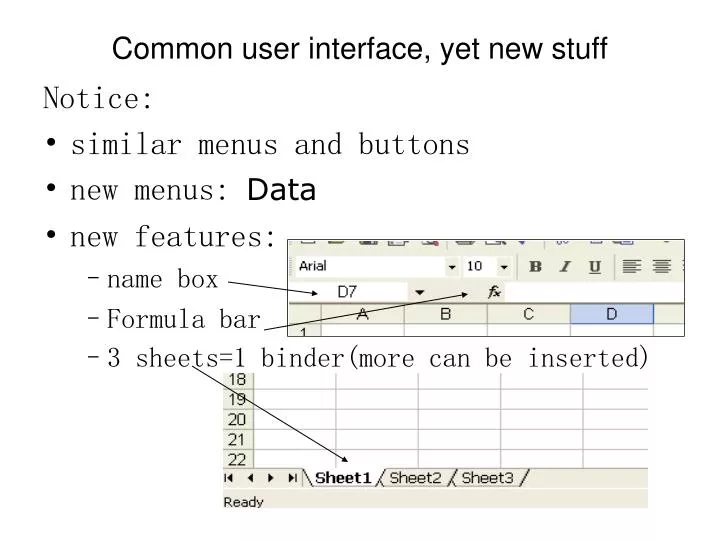
Common user interface, yet new stuff. Notice: similar menus and buttons new menus: Data new features: name box Formula bar 3 sheets=1 binder(more can be inserted). New buttons. New buttons: … The fx button is next to the formula bar. It contains pre-defined functions for formulas.

E N D
Common user interface, yet new stuff Notice: • similar menus and buttons • new menus: Data • new features: • name box • Formula bar • 3 sheets=1 binder(more can be inserted)
New buttons • New buttons: … • The fx button is next to the formula bar. It contains pre-defined functions for formulas.
Excel View & settings 1/3 Tools Customize Try: Investigate the options: • buttons on 1 or 2 rows • show full menu
Excel View & settings 2/3 You can control how things look in the ViewMenu try: Click on and off: • a new toolbar, • the Status bar, • the formula bar, • the task pane
Excel View & settings 3/3 Tools Options Here you can change many functions controlling how the Excel program acts. Try: • Press <ENTER> several times and notice direction of move. • Click Tools Options • Click on tab called Edit and try changing the option called “Move selection after <ENTER>”. Change the direction to the right. • Click on another tab and see what you discover. Change something, test it out. You may want to change it back if you don’t like it.
Moving around… • Recall, in the Excel grid: • columns go up and down, • rows go across • To move around: try • <enter> key • <tab> key • scroll and click • the arrow keys
Editing in Excel 1/8 • Cell name = cell reference • The cell reference for the cell containing “4” is B1. When typing cell references, you can type them lowercase. (ex. b1) • Active cell has border around it (C1).
In the next slide… • Focus only on the blue part
Editing in Excel 2/8 • To enter info (or replace info) • Click on cell • Type • Press <enter> • To edit • Dbl-click in cell • Edit • Press <enter> • To delete • Click in cell • Press DELETE key.
Editing Exercise 3/8 Try: Type the following into the cells pictured: 2, 4, =a1+b1, Joe. • Replace Joe with Vanna (click and type and <ENTER>)
Editing in Excel 4/8 • To enter info (or replace info) • Click on cell • Type • Press <enter> • To edit • Dbl-click in cell • Edit • Press <enter> • To delete • Click in cell • Press DELETE key.
Editing in Excel 5/8 • Note you can also edit from the Formula bar. Click the green check or press <enter> afterward
Editing Exercise 6/8 Try: • Edit Vanna into Evanna • Edit Evanna into Evanna Jones • Edit =a1+b1 into =a1+b1*4
Editing in Excel 7/8 • To enter info (or replace info) • Click on cell • Type • Press <enter> • To edit • Dbl-click in cell • Edit • Press <enter> • To delete • Click in cell • Press DELETE key.
Exercise: Insert & Delete columns and rows 8/8 Try: • Delete all entries of your previous practice and type the enter the following: • Click File Tab, Save as: Excel Practice to U: or USB: drive
In the next slide… • Focus only on the blue part
To Delete or Insert a row (or column) To Delete a row: • Click on row (or column) • On Home Tab, in Cells group, click the down arrow next to Delete, select: • Delete Sheet Rows (or Delete Sheet Columns) To Insert a row: • The Row you click on moves down. (Column moves to right) • On Home Tab, in Cells group, click the down arrow next to Insert, select: • Insert Sheet Rows (or Insert Sheet Columns)
Exercise: delete row Try: • Delete the “Tom” row. Beforeafter
To Delete or Insert a row (or column) To Delete a row: • Click on row (or column) • On Home Tab, in Cells group, click the down arrow next to Delete, select: • Delete Sheet Rows (or Delete Sheet Columns) To Insert a row: • The Row you click on moves down. (Column moves to right) • On Home Tab, in Cells group, click the down arrow next to Insert, select: • Insert Sheet Rows (or Insert Sheet Columns)
Exercise: insert row • Insert an “Oscar 85, 90” row in between Joe and Mary.(Save your work: Click Save button) Beforeafter
Set up page and print preview Print Preview: • Click File Tab, Print (print preview is at the right) • Or add icon to your Quick Access Toolbar.
Set up page and print preview • Set up page in Page Layout Tab • In Page Setup group, change page Orientation. • In Sheet Options group, • check box to print gridlines • check box to print headings • (FYI – more settings if you launch dialog box in Page Setup group)
Set up page and print preview Try: Use Print Preview to preview “before” and “after” making the following changes: • In Page Layout, change page orientation to landscape • In Page Layout, check boxes to print gridlines, and to print headings.
Insert Header/footer Try: Add a header: • Click Insert Tab, click Header & Footer icon. • Click in the left header area • In the Header & Footer elements group, click File Name icon • In center of header, type your name. • Click outside header, in spreadsheet area to get out of the header. • At bottom right, click Normal View button.
Save, close and new Try: • Click the Save Button. • Click File Tab, Close to close the spreadsheet file only, not the program. • Click File Tab, New. Double click “Blank worksheet” for a new spreadsheet. • Click File Tab, Save As and save as Formula Practiceto U: or USB
Formula Notes • Always type an = (equals sign) first. See example below • Use constants - ex. 7 • cell references - ex. b2 • operations: +, -, /, * (* is multiply) • predefined functions - ex. =sum(a1:a5) • What If: If you change a # that is used in a formula, the formula recalculates. • An example: =8*c3*c4
Formula exercise 1/3 • Retype 2, 4, and =a1+b1 into a1, b1 and c1. • Click back on the cell c1 to see the formula in the formula bar. Its value is in cell.
Formula exercise 2/3 • Replace the 2 with a 7 in a1.Observe the automatic recalculation. • Type in cell d1: =a1*b1 • Click back on the cell to see the formula in the formula bar. Its value is in cell. • Type in celle1: =a1*10. • Repeat step 3. • Type in cell f1: =sum(a1:b1). • Repeat step 3. • Save.
Formula exercise 3/3 • Enter 3 more small numbers into column A, in a2, a3 and a4. • Enter 3 more small numbers into column B, in b2, b3 and b4. • Save.
Ctrl + ~ shows formulas • Hold down the ctrl key and then tap the ~ key (its above <tab>) to get formulas to show. Do again to hide formulas. • Narrow the columns by dragging on their borders inside the gray column headings. Try: Show the formulas, adjust columns. Then hide formulas. Save.
Copying cells • Refer now to the Copying Cells handout and practice copying the formulas in C1, D1, E1, and F1 down into the rows below them using 2 methods: • copy/paste • drag fill handle The end