Download
1 / 15
150 likes | 611 Views
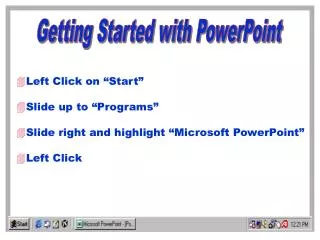
Getting Started with PowerPoint Left Click on “Start” Slide up to “Programs” Slide right and highlight “Microsoft PowerPoint” Left Click Click Here to open a previously saved presentation

E N D
Getting Started with PowerPoint • Left Click on “Start” • Slide up to “Programs” • Slide right and highlight “Microsoft PowerPoint” • Left Click
Click Here to open a previously saved presentation Click Here to start a new blank presentation file Click Here to use a preformatted template Click Here to get Step-by-Step help with your presentation
Choosing an AutoLayout Left click on a slide layout that reflects your needs. When you click on a layout a description appears here. Choosing a Blank (bottom right) is the most frequent choice.
Adding New Elements to Your Presentation To add new elements to your show, click on Insert at the top of the window, slide to the object you want to add and left click. To add another slide to your show, go to “New Slide” To add a copy of a slide you, go to “Duplicate Slide” To add text to the slide, go to “Text Box” Go to “Picture” to add clipart, saved picture files, Autoshapes, charts, or Wordart. Saving Internet Pictures: Get on the net. Place the mouse cursor over the picture you want to save. Right click, select Save Picture As, name the file, and save. Now, you can insert it in your PowerPoint show. You may also just Edit, Copy, and Edit, Paste in your slide.
Use "Format" to Change Fonts, Backgrounds, Etc. Select the object by left clicking on it once. Then, left click “Format” at the top of the window. Slide to the appropriate option: Font, Line Spacing, Text Box, etc. and left click. Make your changes and click “OK” Another way to make changes to an object is to select the object with a single left click. Then right click once. This brings up an menu of options for that object. Select one and away you go.
Adding Animation to Your Slide • Select any object by left clicking on it. • Leaving the cursor on the selected object, right click. • Slide to Custom Animation and left click. • This will open the Animation Menu.
Using the Effects Tab • In the top left corner of the menu, put a check mark next to the objects you want to animate. The order you click them in will be their animation order. Animation order can be changed later. • Select the Entry animation and sound for each object as you checkmark it (go to Other Sound to add your own file. • Don’t Dim will show the • object for as long as the • slide is on display in your • show . • Hide on next mouse click • will take the object off the • slide on the next mouse • Click in your show. • Hide after animation will • make the object disappear • after its animation effect is • finished. • Introduce text options allow you to bring in text by the letter, the word, or, if you click Grouped by, by the line.
Order & Timing Tab • To change an object’s animation order, highlight the object in the Animation Order window found in the bottom left corner of the menu and click the up or down arrow to the right. • Select how you want • to start an object’s • animation by going • to the Start Animation • area to the right. • On mouse click • animates the object • when you click the • mouse. This gives • you total control of • your presentation. • Automatically allows you to time the start of the object’s animation. This setting can be a problem if your presentation is interrupted for some reason.
Multimedia Settings Tab Use this tab to choose the play options for your sound files, especially longer music and sound files. Pause slide show stops the show until your sound file stops playing. Continue slide show allows you to keep moving through your presentation while the sound plays. Stop playing allows you to stop a sound file after a selected slide. More Options lets you loop a sound file to play throughout your entire presentation.
Working with the Whole Show! Left lick on a slide number to Work on it. To move a slide, left click, hold, and slide to a new position. To delete a slide, left click and hit the Delete key. Click Slide view to work on one slide. Click Slide Sorter view to see all your slides. Click Slide Show to see a slide in action.
Setting the Animation Options for Your Entire Show • Go to Slide Sorter View. • To add a transition between all of the slides in your presentation, click on the “there’s more” arrow to the right of No Transition and make your selection. • If you want to do some custom • timing settings for your • presentation, click on the • Rehearse timings icon. • This will let you click through • your show timing each event • as you go. You may then • save this timing setting and • apply it to your show. Your • show will then play • automatically using the exact • timings you set. 2. Select a transition 1. Select Slide Sorter View 3. Rehearse Timings
What Do all those Icons Do? Highlight your text to Change the font. Click here to bullet Your text. Highlight your text to Change the font size. Highlight your text to left justify, center, or right justify. Highlight your text to Bold, italic, underline, shadow. To Add WordArt, Click Here To Change the Color of an Object, Click Here To Change the Color of a Line, Click Here To Add a text box, Click Here To Change Font Color, Click here To Add Circles, Rectangles, Lines, Arrows, or Shapes, Click Here To Change Line or Arrow Styles, Click Here To Add a Shadow, Click Here To Add 3D to an Object
Saving Your Presentation To save a new presentation: Click on File, slide to Save, and left click. Name your file and click Save in the window. To save a previously Saved file: Click on File, slide to Save, and left click. To take a show with you: Click on File, then Pack and Go To save a show that will play on any computer: Click File, Save As, and select PowerPoint Show under Save as Type To exit the program: Click on File, slide to Exit, and left click.
Computer Basics Mouse Tips: Use the left mouse button to select objects, highlight text, resize objects, and execute commands. Use the right mouse button to bring up options menus. (To do this, select the object with a left click and then right click to see the options menu.) Moving an Object: Select the object with a left click. Move the mouse cursor over the object. When it turns into a 4-way arrow, hold down the left mouse button and drag the object to its new position. Resizing Tips: Use the corner “handles” (handles are the small boxes that appear on a selected object) to maintain perfect proportion. Use the middle handles to lengthen or widen or to smash or stretch.
Power Point Tips Insert: Click on Insert at the top of the window in order to add a new slide, a text box, a picture, a movie, or a sound. Whenever you want to add something to your show, click here. Format: Click on Format to make changes on any selected object like fonts,backgrounds, borders, paragraphs, or bullets. Fonts: Left click on a text box to select it. You may now highlight the text using the left mouse button or you may left click a second time on the box border (this changes the border from slanted lines to dots). Now, select your new font style, size, or color. (Use this icon at the bottom of the screen to change the color.) Pictures: Select a picture and right click to bring up the options menu. Select Show Picture Toolbar. Use the tools to change to black and white or watermark, adjust contrast and brightness, crop, format lines, wrap text, recolor, or set transparency color. Internet Pictures: Get on the net. Place the mouse cursor over the picture you want to save. Right click, select Save Picture As, name the file, and save. Now, you can insert it in your PowerPoint show. You may also just Edit, Copy, and Edit, Paste in your slide.