1 / 0

Current Electricity Lessons

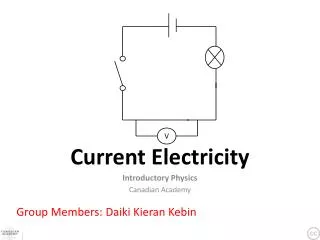
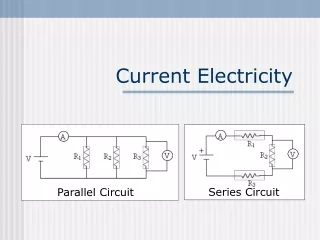
Current Electricity Lessons. The following Power Point is designed for teachers to use to plan inquiry-based electricity lessons and to present these lessons to their students.

makala
Download Presentation

Current Electricity Lessons

An Image/Link below is provided (as is) to download presentation Download Policy: Content on the Website is provided to you AS IS for your information and personal use and may not be sold / licensed / shared on other websites without getting consent from its author. Content is provided to you AS IS for your information and personal use only. Download presentation by click this link. While downloading, if for some reason you are not able to download a presentation, the publisher may have deleted the file from their server. During download, if you can't get a presentation, the file might be deleted by the publisher.

E N D

Presentation Transcript


  1. Current Electricity Lessons The following Power Point is designed for teachers to use to plan inquiry-based electricity lessons and to present these lessons to their students. The teacher slides give you an overview of the lesson, ideas for teaching each section of the lesson, and hints for facilitating the hands-on portions of the lesson. The student slides are intended to be projected and/or printed and used by small groups during stations, investigations, or class discussions.
  2. Electrical Circuits

    Introduction to Circuits Teacher Slides: 3 – 10. Student Slides: 11 – 13 More Circuits Teacher Slides: 14 – 22. Student Slides: 23 – 30 Circuit Projects Teacher Slides: 31 – 34. Student Slides: 35 – 40 Fun Circuit Extensions Teacher Slides: 41 – 43. Student Slides: 44 – 47
  3. Introduction to CircuitsBased on: Interconnections, Grade 5: Simple Circuits, pg. 209

    Teacher Slides
  4. Introduction to Circuits Objectives and Indicators Analyze the behavior of current electricity. Make a working model of a complete circuit using a power source, switch, bell or light, and a conductor for a pathway. Draw and label the components of a complete electrical circuit that includes switches and loads. ILOs Solve problems appropriate to grade level by applying science principles and procedures. Explain observations carefully and report with pictures, sentences, and models.
  5. Introduction to Circuits ENGAGE: Dear Mr. Henshaw by Beverly Cleary EXPLORE: Lighting a bulb EXPLAIN: Circuit foldable ELABORATE: Adding a switch EVALUATE: How does a flashlight work?
  6. Engage: Intro to Circuits Dear Mr. Henshawby Beverly Cleary Read Leigh Botts’s journal entries about making a lunchbox burglar alarm. Ask students to listen for the supplies he needs to build his alarm (wires, bell, battery, etc.). Journal Entries: January 9, January 10, end of February 7, February 8, March 1, March 3, and March 15
  7. Explore: Intro to Circuits Light a Bulb (Sample Student Notebook Page) Question: How can you light a bulb with one battery, one bulb, and one wire? Prediction: Observations: Record both what worked and what did not work. Results: To light a bulb the electricity must flow along a pathway called a circuit. The circuit must be a complete circuit in order for the electricity to flow. Teacher Notes: Have students draw their plans for lighting the bulb as their prediction. For observations have students record drawings of circuits that worked and did not work. Ask volunteers to draw both circuits that worked and did not work on the board. Then facilitate a discussion about how you need set up the circuit to make a complete circuit in order to light the bulb. Based on the discussion, write a class results section that students then record in their notebooks. See sample Results section to the left.
  8. Explain: Intro to Circuits Create a four flap foldable. On the front cover draw a complete circuit with a switch. Under each flap name and define: power source – Provides the energy for the circuit, ex: battery. pathway – The path that electricity follows, ex: wires. load - The part that is running in the circuit, ex: bulb, buzzer, motor. switch – Opens and closes the circuit to turn off and turn on the load.
  9. Elaborate: Intro to Circuits Challenge students to build a circuit with a switch. Give students 3 wires, a bulb, a battery, and a paper clip (to create the switch).
  10. Evaluate: Intro to Circuits Have students take apart a flashlight to figure out how it works. Then have students explain, in writing and/or with a diagram, how the flashlight works. Push students to use the words: circuit, load, power source, and switch in their explanation.
  11. Introduction to Circuits

    Student Slides
  12. Light a Bulb Light a Bulb Question: How can you light a bulb with one battery, one bulb, and one wire? Prediction: Observations: Record both what worked and what did not work. Results:
  13. Flashlights Explore how a flashlight works with your group. Draw a diagram of the flashlight. Explain how the flashlight works. Use the terms: circuit, load, power source, and switch in your explanation.
  14. More Circuits

    Teacher Slides
  15. More Circuits Objectives and Indicators Generalize the properties of materials that carry the flow of electricity using data by testing different materials. Investigate materials that prevent the flow of electricity. Predict the effect of changing one or more of the components (i.e. battery, load, wires) in an electrical circuit. ILOs Compare things processes and events. Distinguish between examples and non-examples of concepts that have been taught. Record data accurately when given the appropriate form.
  16. More Circuits ENGAGE: Show a Circuit with Yarn – will it work? EXPLORE: Insulator or Conductor Lab (Based on Interconnections, Grade 5, Insulator or Conductor, pg. 205) EXPLAIN: Conductors and Insulators article & Frayer Model ELABORATE: Batteries and Bulbs Lab EVALUATE: Electrical Circuits CLOZE Paragraph EXTEND: Parallel Circuits & String of Lights Problem
  17. Engage: More Circuits Before class, build a circuit that has yarn instead of wires connecting the battery and the load. Ask students if this circuit will work. “Test” the circuit, and ask students to explain why the circuit does not work.
  18. Explore: More CircuitsBased on Interconnections, Grade 5: Insulator or Conductor, pg. 205 Conductors and Insulators Question: Which materials allow electricity to flow? Background Information: conductors: materials that allow electricity to flow insulators: materials that prevent the flow of electricity Predictions & Observations: Tape in chart from Interconnections, pg. 207 Results: Have students complete the conductors and insulators lab by building a circuit and using different materials to close the circuit. Teacher Note: You can choose whether to introduce the terms insulators or conductors before or after the experiment. The benefit to sharing the terms before students start is that they will begin to use the terms conductor and insulator as they discuss the investigation in their small groups.
  19. Explain: More Circuits Have students read short article on conductors and insulators: http://www.fplsafetyworld.com/?ver=kkblue&utilid=fplforkids&id=16185 Based on the article have students create a Frayer Model for conductors.
  20. Explain: More Circuits Teacher background: The reason that metals conduct electricity so well is that they have free electrons.
  21. Elaborate: More Circuits What happens when you change other components in a circuit? What if you use more bulbs? What if you use more batteries? What else could you change? Have students complete the Batteries and Bulbs Investigation(worksheet available on website). Discuss how adding batteries and/or bulbs to a circuit affects the circuit.
  22. Evaluate: More Circuits Have students fill in the blanks to this cloze paragraph to evaluate their understanding of circuits. You can choose whether or not to give students a word bank. A ________ is the pathway along which current electricity flows. Metals are good __________ because electricity can easily flow through them. Plastic and rubber are good ________ because they don’t conduct electricity. In _______, conductors connect all the parts of the circuit. In ________, there is an opening that prevents electricity from moving in a current. A circuit uses a __________ to open and close it. A ____________ stores_______ energy and changes it into electrical energy. KEY: A circuitis the pathway along which current electricity flows. Metals are good conductorsbecause electricity can easily flow through them. Plastic and rubber are good insulatorsbecause they don’t conduct electricity. In a complete circuit, conductors connect all the parts of the circuit. In an incomplete circuit, there is an opening that prevents electricity from moving in a current. A circuit uses a switchto open and close it. A battery stores chemicalenergy and changes it into electrical energy.
  23. Extend: More Circuits Teacher Note: After the Batteries and Bulbs Investigation students should discover that 1 battery cannot light 2 bulbs. This challenge pushes students to make 2 bulbs light with just one battery. To do this they will need to create a parallel circuit. See pg. 215 in Interconnections, Grade 5 for teacher background on parallel circuits. Once students solve the challenge you can introduce the difference between parallel and series circuits. As a final assessment for this Extend section have students write a letter to Mr. Jones, the owner of a light factory about the best way to make a string of lights. (Sample Student Notebook Page) Science Challenge: Create a circuit in which 2 bulbs shine brightly with one battery. If you remove one bulb, the other should still light. Observations: Draw your circuit below. Results: In a parallel circuit the electricity has more than one pathwayto follow. Each bulb gets its own path to the power source. If you remove one bulb, the other bulb will stay lit. In a series circuitthe electricity flows along a single pathway. The bulbs have to sharethe electricity. If you remove one bulb, the other bulb will go out.
  24. More Circuits

    Student Slides
  25. Conductors and Insulators Conductors and Insulators Question: Which materials allow electricity to flow? Background Information: Predictions & Observations: Results:
  26. Conductor Frayer Model
  27. Batteries and Bulbs What happens when you change other components in a circuit? What if you use more bulbs? What if you use more batteries? What else could you change? Complete the Battery and Bulbs Investigation.
  28. Fill In The Blanks A ________ is the pathway along which current electricity flows. Metals are good __________ because electricity can easily flow through them. Plastic and rubber are good ________ because they don’t conduct electricity. In _______, conductors connect all the parts of the circuit. In ________, there is an opening that prevents electricity from moving in a current. A circuit uses a __________ to open and close it. A ____________ stores_______ energy and changes it into electrical energy.
  29. 2 Bulbs and 1 Battery Challenge 2 Bulbs and 1 Battery Challenge Science Challenge: Create a circuit in which 2 bulbs shine brightly with one battery. If you remove one bulb, the other should still light. Observations: Draw your circuit below. Results:
  30. 2 Bulbs and 1 Battery Challenge Results: In a parallel circuit the electricity has more than one _________ to follow. Each bulb gets its own path to the __________. If you remove one bulb, the other bulb will ___________. In a series __________ the electricity flows along a single ___________. The bulbs have to __________ the electricity. If you remove one bulb, the other bulb will ______________.
  31. String of Lights Assessment Mr. Jones owns a light factory. Customers are complaining about his string of lights. If one light bulb burns out, the entire string of lights goes out. Because you are now an electricity expert, Mr. Jones is asking you to help him solve the problem. How can he build a string of lights that will not break if one bulb burns out?
  32. CIRCUIT PROJECTSBased on: Interconnections Grade 5: Circuit Projects pg. 217 Teacher Slides
  33. CIRCUIT PROJECTS Objectives/Indicators Make a working model of a complete circuit using a power source, switch, bell or light, and a conductor for a pathway. ILOs Solve problems appropriate to grade level by applying science principles and procedures. Use scientific language in oral and written communication. Cite examples of how science affects life.
  34. CIRCUIT PROJECTS These four projects are a great way to have students apply what they have learned about circuits, integrate engineering, and have fun. To assess students, have them write a short explanation of how their project works. QUIZ BOARD (template on website) MORSE CODE MACHINE BURGLAR ALARM LOOP GAME Teacher Note: Detailed directions for each project are provided in the slides that follow. Use these directions for a structured activity. To differentiate for small groups or to push your entire class consider only giving students the design challenge description and a list of materials, or provide an assortment of materials and only give students the design challenge description. You can edit the direction slides by simply deleting some of the text boxes.
  35. Integrating Engineering Introduce the project as a design challenge. Provide design ideas with detailed directions, or make it more of a challenge by having students determine how to build the project. Have students evaluate their work and come up with ideas to improve their design.
  36. CIRCUIT PROJECTSBased on: Interconnections Grade 5: Circuit Projects pg. 217 Student Slides
  37. QUIZ BOARD PROJECT Design Challenge: Have you ever seen a light up quiz board? In this challenge you will create a board with questions and answers. When students match the correct question with the correct answer a light bulb will light up! If students do not match the correct question and answer the light bulb does not light. Using a folder for a board, create a quiz board that will challenge your classmates. Materials: 1 quiz worksheet 1 file folder Glue stick Scissors Ruler Aluminum foil Masking tape 3 wires Battery in holder Bulb in holder 2 paper clips Procedures: Write your matching quiz with 8 questions and mixed-up answers (any subject). Cut a file folder into two 8.5 X11 rectangles. Glue your quiz onto one of the file folders. Then punch 8 holes down each side your quiz. Flip the quiz over and draw a pencil line from the question to the correct answer. Take a strip of foil and fold it 3 times to make a thin strip. Place the strip along the line from question to answer. Make sure the foil shows through the holes. Use masking tape to completely cover the foil strip and tape it to the file folder. Repeat step 5 & 6 for each of the questions. Put the other file folder on the back of your quiz to hide the strips. Tape it in place. Make the tester/pointer and then give the quiz and the pointer to a friend to try out. If they get the answer right, the light bulb will light up. If they get it wrong, no light!
  38. MORSE CODE MACHINE Design Challenge: Before there were telephones people sent messages across the country using a telegraph. A telegraph works by sending electrical signals through wires to an electromagnet (or a buzzer or light bulb). The person sending the message uses Morse code. Morse code is a code of short dots and dashes for each letter of the alphabet. The person receiving the message would hear short buzzes for dots and long buzzes for dashes and then be able to tell what letter the sender was sending. For your design challenge use what you know about switches to create a mini-telegraph, or Morse code machine that can send a message to your partner. Materials: 3” piece of foam or soft wood 2 thumb tacks 1 paper clip 2 long wires Battery in holder Buzzer or Bulb Morse code handout Procedures: Open a paper clip and bend one end up. Pin the paperclip to one end of the wood blockor piece of foam. Push another thumbtack into the other end of the block or foam and wrap a wire around it. Built a circuit that will make the buzzer or light bulb work. Try sending a message to your partner using the Morse code handout.
  39. BURGLAR ALARM Design Challenge: Sam has a problem. His little sister is always sneaking in his room and playing with his things. Help him catch his little sister by creating a burglar alarm. Sam needs the burglar alarm to go on the floor, just outside his door. That way, when his little sister steps on the alarm it will go off. Using cardboard and your knowledge of incomplete and complete circuits, build a “step-on” burglar alarm. Materials: 2 5”X8” cardboard pieces 2 straws Aluminum Foil Masking Tape 3 long wires Battery in holder Buzzer or Bulb Procedures: Take 2 pieces of cardboard, 5”x 8”each. Cut two pieces of foil, 3”x 10” each. Tape the foil along each piece of cardboard and let the ends wrap around the back of the cardboard. Tape the foil ends on the back. Punch one hole on opposite ends of each piece about 1” from the end. Put one piece of cardboard, foil side up on the desk. Put a straw at each end and then put the other piece of cardboard foil side down on top. Tape it all together so that the straws don’t roll out. Attach a wire to each of the holes. Create a circuit using the wires, a battery and a buzzer or light bulb. Put your burglar alarm on the floor. When someone steps on it, the foil-covered cardboard pieces touch, completing the circuit and setting off the alarm! You could hide your alarm under a rug and keep an eye out!
  40. THE LOOP GAME Design Challenge: In this design challenge use what you know about complete circuits to make a loop game. To play a loop game you need to thread a wand of stiff wire over a wire “obstacle course” without touching it. If you cannot thread the loop, and it touches the wire obstacle course a buzzer will sound or a light will go off. If you can thread the loop you will make it from the beginning to the end without setting off the buzzer or light. See the picture of the loop game to give you an idea for how this game works. Good luck! Procedures: Bend the wire into an interesting curved shape to make an obstacle course. Screw the wire onto the board. Make a wand with a loop on the end of it with a small piece of wire or with a paper clip. Form the loop around one end of the obstacle course. Make the circuit so that if the wand hits the side of the game, the buzzer or light will go off. Materials: 8” board with screws 24” of thick wire Wire cutters Pliers Screw driver 3 wires Battery in holder Buzzer or Bulb
  41. CIRCUIT PROJECTS ASSESSMENT Create one page that shows and explains how your project works: Draw a diagram of your project. Explain how electricity flows through your project to make it work. Describe one challenge you encountered when building your project. Explain how you would improve your project or what you could add on to it next time.
  42. FUN CIRCUIT EXTENSIONS

    Teacher Slides
  43. Squishy Circuits What are squishy circuits? – TED Talk For recipes, examples and other cool stuff visit: http://courseweb.stthomas.edu/apthomas/SquishyCircuits/ Caution: Never attach an LED directly to a battery. It can cause the LED to burst, which would be dangerous! Make sure students only put the LEDS in the playdoh. Also, have your students wear safety goggles when using LEDs with 9-volts or battery packs.
  44. Lemon or Potato Batteries Challenge students to make a battery using potatoes or lemons. (Potatoes are cheaper). To make the LED light, students will need 3-4 pieces of potatoes. Two potatoes per group, each cut in half work well for this. For more information on potato batteries: https://www.stevespanglerscience.com/lab/experiments/fruit-power-battery Hints: LEDs are directional. The longer end connects to the positive side. If the LED does not light at first, turn it around. Wires with alligator clips are helpful for this activity, though students can still make it work with wire and masking tape.
  45. FUN CIRCUIT EXTENSIONS

    Student Slides
  46. SQUISHY CIRCUITS Use the images to help you figure out how to build a Squishy Circuit. You must wear safety goggles! Do not attach the LED directly to the 9-volt. Only stick it in the play-dohand be sure it does not touch the wires. In your notebook: Draw and label a diagram of your circuit.
  47. POTATO CHALLENGE Use the pictures to help you figure out how to light an LED using only potatoes, wires, zinc nails, and pennies. In your notebook: Draw and label a diagram of your potato circuit. penny nail nail penny nail penny
  48. Reflection Questions Today you used some crazy supplies to build circuits. 1. What component did the play-doh replace in the Squishy Circuits? 2. What component did the potato replace in the Potato Challenge? 3. How were today’s circuits similar to the circuits you built earlier in the unit?
More Related