Download
1 / 20
220 likes | 492 Views
Histology 1.2.: Immunohistochemistry. Immunohistochemistry uses the principle of immunity: During development the immune system recognizes foreign proteins as antigens If foreign proteins invade the body, this evokes immune response

E N D
Immunohistochemistry uses the principle of immunity: • During development the immune system recognizes foreign • proteins as antigens • If foreign proteins invade the body, this evokes immune response • One type of immune response is the production of highly specific • molecules against the foreign proteins. These are called antibodies, • binding with high affinity to the antigens • Immunocytochemistry utilizes these antibodies for the localization • of tissue components • Production of antibodies: • A tissue constituent is extracted from the body of X animal (e.g. goat), • and purified • 2. This material is injected into the bloodstream of Y animal (e.g. rabbit), • where it behaves as antigen and evokes immune response, • thus, production of highly specific antibodies • 3. The antibody can be extracted from the blood of Y animal, purified and • characterized.
Preparation of tissues for immunohistochemistry: • Collection of samples (tissue blocks from experimental • animals, biopsy, smears, etc.) • Fixation: - immersion (drop the tissue block into fixative) • - perfusion through the heart • Perfusion: • Deep anaesthesia (Nembutal, etc.) • Cannule introduced to the left ventricle • or into the aorta • Wash out the blood with a saline • Fix with paraformaldehyde and/or • glutaraldehyde • 5. Removal of the wanted tissue or organ • immersion-fixed for some hours • 6. Sectioning • 7. Incubation of sections
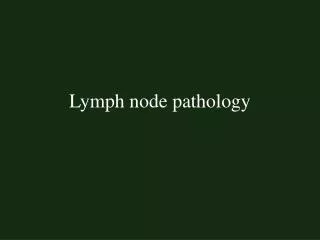
An example: pre-embedding • immunohistochemical reaction: • Antigen (green triangle)-antibody • binding in the tissue • 2. Antigen-antibody binding • between the primary antibody • and the secondary antibody • labelled with either a gold • particle, or a fluorescent dye, • or an enzyme catalysing • a chromogen reaction
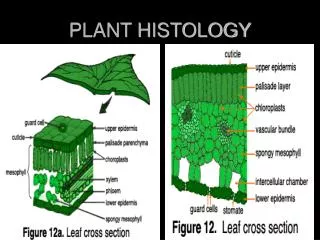
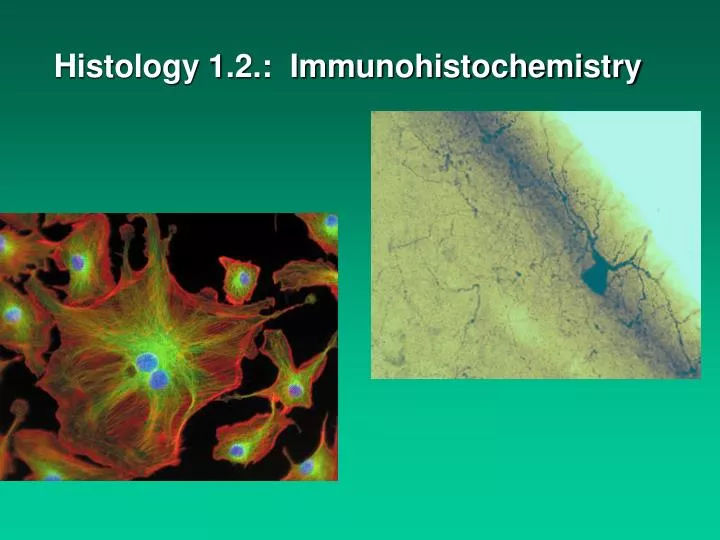
The results: Epithelial cells infected with influensa viruses (brown dots) in the wall of a bronchus in the lung
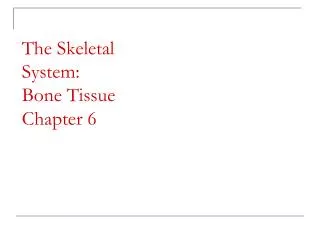
B Nerve cells containing the enzyme nitrogen monoxide synthase (DAB reaction, brown precipitate) Endothelial cell culture: Red fluorescence: actin cytoskeleton Green fluorescence: tubulin Blue: DAPI staining of the nucleus (not immune staining)
IMMUNFLUORESCENCE GAD-GFP and NPY in fluo microscope GAD-GFP and enk, confocal micr.
The electron microscope Brief history: 1920: physicists discovered that accelerated electrons behave in vacuum jut like light - they travel in straight lines and their wavelength is about 100.000 times smaller than that of light. - the electron beam can be manipulated with electromagnetic field just like the light with glass lenses 1931: Ernst Ruska built the first electron microscope
Electron source: triode gun 1. filament: tungsten, heated up to 2700oC: emits electron cloud 2. Wehnelt cylinder: bunches the electrons into finely focused point 3. anode: has a hole in it so that the accelerated electron beam get through it with a speed of several 100.000 km/sec Magnification: with the help of electromagnetic lenses: changing the strength of the current within the coils changes the magnification Image formation: the focussed electron beam reaches the extremely thin specimen (60-90 nm), passes through it and the image is projected to a fluorescent screen the specimen has to be treated with heavy metal salts in order to get contrasty image („staining”=contrasting)
Preparation fo tissues for electron microscopy: • Fixation: buffered solutions of paraformaldehyde and • glutaraldehyde (immersion and perfusion) • 2. Staining/contrasting with osmium tetroxide • 3. Dehydration: in ascending series of ethanol (50%-100%) • Staining/contrasting with 70 % ethanol saturated with uranyl acetate • 4. Intermediate solvent: propylene oxide • 5. Embedding: in synthetic resins e.g. Durcupan ACM (liquid at room • temperature, polymerises at 56 oC) • 6. Preparation of semithin (0.5 mm) and ultrathin (60-90 nm) sections • Staining/contrasting with lead citrate.
The electron micrograph nucleus
Scanning electron microscope (SEM) • Suitable to observe the surface of tissue components • Parts of SEM: • Electron optical column (short with 3 lenses) • Specimen chamber • Works like the tv screen: • - The electron beam hits the surface of the specimen which • has to be covered with a thin layer of metal (e.g. gold) • Secondary electrons are detected and turned into an electrical • signal. • In the monitor electrical signal is turned into light to produce • an image.
SEM images : Red and white blood cells Blood clotting
Pre-embedding immunocytochemistry at electron microscopic level: Its steps are similar to those of light microscopic ICC but: - Triton X-100 detergent is not allowed to use - Instead Triton X-100 freeze-thaw in liquid nitrogen helps the penetration of antibodies - The immunoreaction is carried out on 60-80 mm vibratome sections
Further steps after the immunoreaction: • contrasting: buffered 1 % OsO4 30-60 min • Dehydration in ascending series of ethanol 10-10 min • (70 % ethanol is saturated with uranyl acetate) • Intermedier solvent: propylene oxide 10 min • Durcupan : propylene oxide 1:1 30 min • - Durcupan resin overnight • - Mounting on glass slide in Durcupan resin • - Polimerization 56 oC-on one day • - re-embedding for ultrathin sectioning • - Preparation of ultrathin sections (60-90 nm) in ultramicrotome • - Contrasting with lead citrate 2-10 min • - View in electron microscope
Postembedding immunogold labelling: - Carried out on ultrathin sections - Secondary antibody is decorated with a colloidal gold particle Localization of gonadotrop hormon presynaptic membrane protein