Download

1 / 28
280 likes | 306 Views
Learn about Altera FPGA development boards, schematic design process, connections, project creation, pin assignment, and simulation techniques.

E N D
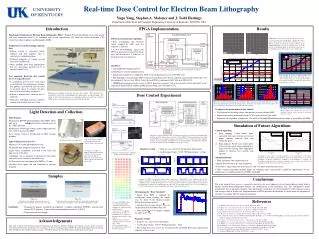
Figure 1.4 Connections between the pushbuttons, the LEDs, and the Altera FPGA.
Figure 1.5a and 1.5b. Equivalent circuits for ORing active low inputs and outputs. (a) (b)
Figure 1.8 Creating the top-level project schematic design file.
Figure 1.10 Active low OR-gate schematic example with I/O pins connected.
Table 1.1 Hardwired connections on the FPGA chips for the design.
Figure 1.12 Active low OR-gate timing simulation with time delays.
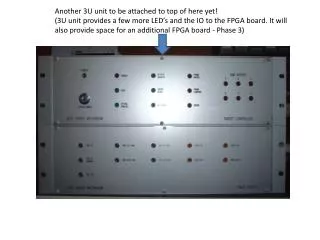
Figure 1.13 ALTERA UP 3 board showing Pushbutton and LED locations used in design
Figure 1.14 ALTERA UP 2 board with jumper settings and PB1, PB2, and LED locations
Table 1.2 Jumper settings for downloading to the UP2 MAX and FLEX devices.
Figure 1.15 UP 2’s FLEX FPGA pin connection to seven-segment display decimal point.
Figure 1.20 Verilog active low OR-gate model (with syntax error).
Figure 1.22 Timing analyzer showing input to output timing delays.
Figure 1.23 Floorplan view showing internal FPGA placement of OR-gate in LE and I/O pins