Download
1 / 8
80 likes | 128 Views
Learn how to clean up raw sequence data for accurate analysis and alignment using 4Peaks software. Identify peaks, align sequences, and create phylogenetic trees easily. Follow detailed steps for optimal results.

E N D
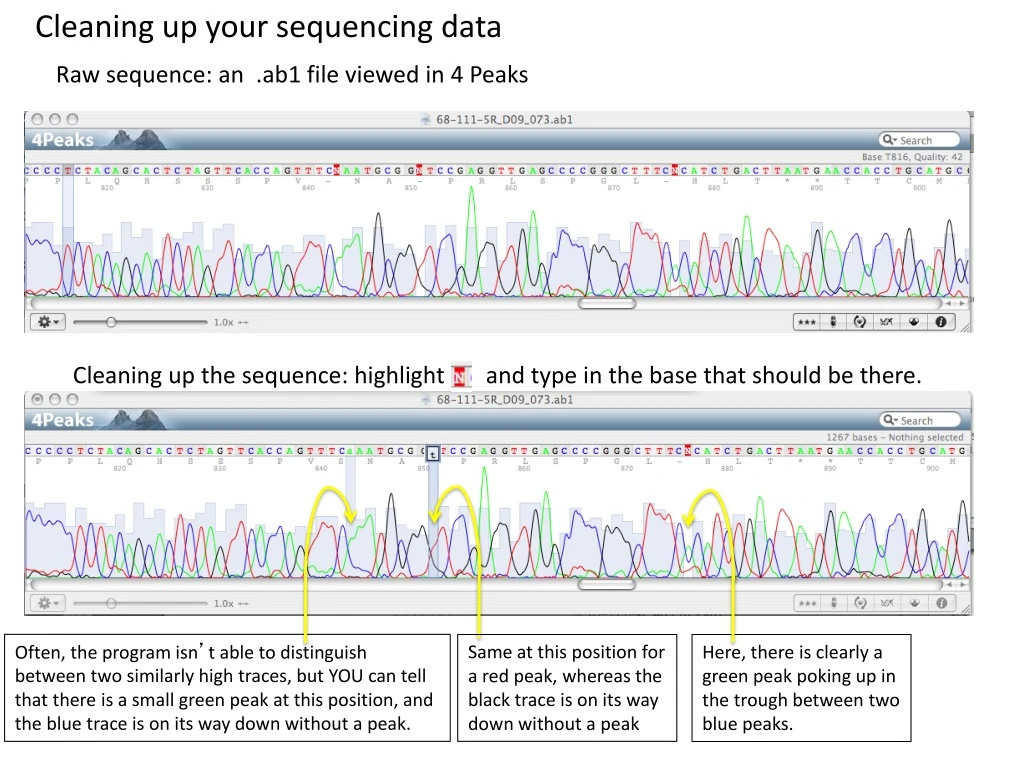
Cleaning up your sequencing data Raw sequence: an .ab1 file viewed in 4 Peaks Cleaning up the sequence: highlight and type in the base that should be there. Often, the program isn’t able to distinguish between two similarly high traces, but YOU can tell that there is a small green peak at this position, and the blue trace is on its way down without a peak. Same at this position for a red peak, whereas the black trace is on its way down without a peak Here, there is clearly a green peak poking up in the trough between two blue peaks.
Sometimes, it is not as clear – at these two Ns, there are two peaks at each position. In this case, the best thing to do is to compare this sequence to the sequence in the opposite orientation. Open the opposite sequence, “Flip sequence” to get it in the same direction, and the do a search for this part of the sequence in the search window. Note: do this search AFTER you have cleaned up the reverse sequence a bit – having too many Ns makes searching difficult! Now you can see that it is more clear that there is a small green peak and a larger blue peak – so now you know it is AC at this position.
Align the F and R sequences to obtain a full sequence of your PCR product F primer PCR product of amplified 16S rRNA gene. 5’ 3’ 3’ 5’ R primer from F primer ATGCCCGTATA Amplified 16S rRNA gene F and R sequences. 5’ 3’ from R primer 5’ 3’ TTCGGGCATAT To ALIGN the sequences, you need to make the reverse complement of one of the sequences. RC of R primer sequence 5’ 3’ AAGCCCGTATA from F primer AAGCCCGTATA Now you can compare them and align them. 5’ 3’ AAGCCCGTATA 5’ 3’ RC of R primer sequence
You can align the F and R sequences using CLC Sequence Viewer Now you can align and BLAST your sequences as described in your lab manual. You can also use CLC Sequence Viewer to compare the sequence of your amplified PCR product with that of your classmates…
You can align two or more sequences using CLC Sequence Viewer… (see lab manual)
You can create a phylogenetic tree Once you have analyzed a sequencing pair and created a consensus sequence that spans the F and R sequence, click and drag the consensus icon over to the CLC_Data list.
You can create a phylogenetic tree For example, if you wanted to compare your sequence to the sequence of one of your classmates who isolated a different colony, you could align these sequences. As before, go to “Toolbox” “Alignments and Trees” “Create Alignment”. Next, click and drag the new alignment icon over to the CLC_Data list.
You can create a phylogenetic tree Once you have an alignment, go to “Toolbox” “Alignments and Trees” “Create Tree”, and select the new alignment from the list. Here is an example of a tree:


