Download
1 / 2
0 likes | 16 Views
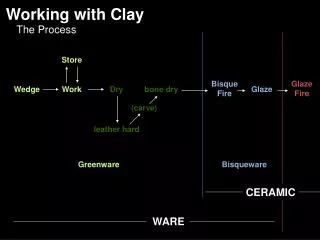
<br>What is a Stone-Like Ceramic Finish?A stone-like ceramic finish is a type of surface treatment that gives ceramics the appearance

E N D
Choosing the Right Clay for Your Stone-Like Finish When it comes to achieving a stone-like finish with clay, choosing the right type of clay is crucial. Not all clays are created equal, and different clays have different properties that can affect the final result of your project. One of the most commonly used clays for creating a stone-like https://s3.eu-west-2.amazonaws.com/potteryuk/dir/news/mastering- detailed-painting-with-underglaze-a-step-by-step.html finish is polymer clay. Polymer clay is known for its versatility and ability to mimic various textures, including stone. It is also easy to work with and can be shaped and molded according to your desired design. Another option is air-dry clay, which is a more affordable alternative. While air-dry clay may take longer to dry and harden, it can also produce stunning stone-like effects with the right techniques.When choosing the right clay for your stone-like finish, consider the color and texture you want to achieve. Some clays come in a variety of colors, while others can be mixed or painted to achieve the desired shade. Additionally, pay attention to the strength and durability of the clay. If you are working on a project that requires a sturdy base, opt for a clay that hardens well and can withstand handling and potential impacts. Finally, consider the drying time and ease of use. Some clays may require special tools or techniques to achieve the stone-like finish, while others are more forgiving and suitable for beginners. By taking all these factors into account, you can choose the right clay that will give you the best results in creating your stone-like finish. Essential Tools and Materials for a Professional-Looking Result To achieve a professional-looking result when creating a stone-like finish with clay, it is essential to have the right tools and materials at your disposal. Here's a rundown of some key items that will help you achieve the desired outcome. First and foremost, you will need a high-quality clay suitable for the stone effect you want to create. There are various types of clay available, such as polymer clay or air-dry clay, each with its own unique properties. Take the time to research and choose the clay that best suits your project.Next, you'll need sculpting tools to shape and texture the clay. A set of metal sculpting tools with different tips and edges will come in handy for creating realistic stone-like textures and details. Additionally, having a rolling pin or a clay roller will ensure an even and consistent thickness of the clay when working on larger surfaces.To add depth and dimension to your stone-like finish, consider investing in a selection of paints and brushes specifically designed for use with clay. Acrylic paints are commonly used for these projects and can be easily layered to create the illusion of different stone colors and textures. Various brush sizes will allow you to achieve both broad strokes and intricate detailing.Lastly, don't forget to have a clean and smooth surface to work on. A non-stick mat or a sheet of wax paper can provide an ideal workspace that prevents the clay from sticking and allows for easy cleanup afterwards.By having these essential tools and materials at hand, you'll be well-prepared to tackle your clay project and achieve a professional-looking stone-like finish. Preparing Your Clay for the Stone-Like Finish To achieve a stone-like finish on your clay project, proper preparation is key. Before you begin applying any coatings or textures, you must ensure that your clay is clean and free from any impurities. Start by kneading the clay thoroughly to make it pliable and remove any air bubbles. This will help prevent cracking and unevenness in the final result. Once the clay is smooth and pliable, you can begin the next step of preparing it for the stone effect.The next crucial step is to create a solid base for your stone-like finish. To do this, you will need to prime the clay surface with a suitable primer. Priming not only improves adhesion but also enhances the appearance of the stone texture. Choose a primer specifically designed for use with clay surfaces, as it will provide better adherence and compatibility. Apply the primer evenly to the entire surface of the clay, using a brush or roller. Make sure to cover all areas, including the sides and edges, to create a uniform base coat. Once the primer is dry, your clay is now ready for the next exciting step of achieving a stunning stone-like finish. Step-by-Step Guide: Applying the Base Coat for a Stone Effect The first step in achieving a stone-like finish on your clay project is to apply the base coat. This base coat will serve as the foundation for the texture and color that will later be added. Begin by preparing your clay surface by gently sanding it with a fine-grit sandpaper. This will help create a smooth and even surface for the base coat to adhere to.Once the surface is prepared, you can start applying the base coat. It is recommended to use a sponge to apply the coat, as it allows for better control and coverage. Dip the sponge into the base coat mixture and evenly distribute it onto the clay surface. Work in small sections, applying the coat in a circular motion to ensure a consistent and even coverage. Make sure to cover the entire surface, including any edges or corners. Allow the base coat to dry completely before proceeding to the next step.Applying the base coat is a crucial step in achieving a realistic stone effect on your clay project. It provides a
solid foundation for the subsequent layers and textures that will be added. Take your time and ensure that the coverage is even, as this will greatly contribute to the overall appearance of the finished piece. With the base coat successfully applied, you are now ready to move on to the next step in creating a stunning stone-like finish.• Gently sand the clay surface with fine-grit sandpaper to create a smooth base• Use a sponge for better control and coverage when applying the base coat• Dip the sponge into the base coat mixture and evenly distribute it onto the clay surface• Work in small sections, applying the coat in a circular motion for consistent coverage • Ensure that all edges and corners are covered with the base coat • Allow the base coat to dry completely before moving on to the next step How do I choose the right clay for a stone-like finish? When selecting clay for a stone-like finish, it's important to choose one that has a texture and color similar to the stone you want to replicate. Look for clay that is specifically designed for sculpting or modeling to ensure it can be easily shaped and manipulated. What tools and materials do I need to achieve a professional-looking result? To achieve a professional-looking result, you'll need a few essential tools and materials. These include sculpting tools such as a wire cutter, metal spatula, and clay modeling tools. Additionally, you'll need sandpaper or sanding blocks, paintbrushes, and the base coat paint. Don't forget to gather protective gear like gloves and goggles for your safety. How do I prepare the clay for a stone-like finish? Before applying the base coat, it's important to prepare the clay properly. Start by kneading the clay to make it soft and pliable. Remove any air bubbles by gently squeezing and rolling the clay. If needed, moisten your hands with water to prevent sticking. Ensure the clay is clean and free from debris before continuing. What is the step-by-step process for applying the base coat for a stone effect? Here's a step-by-step guide for applying the base coat to achieve a stone effect: 1. Clean the surface: Ensure the surface is clean and free from any dust or dirt. 2. Apply a primer: Apply a primer to the surface to enhance adhesion and create a smooth base for the base coat. 3. Mix the base coat: Mix the base coat paint according to the manufacturer's instructions. Use a paint stirrer or a wooden stick to ensure proper mixing. 4. Apply the base coat: Use a paintbrush or a sponge to apply the base coat evenly to the surface. Start from the top and work your way down, using long, sweeping motions. 5. Add texture: While the base coat is still wet, use a sponge, brush, or other texturing tools to create the desired stone-like texture. Experiment with different techniques to achieve a realistic effect. 6. Allow drying: Let the base coat dry completely according to the paint manufacturer's instructions. This may take several hours or even overnight. 7. Evaluate the result: After the base coat is dry, step back and evaluate the stone effect. Make any necessary touch-ups or adjustments to enhance the realism. 8. Proceed to additional layers: Once you're satisfied with the base coat, you can proceed to add additional layers or finishes to further enhance the stone effect. Remember to refer to the specific instructions provided by the paint manufacturer for the best results.