Download
1 / 18
180 likes | 210 Views
Learn how to create a contact sheet using a B&W enlarger and photographic paper. Follow step-by-step instructions for exposing, processing, and analyzing test strips to achieve correct exposure and contrast. Now you can edit and print your film images with ease.

E N D
Equipment & Materials Needed • B&W Enlarger and Lens • B&W Photographic Paper (RC ONLY for print machine) • Contact Frame • B&W Negatives
Step 1 • Ensure both the enlarger’s negative carrier (top) and enlarger lens (bottom) and correctly place in the enlarger at all times • Both must remain in the enlarger whilst the enlarger is switched on.
Proof Printer • Open the Proof Printer. • Insert your negatives into the contact frame. • Negatives must be placed shiny side up towards the glass so that when you close the Proof Printer your negatives are the right way up. • Close Proof Printer firmly.
Place the Proof Printer under the enlarger onto the baseboard • Turn on the enlarger and raise the head so that the light covers the entire area of the Proof Printer. • Set the enlarger lens to f4. • The knob on the right hand side of the head is your contrast control, Grade 0-5 (Set this to Grade 2).
Inserting the paper • Using the paper trimmer in the darkroom trim a sheet of paper to about 3”x10”. Strips thinner than 3” will get stuck in the machine. • Open the contact frame and place the strip of paper underneath a strip of negatives. Close the contact frame firmly.
Timer • Set the timer to 5 seconds.
Expose the paper • Press the expose button on the timer. This will expose the whole strip for 2 seconds. • Using a sheet of card cover 1/5 of the paper and expose for another 2 seconds. • Cover a further piece of the paper and expose for another 2 seconds. • Repeat this action two more times.
Process the Test Strip • Remove the paper from the Proof Printer and take it over to the print machine. • Open the flap at the front of the machine and insert the photographic paper SHINY SIDE DOWN. • Close the flap. Your print will come out dry in about 2.5 minutes.
View the Test Strip outside for correct exposure (1) • Your test strip should look something like this. • The exposures on you test strip will be : 2, 4, 6, 8, 10 seconds at Grade 2.
View the Test Strip outside for correct exposure (2) • Decide which exposure is correct. From this example the final stage (far right) would be the correct choice (10 seconds). • If the test strip is too light or too dark increase or decrease the exposure time.
View the Test Strip outside for correct contrast (1) • Contrast = the density of the print. • Grade 0 = Very Low contrast. • Grade 2.5 = Medium Contrast. • Grade 5 = High Contrast. • Depending on how well your negatives are exposed and processed will determine the contrast available on the negative. • Increase the grade on the enlarger to increase contrast or vice versa to reduce the contrast.
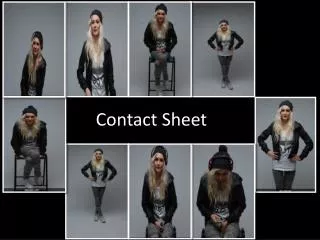
Final Contact Print • Once you have determined correct exposure and contrast grade expose a whole sheet of photographic paper for that amount of time and at that grade setting on the enlarger. • Process the paper as before in the print machine.
Your correctly printed Contact Sheet • You now have a contact sheet which will show you exactly what is on your roll of film. • This can now be used to edit your images for printing. You can mark the contact sheet to remind you which images you have chosen to make individual prints from.