Download
1 / 12
120 likes | 281 Views
Add a seamless NAIP image to ArcMap 10.0. In ArcMap 10.0 you can add an Image Service in the same way that you would add other geodata. This document will show you how to add the service from the INSIDE Idaho web page. 1. http://www.insideidaho.org. 2. INSIDE ArcGIS Services.

E N D
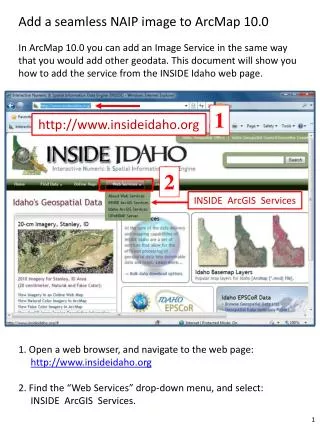
Add a seamless NAIP image to ArcMap 10.0 In ArcMap 10.0 you can add an Image Service in the same way that you would add other geodata. This document will show you how to add the service from the INSIDE Idaho web page. 1 http://www.insideidaho.org 2 INSIDE ArcGIS Services 1. Open a web browser, and navigate to the web page: http://www.insideidaho.org 2. Find the “Web Services” drop-down menu, and select: INSIDE ArcGIS Services. 1
3 3. Click on the folder named ImageryBaseMapsEarthCover. 2
4 4. Click on ImageryBasemapsEarthCover/2011 1m idaho. 3
5 5. In the section named “View In:” choose ArcMap . 4
6 6. In the “File Download” window click on the Save button. 5
7 7. In the “Save As” window navigate to a folder of your choice, then click on the Save button. 6
8 8. Open ArcMap; load a layer from F:\geodata that has the correct projection for your area of interest. Good examples of layers to load include CLU, PLSS and county boundaries. Click again on the “Add Data” button. 7
9 9. In the “Add Data” window navigate to the folder where you saved the INSIDEIdaho layer file. Highlight the file, and click on the Add button. 8
10 10. You now have a state-wide 1 meter NAIP image. 9
11 11. No more black background where counties overlap. 10
12 12. Full normal 1 meter resolution. 11
Some other layers that you may find useful. The three at the bottom are seamless, state-wide ‘topo’ images. Contact Jerry Korol (208-378-5785) if you have questions. 12