https://www.letsnurture.com/blog/building-standalone-app-using-python-and-electronjs.html
Building Standalone app using python and ElectronJs

https://www.letsnurture.com/blog/building-standalone-app-using-python-and-electronjs.html
E N D
Presentation Transcript
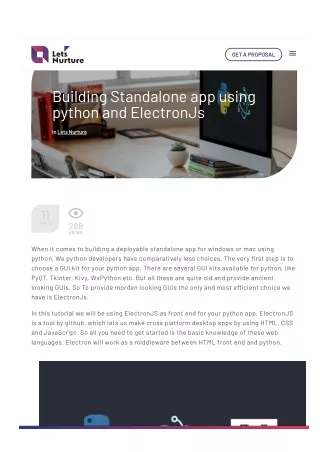
GET A PROPOSAL Building Standalone app using python and ElectronJs In Lets Nurture 288 VIEWS 11 Jan. 21 When it comes to building a deployable standalone app for windows or mac using python, We python developers have comparatively less choices. The very 몭rst step is to choose a GUI kit for your python app. There are several GUI kits available for python, like PyQT, Tkinter, Kivy, WxPython etc. But all these are quite old and provide ancient looking GUIs. So To provide morden looking GUIs the only and most e몭cient choice we have is ElectronJs. In this tutorial we will be using ElectronJS as front end for your python app. ElectronJS is a tool by github, which lets us make cross platform desktop apps by using HTML, CSS and JavaScript. So all you need to get started is the basic knowledge of these web languages. Electron will work as a middleware between HTML front end and python.
We use cookies to give you tailored experiences on our website.We use cookies to give you tailored experiences on our website. Okay Above 몭gure de몭nes the architecture of how our Python-Electron app will work. Electron is our front end and it makes and controls UI windows which we need in our app. Content inside these windows will be put using HTML, CSS and JavaScript. Python will be used as a back-end where we will write our logic part of the app. Essentials: Python NodeJs ElectronJS python-shell After you have installed the above mentioned dependencies you need to download Electron Quick start library using git. # Clone the Quick Start repository $ git clone https://github.com/electron/electron-quick-start # Go into the repository $ cd electron-quick-start
These are the 몭les which are cloned. # Install the dependencies and run $ npm install && npm start After this is done, It’ll look something like this – We will be changing html and js 몭les and connecting it to our backend using electronJs. In the above directory structure index.html is the 몭le which is being rendered on npm start. Main.js is the javascript 몭le which is responsible for making window and loading index.html on npm start command. For better understanding let’s put all these gui related 몭les mentioned in the above screenshot to a folder called GUI. and make a new folder called engine for backend 몭les. We are going to make a desktop application, which can get input data from HTML and process the data in the backend and output processed data to the front-end again. Modify your index.html with this html from where you can pass the input data to your backend.
Running a python script from Electron: As our front end is ready, It’s the time to make our back end python script which will be executed on the submit button and process the input data. Create a 몭le called server.py in the engine folder. engine/server.py import sys input = sys.argv[1] processded_data = "hello "+input print(processded_data) sys.stdout.flush() Create a folder called linkers in the gui folder, and place a linker.js 몭le in it. This Javascript 몭le is responsible for connecting our server.py 몭le to index.html. gui/linkers/linker.js function get_input() { let {PythonShell} = require('python‐shell') var path = require("path") var input = document.getElementById("input").value var options = { scriptPath : path.join(__dirname, '/../engine/'), args : [input] } let pyshell = new PythonShell('server.py', options); pyshell.on('message', function(message) { swal(message); }) document.getElementById("input").value = ""; } gui/index.html <!DOCTYPE html> <html lang="en"> <head> <link rel="stylesheet" href="https://maxcdn.bootstrapcdn.com/bootstrap/3.3.7/css/bootst rap.min.css"> <script src="https://unpkg.com/sweetalert/dist/sweetalert.min.js"></script> <script src="linkers/linker.js"></script> <title>Electron Demo</title>
</head> <body> <br> <div class="container"> <div class="jumbotron"> <h1>Electron Demo</h1> </div> <br> <label>Enter your input here</label> <input id="input" type="text" placeholder="Input"/> <button class="btn btn‐success" onclick="get_input()">Submit</button> </div> <body> </html> On the button submit, you will get the processed data from server.py as an alert as shown in below screenshot. We are giving alerts in this tutorial, but you can do whatever you want to do with that data in html from showing it in a h1 tag to input to another form. In this tutorial we’ve seen how to use Python and Electron to build a standalone desktop
application. I hope this tutorial was helpful to you for getting started with Python Desktop applications. Feel free to contact us and ask any queries. « How to Write a Proposal Request to a Software Development Company A basic analytics and guide of Google Tag Manager Button Click Tracking » Sign up our Newsletter! SUBMIT Author Posted by Lets Nurture
B LO G A directory of wonderful things Object color change using ARKit – iOS How to implement Entrust in Laravel Copy How to implement Entrust in Laravel In Lets Nurture In Lets Nurture In Lets Nurture What is Augmented Reality? Augmented reality is made up of the word “augment” which means to make something great by adding something to it. Augmented reality is used to add … Entrust package provides a 몭exible way to add Role- based Permissions to your Laravel application. This package creates four tables: Roles table: For storing role records Role_user table: For storing one-to-many … Entrust package provides a 몭exible way to add Role- based Permissions to your Laravel application. This package creates four tables: Roles table: For storing role records Role_user table: For storing one-to-many … C O N TACT U S Have an !dea or need help with your current business? 60 Min Free Consulting Call. Detailed Feature List. Strict NDA Policy Multiple business models supported Free Mockup & Wireframe Free MNP Access to Exclusive Digital Assets $500 Digital Gifts
Name* Email* Mobile No.* (201) 555-0123 Select Project Budget* Not Sure Tell us about your requirement* What's 14 - 3 = SUBMIT Let’s Nurture Infotech Pvt Ltd is operational in New York, Seattle, Chicago & Washington in US, Ottawa & Charlottetown, Canada ( Nurturing Technologies Pvt ltd ), London & Glasgow in UK, Singapore, Melbourne in Australia, Ahmedabad in India. © 2021 All rights reserved