Download
1 / 80
1.04k likes | 1.57k Views
What is Veritas Volume Manager. Veritas Volume Manager is an Online Storage Management Tool that provide a logical volume management layer which overcomes the physical restrictions of disk devices by spanning volumes across the

E N D
What is Veritas Volume Manager • Veritas Volume Manager is an Online Storage Management Tool that provide a logical volume management layer which overcomes the physical restrictions of disk devices by spanning volumes across the spindles. It protects against the Disk and Hardware failure
Benefits of Volume Manager • Manageability • You can manage all storages using an intuitive graphical user interface • Provides consistent management across all the platforms ( Solaris, HP-UX, Windows NT/2000, IBM) • Management of storage is performed on-line in real time , eliminating the need for downtime.
Benefits of Volume Manager • Availability • Integrity of storage is maintained by true mirroring across all writes • Through RAID Techniques, Storage remains available in the event of Hardware failures • Data Redundancy is maintained by hot-relocation, which protects Against multiple simultaneous disk failures • Recovery Time is minimized, through logging and background mirror Synchronization.
Benefits of Volume Manager • Performance • I/O Throughput is maximized by measuring and modifying volumes Layouts while storage remains on-line. • Performance bottlenecks can be eliminated using the VxVm analysis tool.
Benefits of Volume Manager • Scalability • VxVM Runs on both 32 But and 64 Bit Operating systems • Storage can be deported to large enterprise-class platforms • Storage devices can be spanned • VxVM is fully integrated with Veritas File System
Veritas Volume Manager Fundamentals • Describe how physical data storage relates to virtual data storage in Veritas Volume Manager. • Install Veritas Volume Manager • Perform Volume Management Tasks Using GUI and CLI. • Manage Disks and Disk Groups • Create and Manage Virtual Volumes
Physical Storage Objects VTOC: Stores Information about Disk structure and Organization. Also Called as Disk Label Partition: After VTOC, remainder of the Disks are divided ito units called Partitions
How Does Volume Manager Works • You Enable Virtual data storage by bringing the disks under volume manager control.It means that volume manager creates virtual objects and establishes a logical connection between those objects and underlying physical objects. Technical Support Group Bangalore
What Happens to a Disk under VxVM Control • Volume Manager removes all the partition table entry from VTOC • Creates two partitions on the physical disk. One is Private region and second is public region. • Private region stores information like configuration database,kernel logs, and disk headers.Minimum size is 1024 Sectors and Maximum is 512000 Sectors ( 512k Sectors) • Public Region consists of the remainder of the Disk.This represents the available space for VxVM to create volumes and assign data to it. • Volume Manager updates the VTOC, with information about the removal of the existing partition and the addition of the new partition during initialization process.
Volume Manager-Virtual Objects • Disk Groups • Volume Manager Disks • Sub-Disks • Plex • Volume
Virtual Objects • Volume Manager consists of variety of virtual objects .Volume is one of the variety of the virtual Objects. Technical Support Group Bangalore
Disk Group • Disk group is a collection of VxVM disks. You group disks into disk groups for management purpose.
Volume Manager Disks • A Volume Manager Disk is created as soon as a physical disk is brought under VxVM control. • Each VxVM disk corresponds to one physical Disk. Technical Support Group Bangalore
Sub Disks • A VxVM Disk can be divided into one or more sub-disks. A sub-disk is a set of contiguous blocks that represents a specific portion of VxVM disk, which is mapped to specific region of the Disk. Technical Support Group Bangalore
Plex • A Plex is a structured or ordered collection of sub-disks that represents a copy of data. A plex consists of one or more sub-disks located in one or more physical disks. Technical Support Group Bangalore
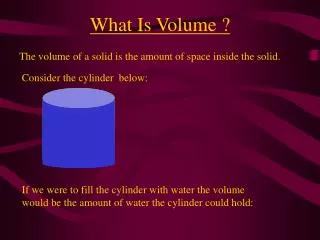
Volumes • A Volume is a virtual storage device that is used by applications in a manner similar to physical disk. Volume is composed of one or more plexes. Technical Support Group Bangalore
Volume Layouts • Volume layout refers to organization of plexes in a volume.
Concatenated Volume • In a concatenated volume, sub disks are arranged both sequentially and contiguously Concatenation allows a volume to be created from one or more physical disks, if there is not enough free space to accommodate the volume in a single disk
Striped Volume • In a Striped Volume, data is spread evenly across the sub-disks. Stripes are equally sized fragments that are allocated alternately and evenly to the sub-disk inside a single plex. There must be at least two sub-disks inside a plex, each of which must exist on different physical disk
Mirrored Volume • Mirrored Volume uses multiple plexes to duplicate the information contained in a volume. At least two plexes are required for a true mirroring.Each of this plexes must exists on different physical disk for redundancy.
RAID-5 Volume • A RAID-5 Volume uses striping to spread data and parity evenly across physical disks. Each stripe consists of a parity stripe unit and data stripe unit.Parity can be used to re-construct the data if one disk fails
Which Disks Under VxVM control • The only disks that you should place under VxVM control during installation are the root disk and its mirror. • You can add other disks and disk groups after installation • If you do not plan to bring the system disk under VxVM control, then place one disk under rootdg. • Rootdg is required, so that volume manager daemons can be started in enabled mode. Technical Support Group Bangalore
Enclosure based Naming • This allows VxVM to access enclosures as a separate physical entities.Enclosure based naming can be useful while implementing DMP(Dynamic Multipathing).When you install VxVM, You are prompted whether to use enclosure based naming
Excluding Disks • If you want any disks to be excluded from volume manager control, then you can specify in the exclusion files
Prevent Multi-pathing • With VxVM version 3.1.1 later, DMP Driver must always be present on the system for VxVM to function.However you can prevent VxVM from multipathing some or all devices without removing the DMP layer.
Preserve or eliminate disk data • When you place a disk under volume manager control, either you can preserve the data (Encapsulation) or eliminate the data (initialization) • Encapsulation should contain minimum 2 free partition table entries on the disk to be encapsulated. Technical Support Group Bangalore
Typical Initial VxVM Setup Technical Support Group Bangalore
Volume Manager Installation • Software Packages • VRTSvxvm Drivers and Utilities • VRTSlic Licensing Utilities • VRTSvmdev Developer Kit • VRTSvmman Manual Pages • VRTSvmdoc Documentation • VRTSvmsa Storage Administration Server and Client
The vxinstall Program • This program is used to initialize the volume manager after adding the software package. • Should be run only once in a System • Purpose of this program is to create rootdg disk group • Volume Manager requires rootdg disk group and it should contain at least one disk • This program is an interactive tool. Example : # vxinstall
The vxinstall program Technical Support Group Bangalore
Volume Manager User Interface • Volume Manager Storage Administrator (VMSA- Gui) Ex: # vmsa & or # vea & • Command Line Interface Ex: # vxdg list • Volume Manager Support Operations (Menu Driven) Ex: # vxdiskadm
VMSA Main Window Technical Support Group Bangalore
Command Line Interface • Many of the commands can be found in /etc/vx/bin /usr/sbin /usr/lib/vxvm/bin • Examples : # vxdisk list # vxdg list # vxprint -ht
Vxdiskadm Interface Technical Support Group Bangalore
Adding Disks • Before You Add Disks.
Disk Configuration Stages • Prior-VxVM
Disk Configuration Steps • Stage One An Initialized Disk is placed under Volume Manager’s Free Disk pool. While initializing it will create private and public region. Technical Support Group Bangalore
Disk Configuration Steps • Stage Two An initialized Disk is placed under Disk Group.Disk Media Name is assigned to it. Technical Support Group Bangalore
Disk Configuration Steps • Stage Three Creating Volumes . Assigning disk space to volumes. Technical Support Group Bangalore
Adding Disk : CLI • The vxdisksetup Command: • # vxdisksetup –i c1t0d0 [ Initialize Disk ] • # vxdg –g oradg adddisk c1t0d0=disk01 The above command add the disk c1t0d0 to diskgroup “oradg” with disk name as disk01. When you add a disk to diskgroup, it is stamped with the system host id. Note: Diskgroup should exist.
Viewing Disk Information Technical Support Group Bangalore
Viewing Disk Information • Information on individual disk. • # vxdisk list <diskname>
Removing a Disk. • Before removing a disk, make sure there is no data on the disk. Else you evacuate the data on the disk onto another disk. • Evacuating a Disk moves the content of the disk onto other disk. • The disk to which data is evacuated should belong to the same disk group. • Example: # vxevac –g oradg disk01 disk02. The above command evacuates data from disk01 to disk02 under diskgroup oradg
Removing a Disk • # vxdg –g oradg rmdisk disk01 The above command removes the disk “disk01” from diskgroup “oradg” and places the disk in free disk pool. Once the disk is placed in free pool, it can be completely taken out of volume manager control using the following command # vxdiskunsetup –C c1t0d0 -C option forces the de-configuration
Managing Disk Groups • Why Disk Groups ? • Disk Groups enables grouping of disks into logical collections for a particular set of users or applications. • It can be easily moved from one host machine to another. • Enables high availability. This can be shared by two or more hosts, but only one can access at a time. If one host crashes, other host takes over. • You can never have an empty disk group. • Disk group cannot share resources. ( One disk belonging to Multiple disk group.
Managing Disk group • Disk Media Name: Unique name assigned to a disk, when it is added to the disk group. • Disk Access record: Mapping of physical disk location to Disk media name. This record can be re-created by running # vxdctl enable Technical Support Group Bangalore