Download
1 / 4
70 likes | 1.28k Views
HyperMesh Introduction: Starting HyperMesh. On PC: Start > Programs > Altair HyperWorks > Altair HyperMesh Shortcut icons Go to <install directory>hmbin Right-click hmopengl.exe > create shortcut New shortcut can be renamed, drag and dropped, etc.

E N D
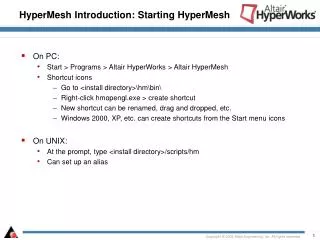
HyperMesh Introduction: Starting HyperMesh • On PC: • Start > Programs > Altair HyperWorks > Altair HyperMesh • Shortcut icons • Go to <install directory>\hm\bin\ • Right-click hmopengl.exe > create shortcut • New shortcut can be renamed, drag and dropped, etc. • Windows 2000, XP, etc. can create shortcuts from the Start menu icons • On UNIX: • At the prompt, type <install directory>/scripts/hm • Can set up an alias
HyperMesh Introduction: Starting Directory • By default, HyperMesh uses the “start directory” for files • Reads configuration files (hm.mac, hmmenu.set, etc.) • Writes history (command.cmf) • Open/save HyperMesh model, FE data, and geometry data files • Start directory determined by: • On PC, specified by the program’s icon • Right click the icon • Go to Properties • Go to the Shortcut tab • A path is specified for Start In: • On UNIX: • Start directory is the directory where you typed the command to run HyperMesh • If configuration files are not found in the start directory, HyperMesh will then look in the user’s “home” directory
Panels: General Layout • Panels often have sub-panels • Accessed by radio buttons on the left side of the panel • Panels generally work from left to right • Example: Project / to plane sub-panel 3) How to do it: Give parameters that define how the function will be executed 4) Do the action: Execute the function 2) What to do it to: Select entities that will be affected 1) What to do: Pick a sub-panel for the function to be used
Panels: General Layout • Some sub-panels are organized in columns • Each column is a different method • Work from top to bottom in the relevant column • Example: surface edit : trim with surfs/plane sub-panel 2) Method to use: Work in the appropriate column 3) What to do it to: Select entities that will be affected 4) How to do it: Give parameters that define how the function will be executed 1) What to do: Pick a sub-panel for the function to be used 5) Do the action: Execute the function