Final Mold Design
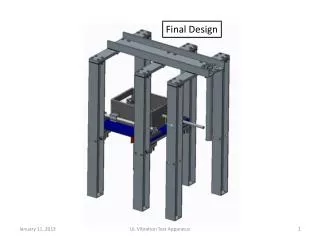
Final Mold Design. Both the dome and slab design use a 5 gallon bucket in the middle to be used as a squat hole. “2-D” Circular Slab Mold. Two metal strip semicircles connected by flanges, that are welded on, and uses bolts to connect the two halves. Notches for handles on both sides

Final Mold Design
E N D
Presentation Transcript
Final Mold Design Both the dome and slab design use a 5 gallon bucket in the middle to be used as a squat hole
“2-D” Circular Slab Mold • Two metal strip semicircles connected by flanges, that are welded on, and uses bolts to connect the two halves. • Notches for handles on both sides • Plastic sheet laid underneath mold for finishing purposing • Easily Reusable/ 2’’ thick • Build per drawing
Dome Mold • Plastic Sheet used a barrier to protect the mold • Reusable • Made from Styrofoam and wood • Inverted so better finish shows • Build instructions on following slides
Dome Mold Assembly • Cut 4 sheets of 1’’ thick housing insulation foam to 30’’x30’’ • Using a two part epoxy, glue the 4 ply’s on top of each other only gluing in the area in the corners as shown in black to the right. Clean surface completely before gluing. • Apply pressure using clamps or setting weights on top and let cure overnight (24 hrs). • On the top ply measure out a 30’’ circle, then measure out a 25’’ circle that is concentric to the 30’’. Cut out the 25’’ circle going down only 1’’ through the top ply and remove all material from top ply inside the 25’’circle. • On the next ply measure a 20’’ circle concentric to the 30’’ circle. Cut out the 20’’ circle going down only 1’’ through the second ply and remove all material from second ply inside the 20’’circle. • -On the next ply measure a 15’’ circle concentric to the 30’’ circle. Cut out the 15’’ circle going down only 1’’ through the third ply and remove all material from third ply inside the 15’’circle. Tools Needed -Flat stiff pieces to spread epoxy/bondo (ex old credit card) -Sand paper (belt sander will help go faster) -Screwgun for wooden box -Car Bondo for mistakes
Dome Assembly Continued • Take a five gallon bucket and trace out the bottom of the bucket for the bottom ply that is concentric to the 30’’ circle. Remove all the material inside the circle on the bottom ply. • Sand down the mold into the desired dome shape. • Can verify dome curvature by making a half circle with radius 30.125’’out of cardboard or plywood, verify with the website below. • http://www.handymath.com/cgi-bin/arc18.cgi?submit=Entry • Move the half circle around perpendicular to the dome until the arc of your 30.125’’ half circle is flush, similar to how a mill drills out a hole in a piece of metal. • If the half circle is not flush all around continue the sand and bondo technique. • Use Bondo to fix any imperfections and sand again. Repeat until complete. • Use strips of duct tape to cover the mold once complete • Build a wooden box around the Styrofoam to protect it from damage and help make transportable.