Trench Rescue JAC Drill
170 likes | 391 Views
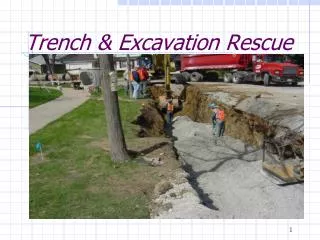
Trench Rescue JAC Drill . Study Session & Review. Making the Trench Safe. Approach Safety, Shut Down Sources of Vibration Edge Protection Laddering / Escape Routes Monitoring / Ventilation Sidewall preparation Strut placement. Approach . Size-up

Trench Rescue JAC Drill
E N D
Presentation Transcript
Trench Rescue JAC Drill Study Session & Review
Making the Trench Safe • Approach • Safety, Shut Down Sources of Vibration • Edge Protection • Laddering / Escape Routes • Monitoring / Ventilation • Sidewall preparation • Strut placement
Approach • Size-up • Approach site to minimize ground-loading and maximize view of collapse zone • Shut down any vibration sources • Secure “responsible party” & interview for information • Establish control zones • Establish Command Post
Safety • Designate a Safety Officer • Ensure Lock-Out-Tag-Out of all potential vibration sources and utilities within trench if present. • Shut down all roadways within 300’ of trench. • Spectator/coworker control (use Law Enforcement). • Begin Confined Space Permit.
Air Monitoring / Ventilation • Monitor air around and in trench prior to ventilating • Record results on permit • Ventilate trench with ducted, forced air prior to and throughout entry operations • Monitor trench again and periodically thereafter • Record results on permit
Edge Protection¾” Plywood – all around area you’re working in
If spoil pile is too near to lip, slide two 2” x 12” boards side-by-side up to pile to stand on as edge protection. Shovel pile back from lip and advance boards one at a time as you progress.
Sidewall Preparation Step One: Step Two:
Sidewall Preparation cont…. Now you’re ready for strut placement
Bridge (2”x6” or larger) is nailed to edge protection (3/4” plywood) to position ladder and Rescuer for safe access to struts Strut is pressurized on one end by two 4”x4” wedges and held in place from below by one 4”x4” wedge acting as a shelf. Strut is captured on the other end by a socket created from four 12”-long 2”x4”s After wedges are pressurized, wedges are captured with a gusset plate (3/4” plywood, 12”x12”) nailed with 8d nails: 1 in each wedge, 1 in the strut, and 1 toe-nailed into the strong-back.
Shoring Thrust Pressures Shoring thrust pressure fans out against a trench wall from the ends of the struts in a conical pattern. The Harder the soil, the farther the pressure is transmitted through the earth. Each strut exerts approximately 4 feet of concentric force radiating outward providing, in theory, 4 foot safe zones.
Strut Spacing Horizontal strut spacing of four feet on center is recommended in type “C” soils or for any rescue activity.
L.C.E.S. • Remember…. • LOOKOUTS • COMMUNICATIONS • ESCAPE ROUTES • SAFETY ZONES