Download
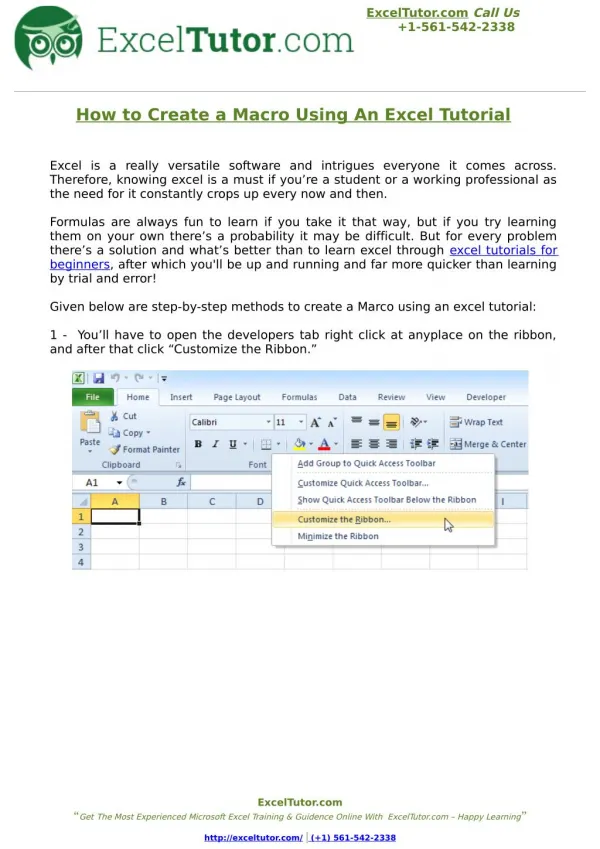
1 / 37
370 likes | 477 Views
Learn how to create a common assessment using Limelight, an online platform that offers automatic grading, quick feedback, practice tests, and easy sharing among department members. Follow these steps to create banks, passages, and questions, align with standards, build tests, and assign to classes. Maximize the benefits of this tool for paperless and environmentally-conscious assessments. Get quick feedback and enhance your assessment process with this comprehensive tutorial. For further assistance, contact shelley.nordquist@sjsd.k12.mo.us.

E N D
How to create a common assessment using Limelight Revised 09.27.11 Saint Joseph School District
Why use Limelight to create common assessments? • Multiple choice questions automatically graded • Quick feedback about students • Quick feedback for students • Ability to practice online assessments • Share common assessments automatically with other members of department • For the environmentally conscious: less paper used
Step 1: Create a new bank • On the home screen, click on “Banks”
Complete the following: “Title, “A Brief Description” • Decide who will be able to see bank • “Only me” or “My school” • Click “Create bank”
Step 2: Create a passage • Click on “Passages”
Make sure to select the desired bank under the option “Bank” • The bank needs to already be created before this step
Copy and paste desired passage to be used for assessment • Select “Subject”, “Grade range”, “Passage type” • Click “Create Passage”
Step 3: Create questions • Click “create a question”
To create questions… • Decide the “Question type” • Multiple choice • Constructed response • Multipart constructed response • Select “Answer options” • Create question in “Question text” • Select “correct answer” • Complete Responses • Correct answer is highlighted in green • Complete Question details • Under “Question Bank” select desired bank to be used for assessment • Make sure correct reading passage is shown • Click “Create and align question” to align to CA, Math, or Science standards.
Decide “Question type” • Select “Answer options” • Create Question in “Question text” • Select “correct answer”
Complete Responses • Correct answer is highlighted in green
Complete Question details • Under “Question Bank” select desired bank to be used for assessment • Make sure correct reading passage is shown
Select Question taxonomy • Click “Create and align question” to align to CA, Math, or Science Standards
Choose: - Standard Document- Grade Level - Subject- Specific Standard
To continue adding additional questions, click “Create a new question and repeat process until desired amount of questions have been added
Special note about adding additional questions: • Make sure you select desired reading passage for each question created • Without selecting passage, students will not be able to view the passage during the question
Step 4: Create assessment • Once desired amount of questions have been added, click “Tests”
Find questions for test • Click “Select by passage” • Select desired passage from your personal created bank, basic, or classroom banks • Click “Show these passages”
Click on passage • Click “Add to test” for each question • Click “Preview and save”
Test preview options • Preview, change question order, or add additional questions • Break test into multiple testing sessions • Click “Save this test” once done
Complete test information • Select “Test category” • Make sure you choose correct bank
Step 5: Assign to classes • Click “Create a new assignment”
Click on Assignment highlighted in blue • Make sure the correct test is listed under “Assigning” • Choose desired options for review after completion and time allowed • Select classes to complete assignment • Click “Create Assignment Group”
After the Common Assessment is created you can: • Print the common assessment for students to take using paper/pencil. • Have the students complete the assessment online. • In order to test online, your building secretary has access to your students’ usernames and logins through Powerschool.Please have her print those for your use. The building secretary is the only staff member in your building that has that capability.
Additional suggestions • When creating assessment items not using a reading passage, skip Step 2 • When creating test, you can also “Select by bank” or “Select by Indicator” to find assessment items • Passages show reading level
If you have any questions, email: shelley.nordquist@sjsd.k12.mo.us