Windows NT
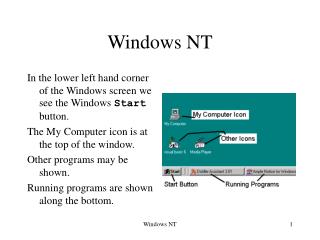
Windows NT. In the lower left hand corner of the Windows screen we see the Windows Start button. The My Computer icon is at the top of the window. Other programs may be shown. Running programs are shown along the bottom. Use of “My Computer”.

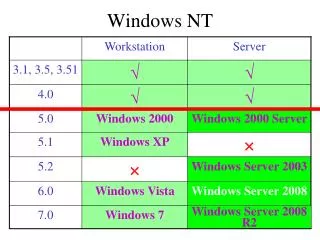
Windows NT
E N D
Presentation Transcript
Windows NT In the lower left hand corner of the Windows screen we see the Windows Start button. The My Computer icon is at the top of the window. Other programs may be shown. Running programs are shown along the bottom. Windows NT
Use of “My Computer” • Double clicking on the “My Computer” icon will invoke the process shown. • There are four views of the data, two are shown. • Normally, only one view of the window will appear until you open sub-menus. Windows NT
Copying Files • Open two “My Computer” windows, one for the area with files in it and one for the destination area • Mark file(s) in first window to be copied • Click on Edit-Copy • Move to other window • Click on Edit-Paste Windows NT
Single and Multiple Files (1) Clickleft hand button to select one file and to deselect all others. (2) While holding down Ctrl, click to add a file to selection list. (3) While holding down Shift, click to add a range of files to selection list. Windows NT
(Hint for Later) This business of Click, Ctrl-Click, and Shift-Click will come in very handy later when you wish to select Objects in Visual Basic (VB) for various kinds of manipulation. When you want to resize, change font, or move a group of objects, the Ctrl and Shift-Click really works to your advantage. Windows NT
Engineering Lab Drives The Engineering Laboratory has several drives available to you. In general they are named A, C, I, Q, R & S. A: The floppy disk drive, 3.5 inch, 1.4 (or 0.7) megabytes C: The local hard drive, belongs to the machine you are sitting in front of (the local machine). I: A part of the disk “farm”. Each of us has his own copy of drive “I” with a 40 megabyte capacity. Q, S: The software “farm”. You may execute some files, copy other but cannot change any of them. R: A part of the disk “farm” with special software for each class. R:\cs132 contains class material. Windows NT
Engineering Lab Drives Windows NT
I & M T Lab Drives Drive P on this system is not the same space as Drive I in the Engineering lab system. Windows NT
Visual Basic (VB) We will be using the Engineering Laboratory to study programming in the Visual Basic Language. This language is one of the tools we will use, it is installed in the Engineering Laboratory, it might also be installed on your computer at home or at work. In the pictures that follow we will examine how that tool is installed in the Engineering Laboratory, other machines will most certainly differ. Windows NT
Accessing Visual Basic (VB) Windows NT
Visual Basic Files • When you save a program in VB several files are created. • The two that are most significant are the .frm and the .vbp files, the form and program files. • Both of them are text files. Windows NT
The File Blink.frm Begin VB.Form Form1 Private Sub blink_Click() If blink.Caption = "blink on" Then Timer1.Interval = 500 blink.Caption = "blink OFF" Else Timer1.Interval = 0 blink.Caption = "blink on" End If End Sub . . . Windows NT
The File Blink.vbp Type = Exe Form = A:\BLINK.FRM Name="Project1" RevisionVer = 0 AutoIncrementVer = 0 ServerSupportFiles = 0 VersionCompanyName="UWM EECS Dept." . . . Windows NT
The Moral of the Story A FEATURE, not a failure, of VB is that it allows a program file on drive A to use a form file on drive I. Thus saving (or copying) a program file to another directory or drive will not change the form file it addresses unless you rename form file first and then resave the program file If you wish to transport your program on a floppy disk, BE SURE to copy both the .FRM and the .VPB files. Windows NT