Windows NT Server
Windows NT Server. Brief Overview of NT Server History, Architecture, System Concept. Installation procedure and related concepts. Material adapted from Inside Windows NT by Helen Custer Windows NT Technical Support, MS press Supporting IIS Server, MS press. Window NT OS Effort.

Windows NT Server
E N D
Presentation Transcript
Windows NT Server • Brief Overview of NT Server History, Architecture, System Concept. • Installation procedure and related concepts. • Material adapted from • Inside Windows NT by Helen Custer • Windows NT Technical Support, MS press • Supporting IIS Server, MS press C. Edward Chow
Window NT OS Effort • Bill Gate hired Dave Culter from Digital in Oct 1988 to build a team for design a new OS. • Dave Culter was the designer of a real time multitasking system called RSX-11M that ran in 32KB on PDP-11 minicomputers. It took 18 month, introduced in 1973. • He lead the effort building VMS for VAX-11 architecture. • He also lead a group that build the MicroVax workstation. C. Edward Chow
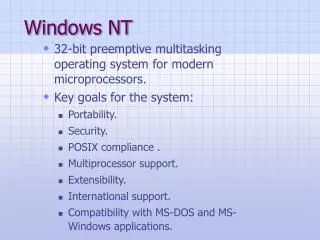
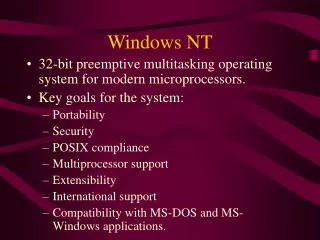
Window NT OS Design Goals • Portability (RISC or CISC) written in C. • Security (Government Certifiable Security Class C2 Level) • POSIX (UNIX standard interface spec) compliance • Compatibility • Scalable Performance (Multiprocessor support) • Extensibility • Ease of Internationalization C. Edward Chow
NT Server • Microsoft, multipurpose server OS. • Provide file, print, and application services. • Internet Information Server(IIS) comes with it. • IIS includes WWW, ftp, and gopher servers. • The OS required for other Microsoft BackOffice server components: Exchange Server (Mailer), SQL server, Proxy server, Merchant server. • Its Directory Service provides single logon and single point of administration • Provide DNS, Dynamic Host Configuration Protocol (DHCP) and Windows Internet Name Service (WINS) C. Edward Chow
NT Architecture C. Edward Chow
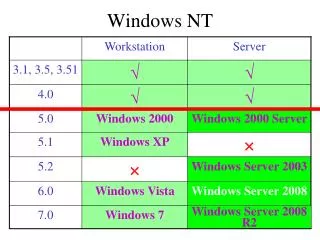
NT Server and NT Workstation • Support multiple platforms: (x86, AXP, MIPS, PowerPC) • Multitasking, Multithread operations • Support MS-DOS, Win-16, Win-32 applications • Built-in networking utilities, drivers, and protocols. • Support FAT, NT File system (NTFS), and CD-ROM File System (CDFS). C. Edward Chow
NT Server vs. NT Workstation • NT Server provides enhanced features for running different servers. • NT Workstation designed and tuned as multitask desktop operation systems. • NT workstation can only have a limit of 10 incoming concurrent sessions. • The # of concurrent sessions on NT server depends on the license (Max. of 256 inbound sessions?) C. Edward Chow
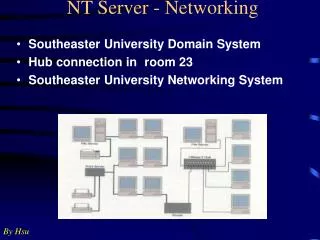
Workgroup vs. Domain • Both NT workstations and NT stand-alone servers can be member of a Window NT workgroup. • Each computer functions as both server and client. Maintains its own accounts, admin, security policy • NT Domain provides improvement over the redundant effort of admin and security.Play Domain video from MS. C. Edward Chow
NT Domain C. Edward Chow
Microsoft Servers C. Edward Chow
NT Installation Preparation • Preparation: Make sure your hardware is in NT Hardware Compatiblity List (HCL). http://www.microsoft.com/isapi/hwtest/hcl.idc?RLD=34 • There is a NT Hardware Qualifier (NTHQ) program for determining hardware on x86 based computer. • Create three NT Server Setup disks. They typically comes with purchase. But it also contains in the CD. • These three floppy need to be formatted and empty. • Type d:\I386\winnt /ox to create them. C. Edward Chow
NT 4.0 Minimum Hardware Requirements • CPU: 486/33 or higher, MIP R4400, Digital Alpha AXP, Prep-compliant PowerPC • Memory: 16MB for NT Server (32 MB at least); 12MB for NT workstation (32MB at least) • Hard disk space: 125MB for NT Server on partition with 16KB clusters (200MB on partition with 32KB clusters); 110MB for NT Workstation. • Display: VGA or higher • Mouse C. Edward Chow
System and Boot Partitions • NT Setup program copies the hardware specific files to the active partition (normally C drive), also known as system partition. • Setup program then prompt you to select a folder for installing NT OS files. This can be on other partition. • The partition that contains the OS files and its supporting files is called boot partition. C. Edward Chow
Selecting File System • You have a choice of NTFS (NT file system) and File Allocation Table (FAT). • NTFS can only be accessed by NT. • More secure. • Provide File level security • Used when it is the only OS in use. • FAT • Allow multiple OS’ (DOS, Linux, Win95, Win32, NT) to access and share • Less secure. C. Edward Chow
NT Server Initial Installation • Insert NT Server Setup Boot Disk and Restart computer. • It indicates inspecting the computer hardware, load NT executive and hardware abstraction layer software. • Then it asks for inserting the NT Server Setup Disk #2. • Setup continues to load files (video, PCMCIA drivers and kernel). It then shows the Welcome to Setup screen. Hit Enter to have NT Setup automatically detect mass storage device. • When asked for NT Server Setup Disk #3, insert it and hit enter. • It then loads the device drives for those devices and detects CD-ROM, or SCSI drives. • Hit enter after mass storage device is detected. • It then load IDE device drivers, NTFS, and CD-ROM FS. • It then asks for NT Server CD-ROM. Insert it and hit Enter. C. Edward Chow
NT Server Initial Installation • The NT licensing Agreement appears. Page down to last page, then hit F8 (I agree). • It then loads the setup.ini and shows the setup has determined certain hardware and software components. Hit Enter to confirm. • The existing partition is then shown. Choose the partition by hitting up or down arrow. • Hit enter to install in the partition highlighted.Choose the last partition for installing NT. • Enter C to create partition in the unpartitioned space C. Edward Chow
NT Server Initial Installation • After choosing the partition, you can choose to leave the current file system in tact, by hitting enter. • You can click Format FAT. Hit Enter. • You are prompted to press F to begin the format. • Default installation directory of winnt is display, hit enter to accept it. • Hit enter to have Setup examine the hard disk. • Setup copies files to winnt folder, take several min. • When prompted, remove floppy and CD-ROM and restart the computer. C. Edward Chow
Gathering Information Step • When prompt, insert NT Server CD-ROM, click OK. • NT Server Setup Wizard Appears, click Next. • NT Server Setup create folder hierarchy for the installation. • Type name and organization, click Next. • In CD-Key Box, type 040-0048126, click Next. • Click Per Server, enter 100 concurrent connections, click Next. • In the name box, type Server1 for the server name, click Next. • Click Primary Domain Controller, click Next. • In the password and confirm password boxes, type “cs401web”, this is the Administrator account password, click Next. • If prompted, click “Do not enable the floating point workaround” click Next. • Click Yes, create an emergency repair disk (recommended) click Next. Click Next again to accept default components. C. Edward Chow
Install NT Networking • Click Next to begin installing Window NT Networking. • Click Next to confirm computer is wired to the net. • Clear Install MS IIS check box, click Next to skip the step. We will install it later. • Click Start Search to detect network adapter card. • Select the appropriate network card, Click OK.. • Clear NWLink IPX/SPX compatible Transport check box, verify that TCP/IP is the only protocol selected, click Next. • Click Next to confirm the selected network services. • Click Next to install the selected network components. • When prompted, enter the appropriate configuration setting of the network card and click Continue. • Click no, since we do not want to use DHCP. C. Edward Chow
Set up TCP/IP • Microsoft TCP/IP properties dialog box appears on the IP Address tab. • Click specify an IP address. • Type 128.198.9.117 in the IP Address box. • Click OK to accept default subnet mask of 255.255.0.0 and a blank default gateway. • Click Next to accept default binding. • Click Next to start the network. • In the Domain box, type Domain1 and then click Next to create the domain. C. Edward Chow
Complet NT Server Setup • When NT Server Setup dialog box appears, click Finish. • In the Time Zone list, click correct time zone, confirm the Date and Time options are correct, and click Close. • Click OK to confirm the detected video adapter. • Click Test to test the video adapter settings, click OK. • When see the bitmap, click Yes and OK. Otherwise adjust the setting. • Click OK to confirm the video setting. • When prompted, insert Emergency Repair disk, click OK. • When prompted, remove floppy and CD-ROM, click Restart Computer. • When OS selection list appears, select the Window NT Server verson 4.0, the press Enter. Setup is complete. C. Edward Chow
Install NT 4.0 Option Pack • It includes NT service Pack 3, Microsoft® Site Server Express, Microsoft® FrontPage® server extensions, new wizards and more. • The Windows NT Option Pack delivers the following new application and communications services, that enable the development of the next generation of distributed applications on Windows NT Server 4.0: • Internet Information Server 4.0 • Microsoft Transaction Server 2.0 • Microsoft Message Queue Server 1.0 • Internet Connection Services for Microsoft RAS C. Edward Chow
IIS Architecture C. Edward Chow
IIS Architecture (continue) • All services of IIS resides in a process called Internet Information Service Application (Inetinfo). • Extenstions of IIS are through connectors, they are DLL acting as comm. Pipe between IIS and a service. • Backoffice connectors: Exchange/ODBC connectors • CGI • ISAPI filters (for pre/post processing of packets); e.g. SSL • Administration tools communicate through RPC. • Logging through log file or ODBC Data Source Name • Performance monitor and Task manager for resource usage. C. Edward Chow
Create NT User Account Select Start | Programs | Administrative Tool | User Mgr for Domain C. Edward Chow
New User Account Creation C. Edward Chow
Managing IIS Services • Select Start | Programs | MS Internet Server | IS mgr Double click on the computer name section of theservice for update C. Edward Chow
IIS WWW Service Configuration C. Edward Chow
IIS WWW Directory Configuration C. Edward Chow
IIS WWW Logging Configuration C. Edward Chow
IIS WWW Access Configuration C. Edward Chow
IIS FTP Service Configuration C. Edward Chow
IIS FTP Message Configuration C. Edward Chow
IIS FTP Directory Configuration C. Edward Chow
Run CGI Perl scripts on NT IIS • www.activestate.com provides free Perl for Win32 machines. Current build version is 513, based on 5.005_3 Perl release. • The activeperl is about 4.8MB. • After download and install, you can run Perl scripts from MSDOS prompt window. • You donot have to include #!/usr/bin/perl as the first line but it does not hurt to include for portability. • Just type the <filename>.pl to execute it. • Same distribution includes PerlIS and ISAPI dll for running perl CGI scripts efficiently. C. Edward Chow
ISAPI • ISAPI (Internet Server Application Programming Interface) is an API for writing extensions to IIS web servers. • Originally developed by Process Software, and adopted by Microsoft as its standard server API. • It complements or replaces the Common Gateway Interface (CGI). • ISAPI's main advantage over CGI is that it uses dynamic-link library (DLL) function calls to communicate with extension components, rather than environment variables and standard I/O, as CGI does. • There's a lot of overhead when starting new processes on Win32 platforms, and DLL calls eliminate the need for new processes, thus reducing the running time. C. Edward Chow
Perl for ISAPI • Perl for ISAPI (PerlIS), is an ISAPI extension that runs Perl scripts on Win32 platforms. • Writing Perl scripts that run under PerlIS is not much different than writing scripts for the Common Gateway Interface (CGI). • Perl for ISAPI doesn't have much general purpose use. For general purpose programming, stick with the perl interpreter (perl.exe). • You may also see Perl for ISAPI referred to as PerlIS. PerlIS is the name of the Perl for ISAPI DLL. • Perl for ISAPI is distributed as a part of the Perl for Win32 distribution C. Edward Chow
Configure IIS 3.0 or lower to support Perl for Win32 • By default, Perl for Win32 maps the .plx extension to PerlIS? • Consult “Configuring and Testing a PERL [sic] Script with IIS” Follow these steps: • Use Regedt32.exe to associate the extension in Registry for your scripts with the appropriate interpreter in the script map for IIS. This is under the Registry key HKEY_LOCAL_SYSTEM, with the sub-key “System\CurrentControlSet\Services\W3SVC\Parameters\Script Map”. • Many people map two extensions: one to perl.exe (for example, .pl) and another to PerlIS.dll (for example, .plx). Use the full paths to specify the executable files (perl.exe or PerlIS.dll) in the script map entry. C. Edward Chow
Windows NT Registry • Registry is a unified database storing all hardware and software configuration information. C. Edward Chow
Use Regedt32.exe to update Registry • Select Edit | Add Value • Enter .plx Click OK • Enter full path as string value C. Edward Chow
Configure IIS to run Perl scripts • Put your scripts in a virtual directory on the server that has Execute access but not Read access. • add virtual directories or view their access with the Internet Service Manager. Remember that the URLs for your virtual directories can't overlap with URLs to directories in the WWW root directory. • Ensure that your scripts are readable by the account used by the IIS server. You set this account in Internet Service Manager; it is set to IUSR_[your server name] by default. • Ensure that all supporting files, like the perl binary files, the perl library files, and the modules that you use, are all readable by the account used by the IIS server. C. Edward Chow
Configure IIS4.0 to Run Perl Scripts 1. Open the IIS 4.0 Internet Service Manager. This will bring up the Microsoft Management Console with the Internet Service Manager snap-in selected. 2. From the tree display on the left, select the level at which to apply the mappings. You can choose an entire server, web site, or a given virtual directory. 3. Select Properties from the Action menu. 4. If you chose to administer the properties for the entire server, the Server Properties dialog will appear. Select WWW Service from the Master Properties pull-down menu and click the Edit button under Master Properties. This opens WWW Service Master Properties. Select the Home Directory tab and proceed to step 7. 5. If you chose to administer the properties for an entire web site, the Web Site Properties sheet appears. Select the Home Directory tab and proceed to step 7. C. Edward Chow
Configure IIS4.0 to Run Perl Scripts 6. If you chose to administer the properties for a virtual directory, the Virtual Directory Properties sheet appears. Select the Virtual Directory tab and proceed to step 7. 7. Click the Configuration button. This opens the Application Configuration dialog. 8. Select the App Mappings tab and click the Add button. You see the Add/Edit Application Extension Mapping dialog. 9. To run Perl as a CGI application, type the full path to Perl.EXE followed by %s %s. When a script is executed, the first %s will be replaced by the full path to the script, and the second %s will be replaced by the script parameters. 10. To run Perl for ISAPI, type the full path to PerlIS.DLL. The %s %s is not required for ISAPI DLLs. 11. In the Extension field, type .pl or .plx (or whatever extension you want to use). 12. The application mapping is now complete. Click the OK button and click OK to dismiss any remaining dialogs/property sheets. 13. Close the IIS 4.0 Internet Service Manager. C. Edward Chow
Application Mapping C. Edward Chow
Homework #7 • Sign up for installing NT server with IIS configurationhttp://redcloud.uccs.edu/~cs401/ntr.htm • At your time slot, • bring your classnote on NT server installation • check out NT Server Evaluation CD from me. • write briefly the steps and the interactions in each step. • create directory with your login in wwwroot directory • ftp your personal web page there. Note the default web page is default.htm not index.html • verify your installation by checking the web access and ftp connection from other machines. Print a copy of the web browser access. • ask me to check the final installation. C. Edward Chow