Student ePlanner
90 likes | 223 Views
This guide provides step-by-step instructions for integrating your Panther Portal calendars, including Academics and Advisory calendars, into Microsoft Outlook 2010. It covers how to copy the Webcal URLs from the Panther Portal, add these calendars to Outlook, customize your calendar view, and effectively manage your tasks and categories within Outlook. Follow these clear instructions to enhance your organizational and planning capabilities.

Student ePlanner
E N D
Presentation Transcript
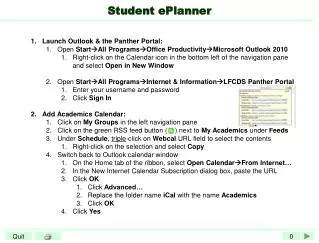
Student ePlanner • Launch Outlook & the Panther Portal: • Open StartAllProgramsOfficeProductivityMicrosoft Outlook 2010 • Right-click on the Calendar icon in the bottom left of the navigation pane and select Open in New Window • Open StartAllProgramsInternet & InformationLFCDS Panther Portal • Enter your username and password • Click Sign In • Add Academics Calendar: • Click on My Groups in the left navigation pane • Click on the green RSS feed button ( ) next to My Academics under Feeds • Under Schedule, triple-click on Webcal URL field to select the contents • Right-click on the selection and select Copy • Switch back to Outlook calendar window • On the Home tab of the ribbon, select Open CalendarFrom Internet… • In the New Internet Calendar Subscription dialog box, paste the URL • Click OK • Click Advanced… • Replace the folder name iCal with the name Academics • Click OK • Click Yes
4. Add Advisory calendar: • Switch back to Panther Portal window • Click on the green RSS feed button ( ) next to My Advisory under Feeds • Under Schedule, triple-click on Webcal URL field to select the contents • Right-click on the selection and select Copy • Switch back to Outlook calendar window • On the Home tab of the ribbon, select Open CalendarFrom Internet… • In the New Internet Calendar Subscription dialog box, paste the URL • Click OK • Click Advanced… • Replace the folder name iCal with the name Advisory • Click OK • Click Yes
5. Customize calendar view • In the Navigation pane: • Drag Academics into the My Calendars group first position • Drag Advisory into the My Calendars group second position • Click Work Week in the arrange section of the Home tab of the ribbon • Overlay the Calendars • In the Academics tab, click on the left-pointing arrow • In the Advisory tab, click on the left-pointing arrow • 4. Click on the Academics tab to bring it to the foreground • 5. Increase the size of the Task bar • Move your pointer to the top of the Tasks area until it becomes a double-headed arrow • Drag the task bar up until you have approximately equal spaces for the calendar and the task bar • Click on the View tab of the ribbon • Select Navigation PaneMinimized
HOW TO DELETE GENERIC COLOR CATEGORIES IN MICROSOFT OUTLOOK Open Microsoft Outlook On the Home tab find and click the Categories button on the top of the… 3. Then click on the All Categories option. Here you will see a list of existing categories. Click in the box next to the category you want to Delete, then click the Delete button on the right. Clicking the Deletebutton will bring up a confirmation message, simply click Yes to delete the category 5. When you are finished deleting all the categories, click OK.
HOW TO CREATE A NEW COLOR CATEGORY IN MICROSOFT OUTLOOK: Open Microsoft Outlook On the Hometab find and click the Categoriesbutton on the top of the… Then click on the All Categories option. 4. On the right hand side click NEW. 5. In the Name box, type a name for the new color category. 6. Click the arrow next to Color and click on the color that you want. 7. Click OK
ADDING ASSIGNED COLOR CATEGORY IN MICROSOFT OUTLOOK: • Please follow the steps above and setup the following class categories with the colors listed bellow: • Mathematicsis Yellow • Social Studies is Red • English is Blue • Scienceis Green • Foreign Language is Purple • Visual Arts/Drama/Music is Dark Gray
7. Add new homework to your assignment book • Move your mouse to the gray task list at the bottom of the calendar and click under the day that the assignment is due. • Type the name of the assignment and press Enter on the keyboard. • To add the buddy binder color to an assignment • right-click on the gray box next to its flag and choose the proper category. • To add more details to an assignment • Double-click on the name of the assignment. • Enter as much information as you need in the task window that appears. (You can copy and paste from the Portal, OneNote, DyKnow, and other programs!) • Click the Save & Close button in the Task ribbon.
Marking homework done • Click on the red flag next to the assignment tocross it off your list. • To “uncheck” an assignment marked done bymistake, click on the check mark • If you finish an assignment early and check it off, it will move to the day that you marked it done (today!). If you accidentally mark an assignment done, you can find it again by click on the Today button in the Home ribbon.