Download
1 / 37
370 likes | 729 Views
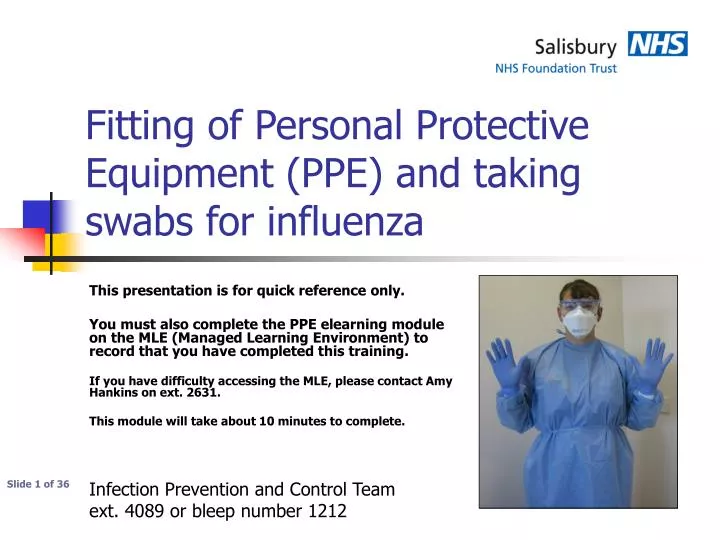
Fitting of Personal Protective Equipment (PPE) and taking swabs for influenza. This presentation is for quick reference only. You must also complete the PPE elearning module on the MLE (Managed Learning Environment) to record that you have completed this training.

E N D
Fitting of Personal Protective Equipment (PPE) and taking swabs for influenza This presentation is for quick reference only. You must also complete the PPE elearning module on the MLE (Managed Learning Environment) to record that you have completed this training. If you have difficulty accessing the MLE, please contact Amy Hankins on ext. 2631. This module will take about 10 minutes to complete. Slide 1 of 36 Infection Prevention and Control Team ext. 4089 or bleep number 1212
In this module: • What is PPE • Types of face mask • How to fit a mask correctly • Removal and disposal of PPE • Taking swabs for influenza Section 1 - Putting on PPE Section 2 - Taking off PPE Section 3 - Specimen taking Slide 2 of 36
PPE (Personal Protective Equipment) includes: Section 1 – Putting on PPE • Disposable apron • Face mask (level 1, 2 or 3) • Disposable gloves • Goggles or visors • Water-repellent disposable gown Slide 3 of 36
Level 1 mask - a level 1 mask is a standard surgical mask Types of masks available Section 1 – Putting on PPE Slide 4 of 36
Level 2 mask Types of masks available Section 1 – Putting on PPE Slide 5 of 36
Level 3 masks Types of masks available Section 1 – Putting on PPE There are several different styles of Level 3 mask, some having valves Principles of fit checking remain the same for Level 2 or Level 3 masks Slide 6 of 36
Masks for suspected/confirmed influenza Level 1 masks These should be worn by staff working in areas where there are patients isolated for suspected or confirmed influenza. Level 3 masks Level 3 masks should be worn, instead of a Level 1 mask, by staff performing aerosol generating procedures, e.g. chest physio, bronchoscopy, intubation and related procedures. Section 1 – Putting on PPE Slide 7 of 36
Other PPE for suspected/confirmed influenza • In addition to the correct mask staff need to wear the following PPE: • Disposable apron • Disposable gloves • If performing aerosol generating procedures staff will need to wear: • Water repellent gown, instead of an apron • Eye protection – visors or goggles • Disposable gloves
Mask Fit checking - general principles Section 1 – Putting on PPE • 1. Separate edges of mask to fully open it Slide 8 of 36
Mask Fit checking - general principles Section 1 – Putting on PPE • 2. Pre-bend the nosepiece to conform to face Slide 9 of 36
Mask Fit checking - general principles Section 1 – Putting on PPE • 3. Hold mask upside down to expose headbands and separate using thumbs and index fingers Slide 10 of 36
Mask Fit checking - general principles Section 1 – Putting on PPE • 4. Cup the mask under chin, and pull headbands up & over the head Slide 11 of 36
Mask Fit checking - general principles Section 1 – Putting on PPE • 5. Position headbands at base of neck and crown of head Slide 12 of 36
6. Conform nose piece across bridge of nose and continue to adjust the mask to achieve facial seal Fit checking - general principles Section 1 – Putting on PPE Slide 13 of 36
7. Continue to adjust the mask to achieve a good facial seal The mask will not work properly if it is not snugly fitted around your nose and chin. Airborne contamination could get through any gaps between the mask and your face. Fit checking - general principles Section 1 – Putting on PPE Slide 14 of 36
Do not proceed with your activity until you have successfully fit-checked your mask and put on all appropriate PPE Section 1 – Putting on PPE Slide 15 of 36
In this section you will learn how to remove PPE. Always assume that your PPE has become contaminated and always follow the correct procedure for taking it off. It is important that PPE is removed safely to prevent contamination. Removal of PPE Section 2 – Removing PPE Back to slide 2 Slide 16 of 36
Remove gloves Step 1 Section 2 – Removing PPE Slide 17 of 36
Remove gloves Take care not to touch the outside of the gloves Step 1 Section 2 – Removing PPE Slide 18 of 36
Remove gown Step 2 Section 2 – Removing PPE Slide 19 of 36
Remove gown Roll up gown inside out Step 2 Section 2 – Removing PPE Slide 20 of 36
Dispose of gloves and gown as clinical waste Step 3 Section 2 – Removing PPE Slide 21 of 36
Remove visor or goggles Handle only by the sides or headband - do not touch the front of the visor or goggles Step 4 Section 2 – Removing PPE Slide 22 of 36
Remove visor or goggles Drop into clinical waste bin Step 4 Section 2 – Removing PPE Slide 23 of 36
Step 5 Section 2 – Removing PPE • Wash hands with soap & water, dry thoroughly using disposable towels Slide 24 of 36
Step 6 - Remove face mask Section 2 – Removing PPE • Depending on type of mask, either break headbands at the side of the mask or stretch the elastic straps over the head • Drop discarded mask into clinical waste bin Slide 25 of 36
Gel hands with alcohol hand rub gel to remove any contamination from the mask Step 7 Section 2 – Removing PPE Slide 26 of 36
Leave room and wash hands again Step 8 Section 2 – Removing PPE Slide 27 of 36
1. Remove gloves 2. Remove gown 3. Dispose of gloves and gown as clinical waste 4. Remove visor or goggles and put in clinical waste bin 5. Wash hands with soap and water, dry thoroughly using disposable towels 6. Remove face mask and drop into clinical waste bin 7. Gel hands with alcohol hand rub gel to remove any contamination from the mask 8. Leave room and wash hands again Removal of Personal Protective Equipment Section 2 – Removing PPE Slide 28 of 36
Specimen taking How to take virology swabs for Influenza Back to slide 2 Slide 29 of 36
Type of Swab Section 3 – Specimen taking for influenza • A combined nose and throat swab should be taken using a viral swab Slide 30 of 36
Assemble required supplies: Section 3 – Specimen taking for influenza • 1 swab for each patient • Staff member taking the swab must weardisposable apron, gloves and face mask • Eye protection must be used if there is a risk of eye splash Slide 31 of 36
Take a specimen from the throat first Throat swab collection Section 3 – Specimen taking for influenza • Using the swab, vigorously swab the posterior pharyngeal wall including tonsil area Slide 32 of 36
Nasal Swabbing Section 3 – Specimen taking for influenza • Tilt the patient’s head back slightly, and using the same swab insert along the medial part of the septum until it reaches the posterior nares • Always take the throat swab before you take the nasal swab Slide 33 of 36 Take a specimen from the throat first, then from the nose using the same swab
Specimen taking Section 3 – Specimen taking for influenza When you have taken the specimen: • Insert swab into the vial and ‘snap off’ swab at breakpoint. • Label appropriately with patient details. • Complete a T’Quest request form in full and place vial in a bag and attach the T’Quest form. Slide 34 of 36 Take a specimen from the throat first, then from the nose using the same swab
Specimen taking Section 3 – Specimen taking for influenza When you have taken the specimen: • Dispose of PPE as clinical waste • Wash hands using soap and water • Dry hands thoroughly with disposable paper towels Slide 35 of 36
Fitting of Personal Protective Equipment (PPE)quick guide completed End of this quick reference guide to using PPE and taking a combined throat and nasal swab for influenza. You must also complete the PPE elearning module on the MLE (Managed Learning Environment) to record that you have completed this training. If you have difficulty accessing the MLE, please contact Amy Hankins on ext. 2631. Slide 36 of 36 Infection Prevention and Control Team ext. 4089 or bleep number 1212