Overview of Picogreen
50 likes | 259 Views
Overview of Picogreen. Setup Time: 10 minutes Runtime: ~5 minutes/plate Cleanup Time: 10 minutes. Preparation: At least 15 minutes prior to setup, take the Picogreen dye out of the fridge and allow it to thaw at room temperature, in a dark location.

Overview of Picogreen
E N D
Presentation Transcript
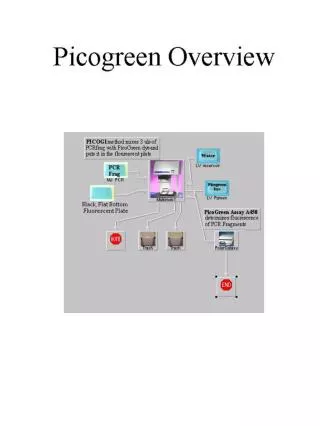
Overview of Picogreen Setup Time: 10 minutes Runtime: ~5 minutes/plate Cleanup Time: 10 minutes • Preparation: • At least 15 minutes prior to setup, take the Picogreen dye out of the fridge and allow it to thaw at room temperature, in a dark location. • Check to be sure there is enough TE for the procedure. TE can be made by adding 500ul of 0.5M EDTA to 250mL of EB (Elution Buffer). • The fluorescent plate is usually found to the left of the sink in the robot room, locate one of these for each Picogreen reaction you perform. • You will need your plate labeled “(Plate ID) PCR Frags (Today’s Date)”, reservoir with water, reservoir with picogreen, and fluorescent plate. • 25mL of TE are mixed with 125 l of picogreen dye for every two plates processed. BE SURE TO USE THIS MIXTURE IMMEDIATELY. It is light sensitive, therefore the longer it sits out in the light, the more your results will be affected negatively. • Procedure: • Multimek - PicoG1 dilutes a portion of the PCR fragments with water, then mixes that dilution with the picogreen dye before adding the entire mixture to the fluorescent plate. • Select the FluoroStar program on the Robot computer. Highlight “User” and click “Run”. At the bottom left of the screen is a box that reads either “Fluorescence” or “Absorbance”. By clicking on that box you can change the function. Be sure it reads “Fluorescence” for the Picogreen procedure. • Open the top of the FluoroStar machine and rotate the cords so the Fluorescence cords are at the top. These are the silver cords. • Open the Fluoro tray. Place the fluorescent plate. Close the Fluoro tray. • Back at the computer, click on the “Traffic Signal” icon. • Click on the “Picogreen Assay” program. Click “Ok”. Label your experiment run with your plate id and the date. Click “Start Test Run”. • Your results are put into an Excel spreadsheet. You can access this spreadsheet by opening FluoroStar and selecting the “Microsoft Excel” icon at the top of the screen, in the middle of the tool bar. • Look for directions on how to access your results in the protocol “FluoroStar Results”. • Next Step: Manual LIC setup
Aspirate 97 lWater Aspirate 3 l PCR frag Dispense to read plate Rinse tips Aspirate/Dispense PicoGreen solution