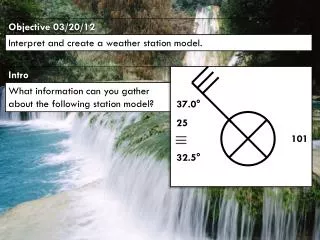
Intro
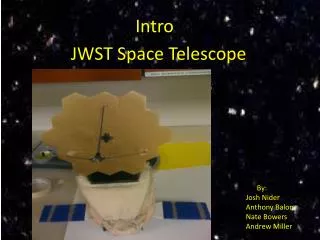
JWST Space Telescope. Intro. By: Josh Nider Anthony Balon Nate Bowers Andrew Miller. Selection of Problem. The Sun shield.

Intro
E N D
Presentation Transcript
JWST Space Telescope Intro By: Josh Nider Anthony Balon Nate Bowers Andrew Miller
Selection of Problem The Sun shield We selected the sun shield because it is necessary to protect the mirror from micrometeorites and the sun, while thermally insulating the electronics and solar panels.
Constraints The sun shield has to be capable of blocking sunlight. It needs to have more than one layer to prevent virtually all light from passing through it. It also has to be protective of micrometeorites along with being thermal insulated to protect the electronics. One last constraint that needs to be recognized is that it has to fold up to go into space.
Ideas Our initial ideas consisted of the materials we needed and the shape of the sun shield. Our initial materials included a thin coat of ceramic, a thin gold coating, a solid gold sheet, a solid platinum sheet, and even possibly a sheet of diamond. We figured that if we put the diamond sheet on the outer most part while having the ceramic, thin gold coating, platinum, and thick gold sheet up to the mirror, it would be fully protected and insulated. While the diamond sheet protected everything from micrometeorites, the other metals and ceramic would serve as a good thermal insulator for the electronics. Our initial shapes were composed of being either triangular, hexagonal, or octagonal shaped. All three could move with certain restrictions on each. For the octagonal shape, we decided that it would be best utilized if we elongated the sides which would in turn elevate the sides to protect the mirror while holding a decent shape in space. As the telescope would go up into space the sun shield would fold up around the mirror to make it very compact until it reaches its destination in space. For the triangular shape, we decided there would be separate triangles hinged together to protect the mirror at any edges it needed and it would fold up inside the space shuttle while going up into space.
Design We began starting our sun shield design by picking the materials and the shape of the sun shield along with designing it on SolidWorks. We decided that it would be best if we picked the triangular design so it could meet the requirements of folding up very efficiently. As for materials, we decided that we could not get the materials we wanted so we decided to use something like it to represent the materials. We used SolidWorks to help visualize the entire telescope by inserting our ideas into our creation of the sun shield and mirror on the program. We also had to take into consideration making the mirror to demonstrate how the sun shield will fold up and protect the mirror.
Model The model helped us very much while designing our prototype. It gave us an idea and understanding of the parts and how to assemble them. It was very convenient because we shaped the model as to what our prototype looks like to fully understand the concept of fabricating our prototype.
Prototype We started our model by finalizing and gathering our thoughts and ideas and turning them into a prototype. We first used SolidWorks to make a model of the mirror. Then we constructed a prototype of the sun shield with cloth and metal rods so it could fold and stand up. After this we made the electronics panel on the bottom and the back of the mirror out of foam core. Finally we assembled everything together and got our finished product
Conclusion Even though we didn’t use some of our initial designs, we made a solution to constructing the JWST. From the beginning, we recognized the problem and started to make a solution. We used the steps from identifying the problem to making a prototype. While we went through these steps, we would always look forward and make sure that we were meeting the requirements that the JWST has to meet in order to go into space. Finally we finished our prototype of the JWST and met its demands complete the model.