Download
1 / 66
660 likes | 690 Views
Learn GarageBand preferences, recording techniques with mic, arranging regions, adding voice effects, importing audio files, and more. Understand loop settings, audio monitoring, effects, and region editing. Enhance your recording skills with hands-on practice.

E N D
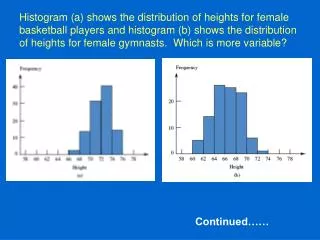
GarageBand Continued Session 09
Announcements Part 1 GB Preferences Recording a voice with a mic Recording multiple takes with Cycle Region Split regions Recording on several tracks at same time Arrange Regions Voice effects Importing audio and midi files Ducking Part 2 Audio Podcast General strategies Markers Preview OVERVIEW
Due to cancel last week Presentation does contain aspects we will skip Musical typing Score view Ringtones ANNOUNCEMENTS
Launch GarageBand (GB) At new project window select Piano Click Choose CREATE A NEW PROJECT
New Project Template Keep default tempo and signature and key Save As testRecordings.band click Create CREATE A NEW PROJECT
5 main sections – one at a time GB Menu > Preferences General Audio/Midi – we will cover last Loops Advanced My Info GB PREFERENCES
Metronome Cycle Recording Audio preview GENERAL
Utilizing the Apple Loops Adding loops to timeline converting to real instrument LOOPS
Limit track amounts Set audio resolution for quality Movie thumbnail would effect RAM usage ADVANCED
Metadata What is metadata? What are reasons for the way it appears below? What are reasons for changing it? MY INFO
Setting up inputs and outputs is critical AUDIO/MIDI
Output means speakers/monitors System setting means what the Mac OS Sound preference is set to Built-in output means the internal speakers in the Mac You could have external hardware that controls output that is recognized by OS but we don’t Input means source of sound System setting means what the Mac OS Sound preference is set to Built-in input means the 3.5mm jack on the back Built-in microphone means the Mac’s own mic SETTING UP INPUT IN GB
Apple Menu > System Preferences > Sound MAC OS SOUND
Setting up inputs and outputs is critical OUR SET UP
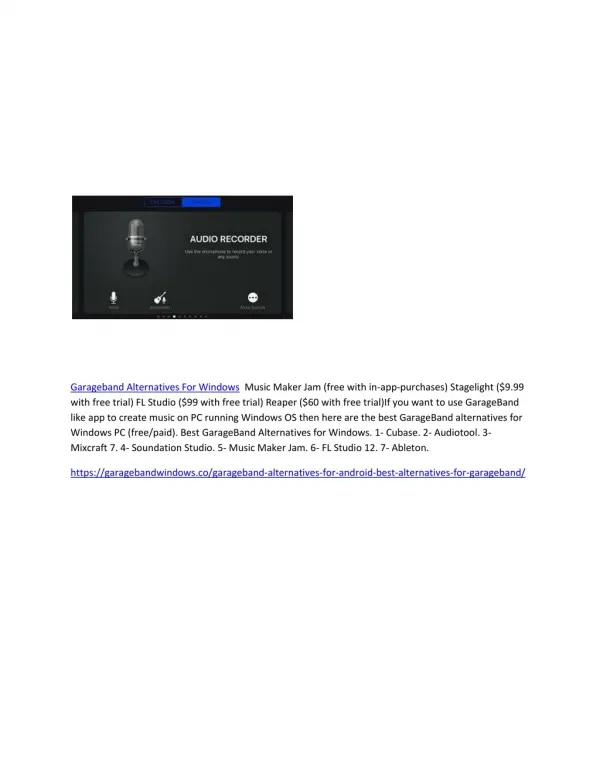
New real instrument track Rename track “Voice” How do we do that? Set icon to outline of person Track Info>Browse Tab, set input source to built-in microphone Monitor means listen to it while you are recording Likely you do not want that Set/confirm inputs RECORD VOICE with MIC
SCRIPT • Simultaneously, as one big group: • Record your voice with script below (errors intentional) • Speak using deliberate cadence, slow, articulate, that could be replicated • Script • 1, 2, 3, 4, 5, 6, 7, 8, 9, 10, 11, 12, 13, 14, 15, 20, 19, 18, 17, 16, • Confirm recording by playback
Select the region you want to split Move the playhead to the point in the region where you want to split it Choose Edit > Split Select your counting sequence track/region Move playhead to after you say 15 Edit > Split Playback SPLITTING REGIONS
Can define specific part of project to record in using cycle region Cycle region determines where recording starts and stops You can record multiple versions or “takes” then choose the one you want Click Cycle Region button Cycle Region appears as yellow strip just below the beat ruler Move left edge of cycle region to the point where you want to start recording by dragging Move right edge to point where recording will end Having it start earlier than you want is helpful if you are manipulating both the mouse and the instrument RECORD with CYCLE REGION
Select the Real Instrument track you want to record in Click Record button to start recording Play or sing and a new region appears in the track When finished click the play button to stop recording For additional takes, click the Record button and play again When finished, click the Cycle button to turn it off When you record multiple takes, the recorded region has a circle in upper left corner showing the selected take, To choose different take: In timeline, click the circled number in the upper-left corner of the loop Takes menu appears Choose different take To delete take, choose delete take from the takes menu To delete all takes, delete unused takes from the takes menu RECORD with CYCLE REGION
Use our 1-15; 20, 19, 18, 17, 16 track recording Identify the split region from 20-16 for cycling Re-record correct sequence, 16, 17, 18, 19, 20 Intentionally make errors to produce multiple takes Errors of sequence or errors of voice Find the best take Fix the original track, confirm with playback RECORD with CYCLE REGION
In Track Info pane, each Real Instrument track must be set to use different input source Enable tracks for recording Click Record in transport controls RECORD SEVERAL TRACKS AT SAME TIME
Given what we’ve learned so far what are some things you could do with GB? IDEAS THAT COME TO MIND
LETS REVIEW This is what? This is what? This is what? Questions:
More on regions and moving regions Loop regions Resize regions Split and join regions Use arrange track to define sections of project Transpose regions Enhance timing of regions Use timeline grid to snap region to measures, beats or time ARRANGING & EDITING
Editing a region does not effect original Apple loop Purple = Real Instrument from your recording Blue = Real Instrument from loops Orange = Regions imported from audio files Green = Software Instrument from recording or loop Selecting regions Click For multiple regions, shift-click Dragging Cut, copy, paste all traditional cut, copy, paste REGIONS
Drag left or right in timeline Drag up or down to different track of same track type Delete a region MOVING REGIONS
Select the region you want to split Move the playhead to the point in the region where you want to split it Choose Edit > Split Select your counting sequence region Move playhead to after you say 5 Edit > Split Repeat by placing playhead after you say 10 Edit > Split Playback SPLITTING REGIONS
Regions must be same type Regions must be adjacent to each other on same track Select the regions you want to join Choose Edit > Join If joining audio/real instruments you will be asked if you want to create a new audio file. Click Create to join. Apple Loops cannot be joined Select your two regions 1-5 6-10 Choose Edit > Join JOINING REGIONS
First lets split up again Select your counting sequence region Move playhead to after you say 5 Edit > Split Repeat by placing playhead after you say 10 Edit > Split Playback Second, deleting them and impact on rest of track Last week we selected region, pressed delete and created empty space This week, select region, Edit > Delete and Move What happened? IMPACT OF DELETING REGIONS
Resize region Move pointer over lower half of either edge Pointer becomes resize pointer Drag the edge to shorten or lengthen This will add silence; useful for making copies of certain number of beats RESIZE REGIONS
Looping regions Looping means repeat over time, it will play for as much time as you extend the timeline Drawing the original region into copies or partial copies No effect on playhead in sense of looping Move pointer/cursor over the upper half of the right edge of the region Pointer changes to a loop pointer with circular arrow Drag the right edge of the region to the point where you want it to stop playing When you playback, the region will playback multiple times depending on the drag So last week we copied and pasted multiple copies of same loop into 2 regions; alternatively you could just draw out the region with this loop method LOOPING REGIONS
Choose Track > Show Arrange Track Arrange Track appears at top of timeline below beat ruler Click on the plus side to add Default is 4 measures long and named “untitled” Hold mouse down over “untitled” to rename To move Arrange Region click and drag Will move all tracks and regions under it Good for copies of verse/chorus Good for reorganizing major sections ARRANGE TRACK & REGIONS
When you add a region to the timeline the region is matched or transposed to the key of the project You can transpose manually Select the 1-20 track Select entire track or one region within it Edit mode Check box Follow Tempo & Pitch Slide Pitch slider up/down Measured in semi-tones TRANSPOSING
New Project > Voice Record enable either male or female voice track Record yourself saying simple 1 sentence Playback, confirm it sounds like you Track>Duplicate Track; copy/paste region Lock to preserve original; we will edit copy VOICE EFFECTS
Track Info button > Edit tab Add an effect > Speech Enhancer Male or Female Radio VOICE EFFECTS
Download DTNA.mid from course website Session 09 Drag the midi file from the Mac OS to the timeline, either software instrument track or empty area below existing tracks Click on any one track containing imported midi Click on Edit button Click on Score view You know have sheet music for tracks IMPORTING MIDI
Notice how GB creates multiple tracks for the midi parts Assigns each track an instrument (varies) This structure imposed by midi creator Interpreted by your machine May not always match Each can be altered to fit your needs In DTNA.mid lets: Identify melody line (line 1) Change instrument to Guitars> Classical Acoustic Identify main rhythm line (line 3) Change instrument to Strings > Hollywood Strings Mute rest of parts IMPORTING MIDI
Download centralEducator2.aif from course website Session 05 Drag the audio file from Mac OS to timeline, either to Real Instrument track or empty area below existing tracks AIFF, WAV, AAC (except protected AAC files), Apple lossless, MP3 all supported Compressed files (AAC and MP3) remain compressed IMPORTING AUDIO
Mute the centralEducator2.aif track Auto feature for balancing levels of two tracks Control>Ducking Ducking control appears in each track’s header Tracks with upperward pointing arrows are lead tracks This is your one sentence recording track Tracks with downward pointing arrows backing tracks All other tracks Track > Show Track Info > Master Track Click Edit to adjust DUCKING
The GB file itself iTunes To Disk Burn CD SHARING
File > Save As… Check box Archive project Moving between machines Pointer files THE GB FILE ITSELF
Share > Send to iTunes Change tags for playlist, artist, album, and composer Metadata Compression settings Gives you options AAC and MP3 iTUNES
Share > Export Song To Disk Compress gives you options TO DISK
Burn the project to cd If you had entire album with silence between songs you could master the whole disc If you have tracks muted they usually don’t get bounced BURN CD
Audio Podcast New project to learn podcast features General strategies Markers Preview Podcast Track Info Basic Audio Podcast recording OVERVIEW
Create a new project Select Podcast, then click Choose AUDIO PODCAST
At New Project from Template dialog box Keep default tempo and signature and key Save As audioPodcast.band click Create CREATE A NEW PROJECT
4 new tracks Podcast track, Male Voice, Female Voice, Jingles Podcast Editor area GB WINDOW
Narration or spoken voice recorded in Real Instrument tracks Use either male or female tracks Real Instrument Confirm GB preferences and input & output settings of Mac’s microphone Ducking happens by default GENERAL STRATEGIES
Use Apple loops, Musical typing from previous weeks Jingles, stingers, effects Categories and searchable just like loops Treat just like other loops we have used Jingles are complete background music tracks For use behind narration or dialogue, between spoken segments, or as intro/outro Long, medium, and short jingles available Loop Browser (eyeball) Stingers are brief sounds Used as transition or for punctuation between speakers or sections of a podcast Loop Browser Sound effects Sounds of people, animals, machines, room ambience Loop Browser GENERAL STRATEGIES