Download
1 / 30
300 likes | 428 Views
This tutorial will guide you through the process of creating attractive classroom newsletters using Microsoft Publisher. You will learn how to start from scratch, select and customize templates, adjust color and font schemes, and insert various types of content such as textboxes, clipart, and images. Enhance your newsletter's visual appeal with borders and fills, and effectively utilize space. Troubleshooting tips and resizing techniques will ensure your final product looks professional. Perfect for teachers looking to communicate effectively with students and parents!

E N D
Creating a Classroom Newsletter Publisher 2007Tutorial
What Would You Learn? • Start from the beginning • Selecting a Template • Color Schemes • Font Schemes • Font • Adding Content • Inserting a Textbox • Inserting Clipart • Inserting a Picture from File • STUDENT EXAMPLES • Resizing • Rotating • Moving • Adding Borders • Adding Fill • Visual Appeal • Character Spacing • Zooming In and Out • Troubleshooting • Creating Page 2 • Deleting Unused Pages Clipart and Textboxes
Getting Started To begin, open Publisher and select “Newsletters” from the menu on the left or by clicking the “Newsletters” folder. If you do not have Microsoft Publisher, you can download it free by clicking here: IU Ware Back to Menu Go on…
Newsletter Templates Next you’ll need to select a template for your newsletter. Scroll through the choices, and click on the template you’d like to use. Then click “Create” in the bottom right corner.
More Templates If you would like to use a different template than what is shown, be sure to check out View Templates from Microsoft Online. These are free to download and offer more choices.
Color Schemes You may want to change the color scheme of the template you selected. To do so, click “Color Schemes” from the Newsletter Options column on the left. You can also click FORMAT from the menu to see the same options.
Font Schemes In addition to changing the color schemes, you can also change the font schemes by clicking “Font Schemes” from the Newsletter Options toolbar. To change the font of individual items, use the font drop-down box from the top menu. Try to keep your font simple, yet effective.
Font Type, Size and Color If you can not locate these drop-down boxes, click FORMAT from the menu and select FONT. To change the font, size, or color, use the drop-down boxes from the top menu.
Adding Content Now you are ready to type the information you have researched into your newsletter. To begin, click on the story where you want to type (it will automatically highlight), once you begin typing your text will replace the default text.
Insert Textbox To insert a new text box, click INSERT from the top menu and select “Text Box.” You can then draw your text box with your mouse.
Insert Clipart To insert clipart, either double-click on the template’s clipart and select a new picture to replace it OR delete the template’s clipart by right-clicking on it and selecting “cut.” Then click INSERT – PICTURE – CLIPART from the menu. You can also click on the picture icon in the left menu. Type in the clipart category you are searching for, and double click on the picture to insert it.
Insert Picture from File If you have a picture you’d like to use from a file (one you’ve downloaded from a clipart website, etc), click INSERT – PICTURE – FROM FILE. Locate your picture and select “Insert.” You can also click the PICTURE FRAME icon from the left menu. *Check out Discovery School for more educational clipart.
Resize Clipart and Textboxes Once you’ve inserted your clipart, you may need to resize it. Click on your clipart. You will see 8 small circles that surround it in a box. Select one of the corners and use your mouse to enlarge or shrink your picture. Be sure to resize it from the corners so that the picture proportions stay consistent.
Rotate Clipart and Textboxes To add creativity to your newsletter, you can rotate clipart and textboxes. To do this, click on the item you want to rotate, use your mouse and use the green dot to rotate your object.
Move Clipart and Textboxes To move a piece of clipart or textbox, click on it until you see the 8 circles that surround it in a square. Place your cursor over the middle until you see the following symbol: Then move your picture or textbox by dragging it with your mouse to the designated location.
Adding Borders You can add a border to your clipart or textbox by right-clicking on the object and selecting “Format Picture” or “Format Textbox.” You can change the line color, style, and weight or add Border Art.
Format Textbox: Fill To enhance your textboxes, you can fill them with color. To do this, click the paint can icon from the top menu or right-click on the text box and select “Format.” Click “Fill Effects” for even more color options.
Visual Appeal: Use of Space Be sure to utilize the space effectively in your newsletter. To make your newsletter look its best, do not large areas blank.
Visual Appeal: Delete Unused Textboxes Be sure to delete any unused text boxes or clipart that is from the template. To delete a textbox or clipart, right-click on it and select “cut” from the menu.
Character Spacing Another enhancement is to stretch or shrink your text to fill a space. Highlight the text you want to expand or shrink. Under theFORMAT menu, select “Character Spacing.” Use the “scaling” to select a percentage, then click “OK.”
Zoom In and Out To zoom in and out, you can either click F9 on your keyboard, use the Zoom drop-down box (shown to the left), or click VIEW – Zoom from the top menu.
Troubleshooting: Text in Overflow Make sure all your text fits in the textbox. If you see the A…symbol, it means you need to enlarge your text box or make your font smaller to fit.
Troubleshooting: AutoFlow If you cut/paste too much text in a text box, you may be prompted to use the text autoflow. This will place the remaining text into a textbox on the next page.
Creating Page Two Once you’ve completed the first page of your newsletter, simply click 2 on the bottom.
Deleting Unused Pages When you finish your newsletter, be sure to delete pages 3 and 4 by completing Step 1 and 2. Step 1: To delete pages 3 and 4, right-click on the page numbers and select “Delete Page…” Step 2: Select “Right page only” to delete page 3. Repeat Step 1 to delete page 4.
Creativity Spend some time challenging yourself to use your creativity.
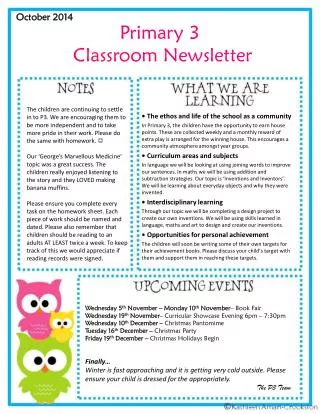
Student Example: Hinkle News FRONT BACK
Student Example: HCHS Compass FRONT BACK
Student Example: Internet Ethics FRONT BACK
Student Example: Internet Success FRONT BACK