Download
1 / 26
260 likes | 389 Views
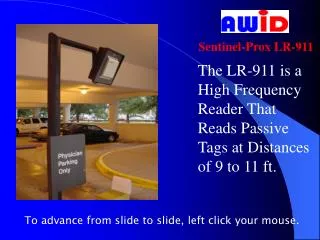
Sentinel Prox LR-911 Installation Practices and Procedures. To advance from slide to slide, run slide show and left click your mouse. Sentinel Prox LR-911 Installation Practices and Procedures.

E N D
Sentinel Prox LR-911Installation Practices and Procedures To advance from slide to slide, run slide show and left click your mouse.
Sentinel Prox LR-911Installation Practices and Procedures • The LR-911 is a high frequency (902-928 MHz), long range (9-11 feet) reader that reads passive (NO battery) tags. • The LR-911 is designed primarily for AVI (Automated Vehicle ID), Asset Monitoring and Assistive Technology applications. • Unlike low frequency (125 kHz) “plug ‘n’ play” prox readers, there are a number of issues that must be considered to achieve optimum results. • Attention to the issues covered in this presentation will result in satisfied customers and more profitable installations!
Sentinel Prox LR-911Installation Practices and Procedures Customer Expectations • Is the customer familiar with a toll tag type of system? If the answer is yes, please insure they understand that most toll tags either a) contain batteries or, b) are FCC part 90 with a larger antenna. The LR-911 reading passive tags is NOT designed for vehicles moving at any rate of speed, rather for vehicles approaching a barrier and almost coming to a stop. If the customer can not, or will not slow vehicular traffic, then it may be necessary to install a system using active tags, not the LR-911!
Sentinel Prox LR-911Installation Practices and Procedures Customer Expectations • Is the customer familiar with a system that uses active tags? Our tags are passive, meaning they contain no battery and therefore, will not read from as great a distance. A good example of the problem caused by this erroneous expectation: The entry to the surface lot is 25 feet wide, the reader is being mounted on the left side and most people drive on the right! Their previous system worked, but the LR-911 will not. SOLUTION: Create a physical barrier to narrow the lane!! The tag and reader must approximate parallel surfaces so the vehicle must be driving into the read zone, not skimming across it!!
Sentinel Prox LR-911Installation Practices and Procedures Customer Expectations • Have you noticed that there are NO personnel tags for the LR-911? This is due to the fact that the operating frequency (902 to 928 MHz) is susceptible to body blocking. Body blocking means simply that having the human body between the tag and the reader will inhibit, and quite possibly prevent, the reading of the tag. Body blocking can become an issue when customers want to hold the MT tag in their hands – Hold on the edges and do not wave it like a mad person!
Sentinel Prox LR-911Installation Practices and Procedures Customer Expectations • Windshields with a high metal content will impede the performance of, and possibly render the WS (windshield sticker) useless. It is a simple matter of physics – if there is metal between the LR-911 and the tag, it will not work!As great as our engineers are, they can not change the laws of physics. At the end of this presentation, we will discuss alternate tags/mounting procedures to address this issue.
Following is a listing of automobiles that may have windshields with a metallic content that may impede the performance of the WS sticker. • Audi A-8 - All Years • Buick Roadmaster 1992-96 • Buick Century 1996-00 • Buick Rendezvous • Cadillac Deville 1990 • Cadillac Eldorado 1995 • Cadillac Fleetwood 1990,94,96 • Cadillac Seville 1996 • Cadillac STS 1992,94,95 • Cadillac w-rain sensing (2002 +) • Chevrolet Lumina APV van • Chevrolet Impala SS • Chevrolet Corvette • Chrysler Concorde • Ford Crown Victoria 1992 • Ford Taurus and SHO • Honda Accord 1997 • Jaguar VDP 1995-98 • LandRover LWB • Lincoln Continental 1989,90,92 • Lincoln Towncar 1990 • Mazda 626 1995 • Mazda 929 and MPV • Mercury Grand Marquis 1989 • Mercury Sable • Oldsmobile Custom Cruiser Wagon • Oldsmobile Silhouette • Plymouth Voyager • Pontiac Grand Am 1996 • Pontiac Montana • Pontiac Trans Sport Van 1992 -97 • Pontiac Aztec 2000 • Range Rover • Subaru SVX • Saab 900 series 1995 & up • Saab 95, 93 series 1999 & up • Volkswagen Passat 1995
Sentinel Prox LR-911Installation Practices and Procedures Angle of Attack • You must consider the need for the surface of the tag to be as parallel to the reader as possible • The vehicle should be “straight on” to the reader for 10 feet before the gate/barrier • Do not place the reader on a corner where the vehicle is changing direction in the read zone • Consider the location of any ground loops, allowing the LR-911 to read and transmit tag number while the vehicle is on the loop • Do NOT place the LR-911 behind the gate/barrier position, there will not be enough room for the vehicle to enter the “read zone” before reaching the gate/barrier.
Sentinel Prox LR-911Installation Practices and Procedures Angle of Attack In this installation, the installer had mounted the LR-911 on the white column to the left of the travel lane. This poor positioning did not allow any angle of attack as the vehicles were turning while in the read zone.
Sentinel Prox LR-911Installation Practices and Procedures Angle of Attack Once the LR-911 was moved back six feet, it allowed the vehicles to make the corner and straighten out before entering the read zone. Result? Perfect performance and installation acceptance by the customer!
Sentinel Prox LR-911Installation Practices and Procedures Angle of Attack LR-911 Reader Correct! Always insure that the vehicle is moving into the field towards the reader, as opposed to moving across the field Tag and Reader Surfaces Should be Parallel to Each Other
Sentinel Prox LR-911Installation Practices and Procedures Angle of Attack When reading tags mounted to vehicles, it is always recommended that the LR-911 be mounted above the travel at a height of 80 to 95 inches and be angled down (approx. 26 degrees) at the tag location. Use a standard camera mounting bracket that allows angling up and down as well as side to side.
Sentinel Prox LR-911Installation Practices and Procedures Angle of Attack In other cases, the LR-911 can be “hung” from the ceiling. This assumes that the ceiling of the structure is less than 9 feet high.
Sentinel Prox LR-911Installation Practices and Procedures Mounting of Tags – WS – Windshield Sticker The WS is designed for one kind of installation, on the inside of a vehicular windshield. When the removable label on the WS is peeled off, adhesive is exposed. That side of the tag should be placed on the inside of the vehicle's windshield at a location where there is no tinting or embedded wires for antenna or defrost, and where there is direct line of sight from the tag to the LR-911 reader. The tag should then be pressed firmly against the windshield glass, so that it is tightly connected without air pockets or creases. This is an aggressive adhesive, so it does attach firmly to the glass. It is ideal to apply the tags so that they approximate facing the reader (parallel to the reader's surface). The recommended mounting area is the lower left corner of the windshield, just above the area where an inspection sticker would be mounted.
Sentinel Prox LR-911Installation Practices and Procedures Mounting of Tags – WS – Windshield Sticker • The WS utilizes the dielectric properties of the glass, therefore it will not perform to specifications if it is not attached to the glass! Once attached, it is difficult to remove without destroying the tag! • Taping the WS to the windshield (for testing usually) will most often result in a read range of 7 feet or less. • We recommend mounting the WS at the bottom of the windshield – that area is usually free of antennae or defroster wires and tinting.
Sentinel Prox LR-911Installation Practices and Procedures Mounting of Tags – MT – Metal Mounting Tag If the MT is being mounted on the outside of a vehicle or piece of equipment, we highly recommend that you run a bead of silicon sealant around the outside perimeter of the MT. The silicon sealant not only helps the MT adhere to the surface, it also helps maintain the integrity of the sides of the tag!
Wire on LR-911 Connect to -- Purpose Black DC power ground DC power common (local ground) Red DC power plus DC power hot (between +6.5 and +15 volts) Recommend 12VDC Green Panel’s Data 0 input Data 0 in Wiegand interface White Panel’s Data 1 input Data 1 in Wiegand interface Yellow Momentary-ground terminal of vehicle sensor, if used; or Tie to LR-911 reader’s black wire Switches LR-911 reader from stand-by to active mode when reading a tag Orange Nothing (cap or tape off singly) (Not used) Blue Panel’s signal common or ground Signal return line for Wiegand data Drain (clear) Shield of cable from reader to panel (Do not ground at either end) Cable shield common Violet Nothing (cap or tape off singly) (Not used) Sentinel Prox LR-911Installation Practices and Procedures Wiring and Power Supply
Sentinel Prox LR-911Installation Practices and Procedures Wiring and Power Supply • Common Wiring Mistakes • Failing to connect the YELLOW wire to a ground terminal, either momentary ground contact on ground loop vehicle sensor or the LR-911 BLACK wire. • Failing to connect the BLUE wire (data return) to control panels’ data signal return (ground at control panel reader input) via a separate wire. • Failing to connect the DRAIN to the Shield or Drain of the connecting cable. Connecting cable should NOT be tied to Ground at either end. • Failing to tie Ground wires from Controller, Controller Reader Port and Aux. Power Supply together to create a common ground reference. • AWID Technical Support (800) 369-5533 or (845) 369-8800
Sentinel Prox LR-911Installation Practices and Procedures Wiring and Power Supply • Common Power Supply Issues • Use an independent DC power supply, 6.5 to 15 VDC (recommend 12VDC to 15VDC) – do NOT use control panel’s reader power supplies. • Auxiliary power supply – please do not use the cheapest supply that money can buy! Power supplies with a Linear Output are usually of a higher quality. We offer a 12 VDC Linear, Regulated, plug in 1amp transformer. • At 15VDC, the LR-911 draws 400mA –12VDC =500mA, 6.5VDC = 1.0A • Dedicate the auxiliary power supply to the LR-911 – Do NOT piggyback other devices (incl. other LR-911) on the same power supply.
Sentinel Prox LR-911Installation Practices and Procedures Did you notice the aluminum mounting plate? Did you know that this plate is intended for use in mounting the reader? Did you know this is an integral part of the reader? Did you know that removing this mounting plate would void the warranty? Please do not remove it!
Sentinel Prox LR-911Installation Practices and Procedures Did you know that this is not a working LED? Therefore, the fact that this does not work does NOT mean there is a problem! Audible and visual verification, necessary during the installation and aiming process, is accomplished by connecting the LRIN – Install Kit. DO NOT FORGET THE INSTALL KIT !
Sentinel Prox LR-911Installation Practices and Procedures Audible and visual verification, necessary during the installation and aiming process, is accomplished by connecting the LRIN – Install Kit. DO NOT FORGET THE INSTALL KIT ! LRIN includes: MT tag, GMWS (glass mount WS), PS12-1A Power Supply, SP-6820-LR and Programming Connector
Sentinel Prox LR-911Installation Practices and Procedures Alternative Tag Mounting If the metal content is only partially inhibiting the ability of the LR-911 to read the WS tag, perhaps mounting the MT tag on the dashboard will work? This suggestion is taking into consideration the fact that the MT is more robust than the WS and may perform more consistently. Affix the MT to the dashboard with a velcro dot, this will allow the MT to be removed.
Sentinel Prox LR-911Installation Practices and Procedures Alternative Tag Mounting If there is so much metal in the windshield that no tag (either WS or MT) will read from inside the vehicle, try attaching the MT to one of the following: In the grill of the vehicle ***Always test prior to securing tag***
Sentinel Prox LR-911Installation Practices and Procedures Alternative Tag Mounting If there is so much metal in the windshield that no tag (either WS or MT) will read from inside the vehicle, try attaching the MT to one of the following: • On the underside of the sunroof shield/windscreen • The back of the “Auto Bra” • The backside of the “Bug Deflector” • Behind non-metallic “nose cone” of vehicle • Behind the grill
Sentinel Prox LR-911Installation Practices and Procedures Alternative Tag Mounting COMING SOON! (1st Qtr 2005) The MT-LP designed specifically for license plate mounting!